Understanding a RESTful API using Node.js, TypeScript and Pokemon

Instead of just saying: do this, do that and voila it’s done, let’s take it this way: why do this? what is that for? So hopefully this should be a beginner friendly tutorial. After reading this post you should be able to understand and make a simple API.
Shared with ❤️ in Bit’s Blog
With Bit components are building blocks, and you are the architect. Share, discover and develop components anywhere with your team. Give it a try!
Step 0: Initial concepts
Before starting with the tutorial, let’s get some concepts right.
Node.js
If you are new to Node.js, I would recommend that you read my previous blog (24k claps!) on What exactly is Node.js?
TypeScript
TypeScript is a super-set of JavaScript. Most valid JavaScript code can be written in TypeScript file(.ts), because .ts compiles to .js in the end. This explanation is good for a top level view of TS, but understanding all the nuances will require a separate post. This stack-overflow question has some great answers for TS.
Express
Express.js is a framework built on top of Node.js to help ease our task. You can setup the routes in Node.js without express.js or use any other framework like Hapi.js. Not using a framework is not a good idea because the code we write may not be optimal, may contain errors, have security issues or simply become unreadable as the application scales. Express has a lot of features, utility methods and middleware to help us create scalable and robust APIs quickly.
Step 1: Getting started
TypeScript compiler(tsc) helps to compile .ts to .js file. We need to setup two configuration files: tsconfig.json and package.json.
Make a new directory and a tsconfig.json file.
mkdir pokemon-api
cd pokemon-api/
touch tsconfig.json
A) tsconfig.json file
This is a minimal setup, more details of all the available options can be found here.
{
    "compilerOptions": {
      "target": "es6",     //default is es5
      "module": "commonjs",//CommonJs style module in output
      "outDir": "dist"  ,   //change the output directory
      "resolveJsonModule": true //to import out json database
    },
    "include": [
      "src/**/*.ts"       //which kind of files to compile
    ],
    "exclude": [
      "node_modules"     //which files or directories to ignore
    ]
 }
The JavaScript language didn’t have a native way of organizing code before the ES2015(ES6) standard. So Node.js picked up a module system or community driven convention called CommonJs for organizing code that’s split into different files/modules.
npm init -y
npm install typescript ts-node nodemon --save-dev
- Just like running
npm installlooks for details in package.json, runningtsclooks in tsconfig.json. - After compiling the .ts files, all the transpiled JavaScript files are placed in the same directory as their corresponding .ts file. To change this behaviour we have included the option of “outDir” in our tsconfig.json file.
ts-nodealso does the work oftsc. But instead of loading from tsconfig.json file, it starts from the input file and discovers the rest of the project tree through imports and references.- Similarly, you can run your .js file(after compiling with tsc or ts-node) with
node foo.jscommand but with every change you need to restart the server.nodemonhelps in this process by detecting file changes and restarting server.
B) package.json file
"scripts": {
    "build": "tsc",
    "dev": "ts-node ./src/server.ts",
    "start": "nodemon ./dist/server.js",
    "prod": "npm run build && npm run start"
}
Step 2: Boilerplate
To justify using TypeScript and get auto-completion we need to have the types definition of the 3rd party modules we use. This is the file/package from which TS understands the type of var/const and your editor suggests intelligent snippets.
npm install express body-parser --save
npm install @types/node @types/express @types/body-parser --save-dev
mkdir src
touch src/app.ts src/server.ts
A)app.ts file
import * as express from 'express';
import * as bodyParser from 'body-parser'; //used to parse the form data that you pass in the request

class App {

    public app: express.Application;

    constructor() {
        this.app = express(); //run the express instance and store in app
        this.config();
    }

    private config(): void {
        // support application/json type post data
        this.app.use(bodyParser.json());
        //support application/x-www-form-urlencoded post data
        this.app.use(bodyParser.urlencoded({
            extended: false
        }));
    }

}
B) server.ts file
import app from "./app";
const PORT = process.env.PORT || 3000;

app.listen(PORT, () => {
    console.log('listening on port ' + PORT);
})
Command npm run dev will help you check if everything is working.
Step 3: Project structure and Database
Although this is a small project but the aim is to prepare for the bigger one. So we will structure properly. All routes should go in one folder and all routes related to each other should go in one file. The general structure should look like this:
src/
|--dist/
|--server.ts
|--app.ts
|--routes/
|  |--trainers.ts
|  |--pokemons.ts
|--models/
|--tests/
Routes for performing CRUD operations on trainers should be inside the trainers.ts file and similarly for pokemons.
In larger applications, you may define a model/schema for your database which should go into the models folder.
Currently we require mkdir src/routes and touch src/routes/pokemons.ts
Database
We could have used any SQL or NoSQL database with this but currently our main aim is to understand the node.js part. Considering the fact that NoSQL like MongoDB stores data as documents. We will use a db.json file as our database. Download this file and place in src/db.json
Step 4: Creating your first route

import {Request, Response} from "express";

import pokemons = require('../db.json'); //load our local database file

export class Pokemons {

    public routes(app): void { //received the express instance from app.ts file
        app.route('/pokemons')
        .get((req: Request, res: Response) => {
            res.status(200).send(pokemons);
        })
    }
}
We need to import this route in our app.ts file
// /src/app.ts
import * as express from "express";
import * as bodyParser from "body-parser";
import { Pokemons } from "./routes/pokemons";

class App {

    public app: express.Application;
    public pokeRoutes: Pokemons = new Pokemons();

    constructor() {
        this.app = express();
        this.config();
        this.pokeRoutes.routes(this.app);
    }
    private config(): void{
        this.app.use(bodyParser.json());
        this.app.use(bodyParser.urlencoded({ extended: false }));
    }
}
Now you need to configure the endpoints based on your requirements. Look at the following part in pokemons.ts file. Based on this route’s understanding we will configure other RESTful routes of our API.
//to pokemons/ route. this is your endpoint
app.route('/pokemons')
.get((req: Request, res: Response) => {   //get(verb) request
         //send all pokemons with a 200 success status code.
          res.status(200).send(pokemons);
 })
RESTful routes
Representational State Transfer (REST) is an architectural style that defines a set of constraints to be used for creating web services. -Wikipedia
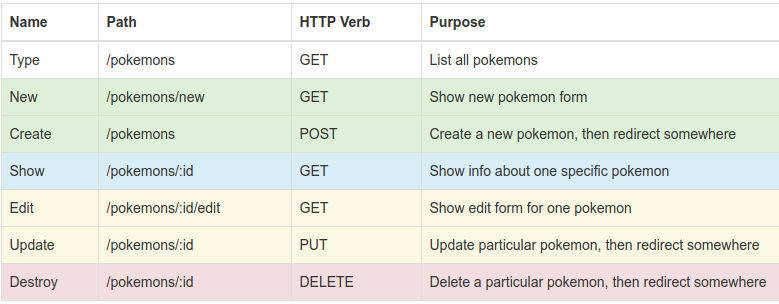
Simply put, it is a standard to name your API endpoints. Look at the Path column in the table below and analyse the pattern.

When you want a pokemon with a particular id, your endpoint would look like [http://localhost:3000/pokemons/2](http://localhost:3001/pokemons/2) . The last part ‘2’ is the id which is variable hence we need to extract this id using request parameters.
app.route('/pokemons/:id')
.get((req:Request, res: Response) => {
   let id = req.params.id;
   res.status(200).send(pokemons[id]);
})
Create, Update and Delete routes will receive a payload(data) to process and would make more sense with a database connectivity. But you can still do it with the db.json file with Node.js file system(fs) module.
app.route('/pokemons')
.post((req: Request, res: Response) => {
   let name = req.body.name;   //this requires body-parser package
   let attack = req.body.attack;
  //logic to store in database
})
Finally, run your server using npm run dev or npm run prod
Step 5: Making requests using Postman
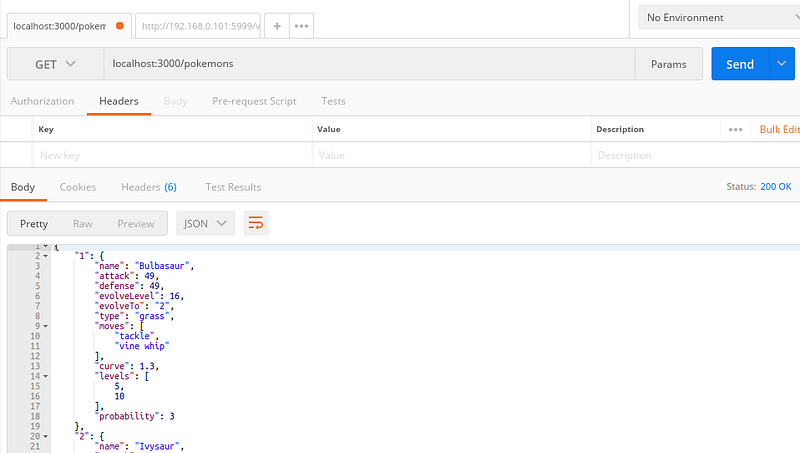
Download Postman from here. This a very useful tool to test your API before you make a frontend for your app.
The post request requires you to send your data in the body as json data. Select the right verb(GET, POST, UPDATE, etc) from the dropdown.


Conclusion
This sums up the tutorial. Hence we have learnt how to make a simple RESTful API using TypeScript, Node.js and Express.js.
You can find the complete code repository here.
Next Steps: Learn MongoDB concepts and its connectivity with Node.js. Stay tuned.
Shared with ❤️ in Bit’s Blog
Bit helps your team build apps faster and share code across projects. Instead of writing code twice or working hard for NPM, simply share code directly between projects, make changes and stay in sync. Give it a try.
Learn more
☞ Learn Nodejs by building 12 projects
☞ Supreme NodeJS Course - For Beginners
☞ Node.js for beginners, 10 developed projects, 100% practical
☞ Node.js - From Zero to Web App
☞ Typescript Async/Await in Node JS with testing
Suggest:
☞ Web Development Tutorial - JavaScript, HTML, CSS
☞ E-Commerce JavaScript Tutorial - Shopping Cart from Scratch
☞ Javascript Project Tutorial: Budget App
☞ Machine Learning Zero to Hero - Learn Machine Learning from scratch