Realtime Chat App - One-to-One using Flutter, Socket.io & Node.js

In my previous blog on real-time chat I discussed about how to get started with socket.io and setup a simple chat app in which one can chat with all the people online. You can read it here In this article I will be discussing about making a chat app in which you can chat one to one with someone.
What will you learn?
- Using socket.io to create a real-time connection between two devices
- The concept of rooms and how to use them with socket.io
- A bit of scoped model library
Prerequisites
The following should be installed and running in your PC.
- Node.js : https://nodejs.org/en/download/
- Flutter : https://flutter.dev/docs/get-started/install
- Heroku CLI : https://devcenter.heroku.com/articles/heroku-cli
- git : https://git-scm.com/downloads
Rooms
Rooms are logical grouping mechanism which can be used to target only a specific socket and not all of them.
Lets understand it in simple figures :
Previously one user was sending a message and the server broadcasted it to all the other users.
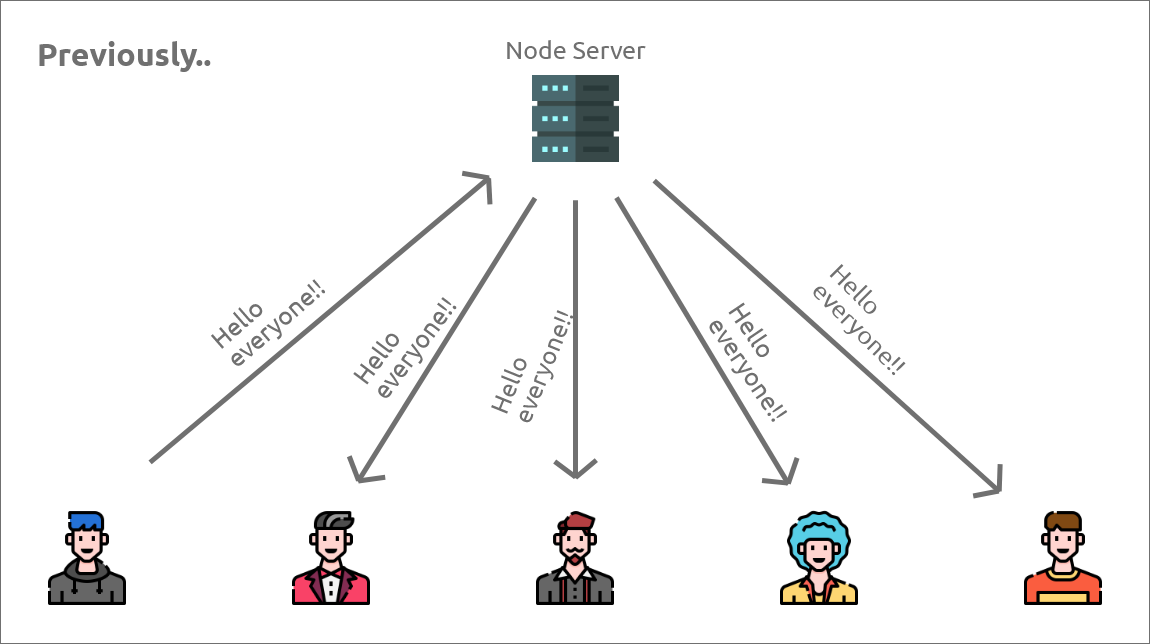
Before using room
After using rooms the server only sends the message to the particular room.
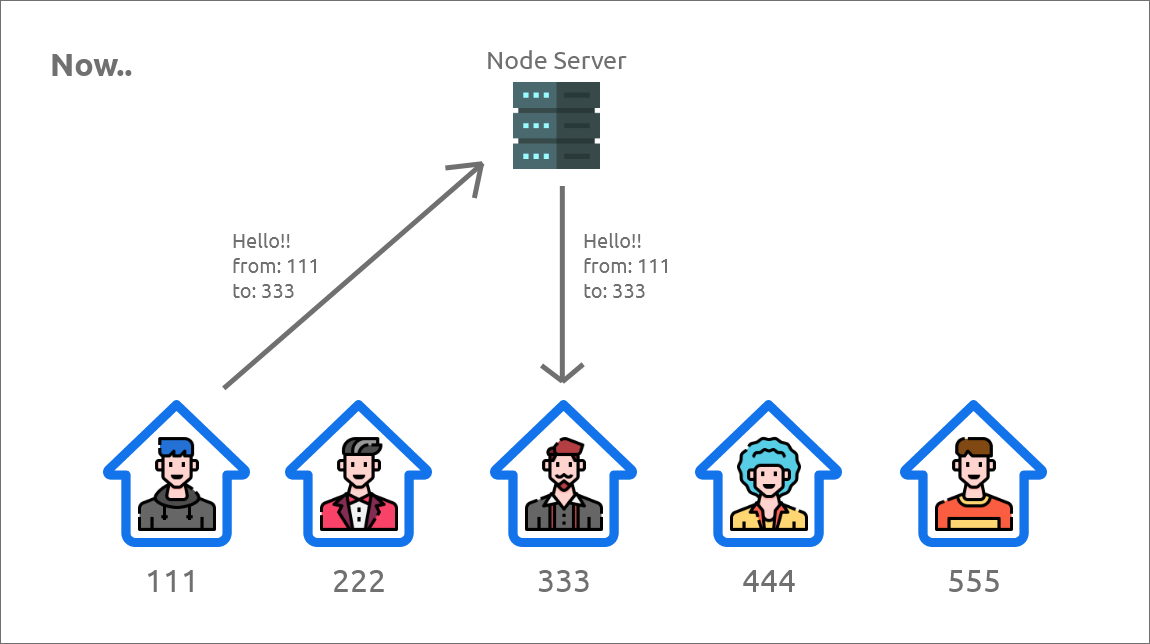
After using room
This way we can achieve one to one chat using rooms. So let’s get started.
Node.js (Server-Side)
Create a new node project and install the following dependencies:
- express
- http
- nodemon
- socket.io
Go to package.json and add the dev script:

dev script in package.json
Next in the index.js file add the following code:
const app = require('express')()
const http = require('http').createServer(app)
const io = require('socket.io')(http);

app.get('/', (req, res) => {
    res.send("Node Server is running. Yay!!")
})

io.on('connection', socket => {
    //Get the chatID of the user and join in a room of the same chatID
    chatID = socket.handshake.query.chatID
    socket.join(chatID)

    //Leave the room if the user closes the socket
    socket.on('disconnect', () => {
        socket.leave(chatID)
    })

    //Send message to only a particular user
    socket.on('send_message', message => {
        receiverChatID = message.receiverChatID
        senderChatID = message.senderChatID
        content = message.content

        //Send message to only that particular room
        socket.in(receiverChatID).emit('receive_message', {
            'content': content,
            'senderChatID': senderChatID,
            'receiverChatID':receiverChatID,
        })
    })
});

http.listen(process.env.PORT)
Every user connected to our server has a particular chatID and that user joins the room with the same chatID. Thus if anyone wants to send message to a particular user he targets their chatID.
Now that our server side code is completed lets deploy it to Heroku.
Create a new file in the root directory named Procfile and add the following line
web: node index.js
Next create a file named .gitignore and add the following line
/node_modules
After this initialize git and commit all the contents. Next create a new heroku app and push the contents to the master branch. If you face any issues, you can refer to my previous blog or the heroku documentation. After successful deployment we will get the url of our node server.
Flutter (Client-Side)
Now that our backend is up and running, its time to create the flutter app. Create a new flutter project and add the following dependencies in pubspec.yaml file :
- scoped_model: ^1.0.1
- flutter_socket_io: ^0.6.0
Let’s create our two data classes Message.dart and User.dart.
class Message{
  final String text;
  final String senderID;
  final String receiverID;

  Message(this.text,this.senderID,this.receiverID);
}
class User{
  String name;
  String chatID;

  User(this.name,this.chatID);
}
Next create the ChatModel.dart where all the logic for socket and all the data will be stored.
import 'package:scoped_model/scoped_model.dart';
import 'package:flutter_socket_io/flutter_socket_io.dart';
import 'package:flutter_socket_io/socket_io_manager.dart';
import 'dart:convert';

import './User.dart';
import './Message.dart';

class ChatModel extends Model {
  List<User> users = [
    User('IronMan', '111'),
    User('Captain America', '222'),
    User('Antman', '333'),
    User('Hulk', '444'),
    User('Thor', '555'),
  ];

  User currentUser;
  List<User> friendList = List<User>();
  List<Message> messages = List<Message>();
  SocketIO socketIO;

  void init() {
    currentUser = users[0];
    friendList =
        users.where((user) => user.chatID != currentUser.chatID).toList();

    socketIO = SocketIOManager().createSocketIO(
        '<ENTER_YOUR_SERVER_URL_HERE>', '/',
        query: 'chatID=${currentUser.chatID}');
    socketIO.init();

    socketIO.subscribe('receive_message', (jsonData) {
      Map<String, dynamic> data = json.decode(jsonData);
      messages.add(Message(
          data['content'], data['senderChatID'], data['receiverChatID']));
      notifyListeners();
    });

    socketIO.connect();
  }

  void sendMessage(String text, String receiverChatID) {
    messages.add(Message(text, currentUser.chatID, receiverChatID));
    socketIO.sendMessage(
      'send_message',
      json.encode({
        'receiverChatID': receiverChatID,
        'senderChatID': currentUser.chatID,
        'content': text,
      }),
    );
    notifyListeners();
  }

  List<Message> getMessagesForChatID(String chatID) {
    return messages
        .where((msg) => msg.senderID == chatID || msg.receiverID == chatID)
        .toList();
  }
}
The ChatModel class contains dummy data of all the users, the current user and the friend list of that user (which is all the users except the current user). It also contains all the messages. There are there methods in it.
- init() : For initializing all the variables and also initializing the socket and adding listeners to the socket.
- sendMessage() : Sending message to the server and adding it to the list of messages.
- getMessagesForChatID(): Extracting the messages from the message list which are relevant to the current conversation.
Next let’s create AllChatsPage.dart. This will be the page where all the users will be displayed.
import 'package:flutter/material.dart';
import 'package:scoped_model/scoped_model.dart';

import './ChatPage.dart';
import './User.dart';
import './ChatModel.dart';

class AllChatsPage extends StatefulWidget {
  @override
  _AllChatsPageState createState() => _AllChatsPageState();
}

class _AllChatsPageState extends State<AllChatsPage> {
  @override
  void initState() {
    super.initState();
    ScopedModel.of<ChatModel>(context, rebuildOnChange: false).init();
  }

  void friendClicked(User friend) {
    Navigator.of(context).push(
      MaterialPageRoute(
        builder: (BuildContext context) {
          return ChatPage(friend);
        },
      ),
    );
  }

  Widget buildAllChatList() {
    return ScopedModelDescendant<ChatModel>(
      builder: (context, child, model) {
        return ListView.builder(
          itemCount: model.friendList.length,
          itemBuilder: (BuildContext context, int index) {
            User friend = model.friendList[index];
            return ListTile(
              title: Text(friend.name),
              onTap: () => friendClicked(friend),
            );
          },
        );
      },
    );
  }

  @override
  Widget build(BuildContext context) {
    return Scaffold(
      appBar: AppBar(
        title: Text('All Chats'),
      ),
      body: buildAllChatList(),
    );
  }
}
The init() in the ChatModel is called from the initState() of AllChatsPage, thus initializing our app on start.
Create the ChatPage.dart where the messages will be displayed.
import 'package:flutter/material.dart';
import 'package:scoped_model/scoped_model.dart';

import './User.dart';
import './Message.dart';
import './ChatModel.dart';

class ChatPage extends StatefulWidget {
  final User friend;
  ChatPage(this.friend);
  @override
  _ChatPageState createState() => _ChatPageState();
}

class _ChatPageState extends State<ChatPage> {
  final TextEditingController textEditingController = TextEditingController();

  Widget buildSingleMessage(Message message) {
    return Container(
      alignment: message.senderID == widget.friend.chatID
          ? Alignment.centerLeft
          : Alignment.centerRight,
      padding: EdgeInsets.all(10.0),
      margin: EdgeInsets.all(10.0),
      child: Text(message.text),
    );
  }

  Widget buildChatList() {
    return ScopedModelDescendant<ChatModel>(
      builder: (context, child, model) {
        List<Message> messages =
            model.getMessagesForChatID(widget.friend.chatID);

        return Container(
          height: MediaQuery.of(context).size.height * 0.75,
          child: ListView.builder(
            itemCount: messages.length,
            itemBuilder: (BuildContext context, int index) {
              return buildSingleMessage(messages[index]);
            },
          ),
        );
      },
    );
  }

  Widget buildChatArea() {
    return ScopedModelDescendant<ChatModel>(
      builder: (context, child, model) {
        return Container(
          child: Row(
            children: <Widget>[
              Container(
                width: MediaQuery.of(context).size.width * 0.8,
                child: TextField(
                  controller: textEditingController,
                ),
              ),
              SizedBox(width: 10.0),
              FloatingActionButton(
                onPressed: () {
                  model.sendMessage(
                      textEditingController.text, widget.friend.chatID);
                  textEditingController.text = '';
                },
                elevation: 0,
                child: Icon(Icons.send),
              ),
            ],
          ),
        );
      },
    );
  }

  @override
  Widget build(BuildContext context) {
    return Scaffold(
      appBar: AppBar(
        title: Text(widget.friend.name),
      ),
      body: ListView(
        children: <Widget>[
          buildChatList(),
          buildChatArea(),
        ],
      ),
    );
  }
}
Finally open main.dart and replace the existing code with the following:
import 'package:flutter/material.dart';
import 'package:scoped_model/scoped_model.dart';

import './AllChatsPage.dart';
import './ChatModel.dart';

void main() => runApp(MyApp());

class MyApp extends StatelessWidget {
  @override
  Widget build(BuildContext context) {
    return ScopedModel(
      model: ChatModel(),
      child: MaterialApp(
        debugShowCheckedModeBanner: false,
        home: AllChatsPage(),
      ),
    );
  }
}
How to test if its working?
Build and run the app in one device. Then open the ChatModel.dart and in the init() method initialize currentUser with someone else. Example:
currentUser=users[1]
Rebuild and run the app in another device. Now you can chat with the other person. 😄
Suggest:
☞ Flutter TabBar & TabBarView by Sample Code | Flutter Tutorial | Flutter 2023
☞ Flutter Tutorial: Flutter PDF Viewer | Flutter PDF Tutorial | PDF in Flutter
☞ Getting Started with Node.js - Full Tutorial
☞ Flutter Tutorial For Beginners In 1 Hour
☞ Code a Twitter Clone with Flutter, Appwrite, Riverpod | Full Tutorial for Beginners to Advanced