Setting up Nuxt and Jest

Setting up testing can be very daunting: especially if you are just starting out. When I started out with Vue and Nuxt, I didn’t really have any experience regarding setting up configurations for linting or testing. The vue-cli provides pre-made configs for several kinds of things, including a Jest setup for Unit and Snapshot testing, however, Nuxt does not offer something similar to the vue-cli at the moment. I wanted to mimic that behaviour but couldn’t find any good resources which outline clear and most of all - easy to follow steps. This article serves as a reference guide for anyone wanting to use Nuxt + Jest.
By the way, whenever I do something a little more complex, I always write down each and every step because it makes it much easier to reproduce it in new projects. Documenting these steps does not have to be very thorough (at the end it has to work though), just write down each command you used. This also makes it much easier to write articles like this one and by publishing them everyone can benefit.
If you specifically looked for a config like the one described here, you probably already know about the advantages of testing. Testing makes proper CI/CD possible, which is quite frankly, one of the coolest things in software engineering (coming from someone who never wanted to test anything). However, if you don’t, I strongly encourage you to find out more about how testing could benefit you and your project.
One last note: I really don’t like when I am trying to set up a specific thing (e.g linting) but the tutorials I find just won’t work. So please please, let me know if something with this config does not work. I really don’t want to waste anyone’s time.
1. Installing dependencies
To install the development dependencies issue the following command inside the root directory of your project:
npm install @babel/core @babel/preset-env babel-core@^7.0.0-bridge.0 @vue/test-utils jest babel-jest jest-serializer-vue vue-jest -D
At the time of this writing, [email protected] requires a peer of babel-core@^6.25.0So we additionally have to install babel@core^7.0.0-bridge.0
2. Jest config
Create jest.config.js in your root folder and add the following content:
module.exports = {
  // tell Jest to handle `*.vue` files
  moduleFileExtensions: ["js", "json", "vue"],
  watchman: false,
  moduleNameMapper: {
    "^~/(.*)$": "<rootDir>/$1",
    "^~~/(.*)$": "<rootDir>/$1",
    "^@/(.*)$": "<rootDir>/$1"
  },
  transform: {
    // process js with `babel-jest`
    "^.+\\.js$": "<rootDir>/node_modules/babel-jest",
    // process `*.vue` files with `vue-jest`
    ".*\\.(vue)$": "<rootDir>/node_modules/vue-jest"
  },
  snapshotSerializers: ["<rootDir>/node_modules/jest-serializer-vue"],
  collectCoverage: true,
  collectCoverageFrom: [
    "<rootDir>/components/**/*.vue",
    "<rootDir>/pages/*.vue"
  ]
};
Because Jest itself does not understand Vue’s Single File Components, we instruct it to use vue-jest as a preprocessor. In addition, even though the latest versions of Node already support most ES2015 features, you may still want to use ES modules syntax and stage-x features in your tests which is handled with babel-jest.
3. Babel config
As stated in the Vue documentation for testing single file components:
The default Babel config disables ES modules transpilation because webpack already knows how to handle ES modules. However, we do need to enable it for our tests because Jest tests run directly in Node.
[UPDATE 11/2019]: babel.config.js has been changed to utilize version 7 of babel.
Therefore we create a file called babel.config.js with the following content:
module.exports = function(api) {
  api.cache(true);

  const presets = [
    [
      "@babel/preset-env",
      {
        modules: "commonjs"
      }
    ]
  ];

  return {
    presets
  };
};
4. Add test script to package.json
What is left to do now, is to add a test-script to package.json as displayed below. In this case, the line "test": "jest" tells your project to run the Jest test suite when issuing npm run test in the command line.
{
  "name": "nuxt-jest",
  "version": "1.0.0",
  "description": "Nuxt jest sample config",
  "author": "Alex Gogl",
  "private": true,
  "scripts": {
    "dev": "nuxt",
    "build": "nuxt build",
    "start": "nuxt start",
    "generate": "nuxt generate",
    "test": "jest"
  },
  "dependencies": {
    "nuxt": "^2.7.1"
  },
  "devDependencies": {
    "@babel/core": "^7.4.4",
    "@babel/preset-env": "^7.4.4",
    "@vue/test-utils": "^1.0.0-beta.29",
    "babel-core": "^7.0.0-bridge.0",
    "babel-jest": "^24.8.0",
    "cross-env": "^5.0.1",
    "jest": "^24.8.0",
    "jest-serializer-vue": "^2.0.2",
    "vue-jest": "^3.0.4"
  }
}
5. Writing tests
Of course, the whole point of this article is to be able to test Vue components, so that’s what we’ll do here. As an example, I’m going to use the default Logo component Nuxt generates when using npx create-nuxt-app.
Jest expects the tests of a component to be in a folder called __tests__ (Note the double underscores). As a convention, the tests folders are always in the same directory of your components. For example if you have a folder structure like this: components/Logo.vue, the test for the Logo component would live in components/__tests__/Logo.spec.js.
Note that the tests as illustrated below are really incomplete and only check if the component mounts and renders properly, however, it is enough to get you started.
import { shallowMount } from "@vue/test-utils";
import Logo from "../Logo";


const factory = () => {
  return shallowMount(Logo, {
  });
};

describe("Logo", () => {
  test("mounts properly", () => {
    const wrapper = factory();
    expect(wrapper.isVueInstance()).toBeTruthy();
  });

  test("renders properly", () => {
    const wrapper = factory();
    expect(wrapper.html()).toMatchSnapshot();
  });
});
6. Running tests
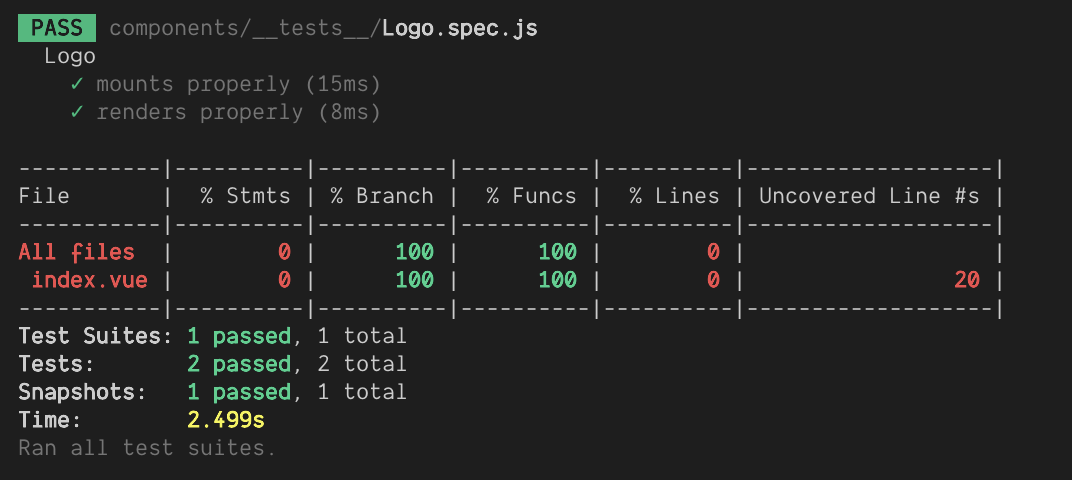
Now run the tests with npm run test. It should print something like this:

Experimental setup with vue-cli
You probably heard about the vue-cli with all its plugins and configurations you can easily install with a single command. Even though there is no mention of Nuxt being compatible with it, you can actually use it in this specific situation for setting up Jest.
Just run this command on a fresh project with no testing set up yet:
vue add @vue/unit-jest
It will automatically create all files needed (.babelrc and jest.config.js) and install the needed dependencies. It will also add this script to package.json:
“test:unit”: “vue-cli-service test:unit”
Which you will have to overwrite to:
"test": "jest"
Additionally it will create a tests folder in the root of your project which you can delete. Now just do steps 5. and 6.
Final note here: even though it works I’m not sure if I would use it in production as I don’t know if it will stay compatible with Nuxt in the future.
Suggest:
☞ Is Vue.js 3.0 Breaking Vue? Vue 3.0 Preview!
☞ Vue js Tutorial Zero to Hero || Brief Overview about Vue.js || Learn VueJS 2023 || JS Framework
☞ 18 Nuxt JS beginner tutorial - Start weather app project