Real-time Using Arduino, Firebase and Angular.js

This simple project is meant to be a hybrid introduction to connecting and manipulating data over the internet with Arduino, Node, Angular and Firebase.
UPDATE: Check out @Moycs777 terrific web app based on this example hosted on Firebase.
COMMENTS: Please do contribute with your comments. I’d like to know how you like (or don’t like) it.
The Internet of Things is nothing new. You may have been using it all along. In the broadest sense, your laptop and smartphones are IoT objects. What’s actually new is the “T” part. We have been using computers and smartphones so often that we hardly recognize them as “things.” However, “things” are more synonymous to everyday objects such as clothes, furnitures, fridges, clocks, books, lamps, skateboards, bicycles, and etc. IoT is when a coffee machine that brews you a cup of java when the weather gets too cold, a pair of shoes that lights up 10 minutes before your train arrives, or a door knob that alerts your phone when your parents try to trespass into your room.
To be able to connect to the internet, make sense of its data and interact with the users, these things need tiny computers aka micro controllers to make them conscious.
What we are building
We are going to connect an Arduino board to the internet and change the RGB color property on a web page in real-time by rotating a potentiometer.
What we need:
- Arduino Uno
- A-B USB cable
- Potentiometer (aka pot)
- RGB LED
- 330 Ohms resistors x 3
- 10 KOhms resistor x 1
- Male-to-male jumper wires x 9
Everything is included in Sparkfun’s inventor’s kit, which is quite neat to get your hands on. No wifi or ethernet shield needed, since we’re actually persisting the data to the online database and communicate with the web app via the REST API provided by Firebase.
If you have not installed Node, head to Node.js home and follow instructions to install Node and npm.
All the codes can be downloaded from my repo or cloned using git:
$ git clone https://github.com/jochasinga/firepot
Once downloaded, cd firepot to getinto the directory, and you should see two subdirectories—pot and app. cd into each one and install the dependencies:
$ cd pot && npm install
All dependencies are indicated in package.json, and npm automatically install them according to the information. They will be collected in a new subdirectory node_modules and can be required by any code within the project scope.
Connecting the circuit

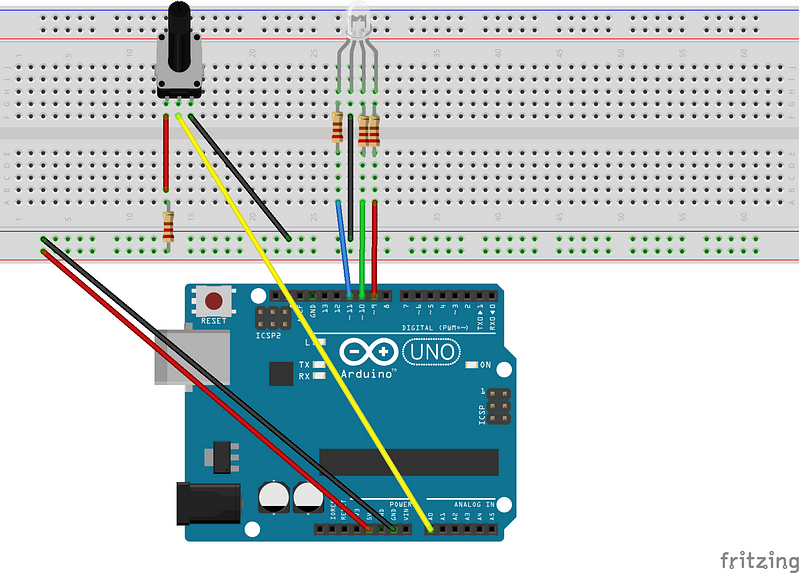
Connect your circuit according to the diagram. A typical potentiometer has three leads. Connect one end to +5V power via 10 KOhms pull-up resistor and the other far end to ground (0V). The pot provides variable resistance between the voltage, and the middle lead should be connected to Arduino’s analog input pin (A0) to feed the voltage signal into the Arduino.
RGB LED is essentially three LEDs in one, each with different color of red, green and blue, together producing 16,777,216 possible colors. We are going to use the pot to traverse this color range from pure red (#FF0000) to blue (#0000FF) to green (#00FF00) and back to red again. The longest lead of the LED is called a common, and should be connected to ground. The rest are connected to Arduino’s PWM outputs (those with ~ preceding the number). The code connects red, green and blue leads to ~9, ~10 and ~11 respectively.
Connect the Arduino to your laptop via the USB cable, and you’re good to go.
Signing up with Firebase
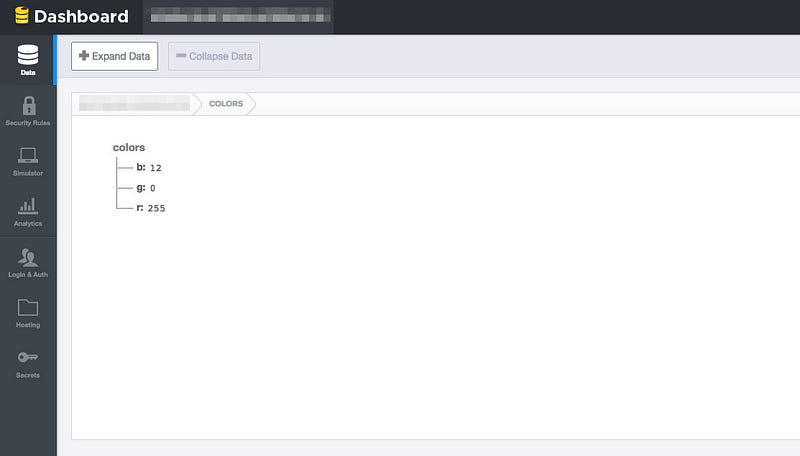
Firebase is a JSON-style database service for real-time applications (You’ll need a free signup to use). Firebase implements a clever way of manipulating JSON data by adopting RESTful APIs. In this project, we will CREATE, READ and UPDATE a data chunk that looks like this:
"colors" : {
  "r" : 255,
  "g" : 0,
  "b" : 0
}
Firebase has an easy way of getting to your data via REST api, i.e. you can get your JSON data at https://burning-limbo-6666.firebaseio.com/colors.json, where https://burning-limbo-6666.firebaseio.com is the domain address of your app which Firebase generates for you after creating a new app, and /colors is the parent node of your data. Firebase has a data dashboard at the very URL, so you can just paste the address into the browser and hit it after you’ve updated the data there in the next section to see your data changed by the pot in real-time.

pot.js
Johnny-five is a javaScript library that wraps around Arduino’s C/C++ language and interface with the board via Firmata firmware, created by the awesome Rick Waldron, and is synonymous to the Nodebot Movement. In order to make it work, you must open the Arduino IDE to flash a standard Firmata code onto the board. On your IDE, go to File > Examples > Firmata > StandardFirmata and upload the code (Don’t forget to select the right board and serial port in the Tools menu). Once the upload have finished, you can close the IDE. Now, let’s have a look at our pot.js code.
var Firebase = require("firebase");
var five = require("johnny-five");

// Create a new reference of Firebase db
var firebaseRef = new Firebase(
  // fictional URL, replace it with your own from Firebase
  "https://burning-limbo-6666.firebaseio.com/colors"
);

five.Board().on("ready", function() {
  var maxValue = 511;
  var colRange = 6;
  var offset   = maxValue / colRange;

  // Create a new pot instance
  var pot = new five.Sensor({
    pin: "A0",
    freq: 250
  });

  // Create a new led array based on pin number
  var ledArray = new five.Led.Array([9, 10, 11]);

  // Listen on data change
  pot.on("data", function() {

    var self = this.value;
    // Print pot value
    console.log(self);

    // Map dynamic color brightness to pot value
    // RED - MAGENTA - BLUE
    var redDec   = Math.round(five.Fn.map(self, offset, offset*2, 255, 0));
    var blueInc  = Math.round(five.Fn.map(self, 0, offset, 0, 255));
    // BLUE - CYAN - GREEN
    var blueDec  = Math.round(five.Fn.map(self, offset*3, offset*4, 255, 0));
    var greenInc = Math.round(five.Fn.map(self, offset*2, offset*3, 0, 255));
    // GREEN - YELLOW - RED
    var greenDec = Math.round(five.Fn.map(self, offset*5, offset*6, 255, 0));
    var redInc   = Math.round(five.Fn.map(self, offset*4, offset*5, 0, 255));

    // Adjusting color brightness conditionally based on
    // the location of the pot output value.
    switch (true) {
      case (self > 0 && self <= offset):
        console.log("1st loop");
        ledArray[0].brightness(255);
        ledArray[2].brightness(blueInc);
        ledArray[1].brightness(0);
	// update firebase colors' child node r, g, b
	firebaseRef.set({"r": 255, "b": blueInc, "g": 0});
        break;
      case (self > offset && self <= offset*2):
        console.log("2nd loop");
        ledArray[0].brightness(redDec);
        ledArray[2].brightness(255);
        ledArray[1].brightness(0);
	// update firebase colors' child node r, g, b
	firebaseRef.set({"r": redDec, "b": 255, "g": 0});
	break;
      case (self > offset*2 && self <= offset*3):
        console.log("3rd loop");
        ledArray[0].brightness(0);
        ledArray[2].brightness(255);
        ledArray[1].brightness(greenInc);
	// update firebase colors' child node r, g, b
	firebaseRef.set({"r": 0, "b": 255, "g": greenInc});
	break;
      case (self > offset*3 && self <= offset*4):
        console.log("4th loop");
        ledArray[0].brightness(0);
        ledArray[2].brightness(blueDec);
        ledArray[1].brightness(255);
	// update firebase colors' child node r, g, b
	firebaseRef.set({"r": 0, "b": blueDec, "g": 255});
        break;
      case (self > offset*4 && self <= offset*5):
        console.log("5th loop");
        ledArray[0].brightness(redInc);
        ledArray[2].brightness(0);
        ledArray[1].brightness(255);
	// update firebase colors' child node r, g, b
	firebaseRef.set({"r": redInc, "b": 0, "g": 255});
	break;
      case (self > offset*5 && self <= offset*6):
        console.log("6th loop");
        ledArray[0].brightness(255);
        ledArray[2].brightness(0);
        ledArray[1].brightness(greenDec);
	// update firebase colors' child node r, g, b
	firebaseRef.set({"r": 255, "b": 0, "g": greenDec});
	break;
      default:
	console.log("Out of range");
        ledArray[0].brightness(255);
	ledArray[2].brightness(0);
	ledArray[1].brightness(0);
	// update firebase colors' child node r, g, b
	firebaseRef.set({"r": 255, "b": 0, "g": 0});
    }
  });
});
First, (1–3) we require our installed dependencies for the app, firebase and johnny-five, then we (5–8)create a new firebase reference firebaseRef to where your data is stored. After that, (10) we create a new johnny-five instance of the Arduino board, and hook it to a callback function which will execute the rest of the code once it’s ready. (11–13) I assign the max value we expect from the pot to a variable and divide it by the RGB color subrange number to obtain a standard offset “distance” used as a step variable to calculate where the output value from the pot is on the RGB strip i.e. offset is MAGENTA, offset * 2 is BLUE, offset * 3 is CYAN and so on. You can see how I divided the RGB color strip into 6 subranges, as graphically shown below.

Normally on 5V power, a pot will convert analog signal (0–5V) to digital and give out a range of integer from 0–1023. In my case, my little pot maxes at half of that, so my maxValue lies somewhere around 511(Check this value by logging the output with console.log()). Then (16–19),create a new instance of the pot sensor, set its analog pin to A0 and frequency to 250. (22) Assign each LED’s pin to an array variable. Now, (25++) set our pot instance to listen to the “data” event, and within the callback function is the rest of the code that (27–40)calculates and maps the pot’s output range (0-maxValue) to a range of 0–255 (LED’s brightness)using our obtained step variable offset. (44–1o2) I use switch-case loop to conditionally adjusts each LED’s color brightness with Led.brightness method and saving these values to Firebase with Firebase.set method according to where the pot value is.
After that, run pot.js with node commandline
$ node pot.js
Your LED should light up and your terminal should be loop-printing the value from the pot (self) and which loop (or subrange) your pot value is currently in. Try spinning the pot to see the printed data changed as the LED’s color gradually shift. Then, browse to your Firebase dashboard using your app’s URL (i.e. https://burning-limbo-6666.firebaseio.com/colors). You should see your data change as you rotate your pot. We have successfully CREATEd and UPDATEd data on a database like you would have done with web forms, sliders or buttons. That concludes the hardware side.
app.js
Now we are going to work on our client, a simple web app. The structure of the app directory is as follow:
app
├── app.js
├── node_modules
|   ├── express
|   ├── firebase
|   └── socket.io
├── package.json
└── public
    ├── index.html
    └── index.js
If you have not installed dependencies, you will probably not see node_modules subdirectory in there. Do so now using npm install.
$ cd app && npm install
Take note of the public directory. app.js is a server code which serve static contents from public directory, in this case, index.html and index.js. Let’s hop into app.js:
var Firebase = require("firebase");
var express = require("express");

// Create HTTP Server
var app = express();
var server = require("http").createServer(app);
// Attach Socket.io server
var io = require("socket.io")(server);
// Indicate port 3000 as host
var port = process.env.PORT || 3000;

// Create a new firebase reference
var firebaseRef = new Firebase(
  "https://burning-limbo-6666.firebaseio.com/colors"
);

// Make the server listens on port 3000
server.listen(port, function() {
  console.log("Server listening on port %d", port);
});

// Routing to static files
app.use(express.static(__dirname + "/public"));

// Socket server listens on connection event
io.on("connection", function(socket) {
  console.log("Connected and ready!");

  // firebase reference listens on value change,
  // and return the data snapshot as an object
  firebaseRef.on("value", function(snapshot) {
    var colorChange = snapshot.val();

    // Print the data object's values
    console.log("snapshot R: " + colorChange.r);
    console.log("snapshot B: " + colorChange.b);
    console.log("snapshot G: " + colorChange.g);
  });
});
What this code does is (5–18) creating a Node web server to listen to requests on port 3000 and (21)serve the front-end contents from inside public directory. Then (24–25) the server waits for a socket connection (i.e. GET request), print out “Connect and ready!” message, and (29++) start tracking data from Firebase and printing out changes. Firebase is not necessary here, since we will be using Angularfire library in public/index.js to sync data from Firebase directly there, but it’s intentionally included in here to exhibit a basic firebase method of detecting data changes and retrieving the snapshot of them. The most important part here is serving the public/index.html page and run script in public/index.js.
index.html

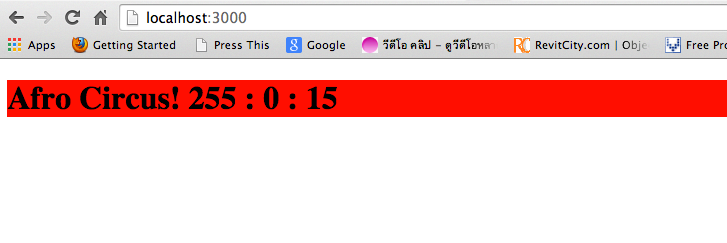
Our web page will be displaying R : G : B values dynamically from Firebase and changing the background color of the div according to how you rotate your pot. We’re going to use AngularFire, Firebase client library supporting Angular.js.
<!DOCTYPE html>
<!--Directive-->
<html ng-app="app">
  <head>
  </head>
  <!--Controller-->
  <body ng-controller="Ctrl">
    <div class="header">
      <!--Style-->
      <h1 ng-style="{'background-color': 'rgb(' + data.r + ',' + data.g + ',' + data.b +')'}">
        Afro Circus! {{ data.r }} : {{ data.g }} : {{ data.b }}
      </h1>
    </div>
    <!--Scripts-->
    <script src="https://ajax.googleapis.com/ajax/libs/angularjs/1.3.0-beta.19/angular.min.js"></script>
    <script src="https://cdn.firebase.com/libs/angularfire/0.8.2/angularfire.min.js"></script>
    <script src="/index.js"></script>
  </body>
</html>
https://gist.github.com/jochasinga/c720677640e026381366
This html view(V) binds its part to a data model(M) that syncs data from your Firebase storage, and as data change, only that part is re-rendered. Angular operates on what’s called a “directive.” Directives add new functionalities to HTML elements instead of manipulating the DOM as in JQuery. (3) ng-app directivestarts the application anddefines the scope of the binding, (7) ng-controller defines the application controller© and scope that that particular controller method has effect on, and (10) ng-style allows dynamic styling of document (like you would have done with JQuery’s .css or .addClass). To display data from the model, double-brackets ({{ }}) is used to contain the variable, which is a common way to do it in other web frameworks’ template language. Never mind the data object for now, you’ll see it in public/index.js. Ensure that you have included the scripts before