Building a Node.js application on Android P2

Part 2: Express and NeDB
In Part 1 we saw how to use Termux, a Terminal emulator and Linux environment for Android. We also edited files with Vim and saw how to run Node. We are now going to build a small node application with the Express framework and use NeDB for the database.
The story, and who could benefit from it
When I found out I could build a full Node.js application with a Mongo-like database on my Android tablet, I got really excited. So I decided to give it a try, and share about my experience.
It turns out that once Termux is running on Android and Node is installed, the fact that we are on Android instead of Linux doesn’t make much of a difference. In fact, all the Termux specific setup was done in Part 1 and you are welcome to code along on your preferred device/computer/cloud IDE…
This also means that, apart from the fact that we substitute Mongo for NeDB, this article is like the usual introduction to building a RESTful API and is mainly for people who are rather new to Node, Express and Mongo/NeDB.
What we are going to do
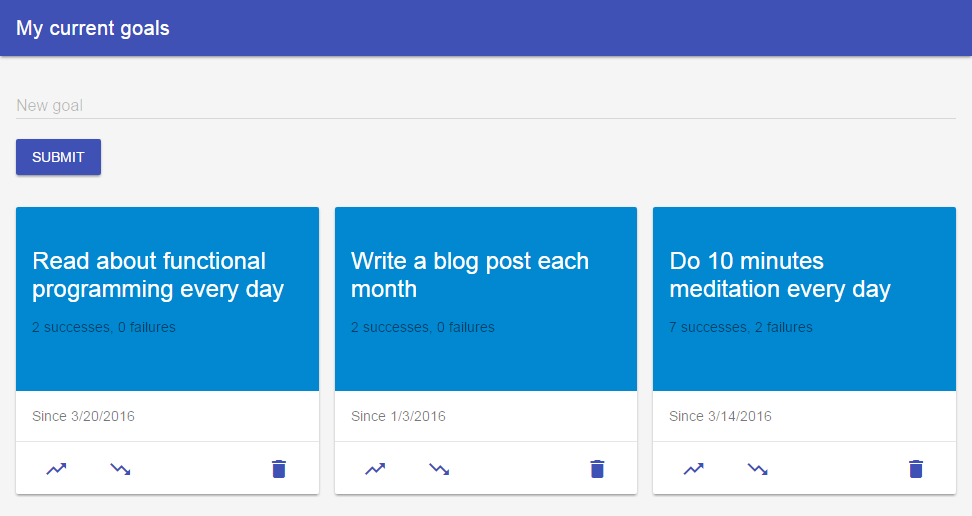
In order to demonstrate how to get started with the Express web framework and an NeDB database, let’s look at a basic goal tracker that I’ve been building for myself. At the current stage, it looks as shown in the picture above.
Users can:
- submit a new goal
- delete a goal
- record a success for a goal
- record a failure for a goal
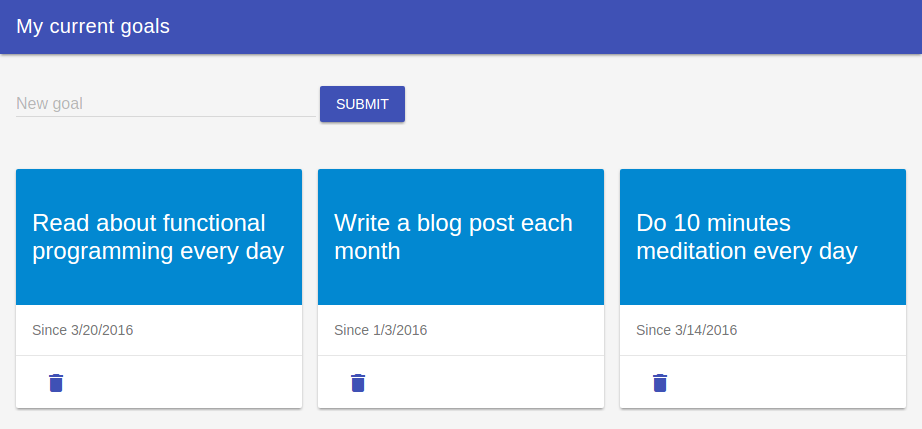
Well, actually we’re only going to implement the first two features in this post, and in case you’re curious about the two remaining ones, I will provide at the end a link to the code of the full implementation.
So without the need for recording successes and failures, our code will look a bit simpler:
Here are the steps we are going to go through:
- Set up the server with Express.
- Describe a few user stories.
- Set up NeDB.
- Build a RESTful API.
Pre-requisites
We are going to start where we left off in Part 1. Thus, the only requirement is that node be installed.
1. Setting up the server with Express
Express is a web framework for Node that helps build Node applications. If you have trouble figuring out what Express brings to Node, I recommend you check out Evan Hahn’s article Understanding Express.
Let’s start a new project:
$ mkdir goals-tracker && cd goals-tracker
$ npm init
$ touch server.js
and install Express:
npm install express --save
We are going to use Express to define the routes_,_ that is to define the application end points (URIs) and set up how the application responds to client requests.
Open server.js and copy-paste/write:
// server.js

// DEPENDENCIES AND SETUP
// ===============================================

var express = require('express'),
  app = express(),
  port = Number(process.env.PORT || 8080);

// ROUTES
// ===============================================

// Define the home page route.
app.get('/', function(req, res) {
  res.send('Our first route is working.:)');
});

// START THE SERVER
// ===============================================

app.listen(port, function() {
  console.log('Listening on port ' + port);
});
With that in place, you can start the app:
$ node server.js
This should print to the console the number of the port on which the server is listening. If you visit http://localhost:8080 in the browser (assuming that 8080 is the number that got printed to the console) you should see on the page: Our first route is working. :)
Some explanations
The ‘/’ in app.get( … ) defines the route where we want to attach some behavior from the server. Using ‘/’ refers to the base URI, in our case: http://localhost:8080. Note that we would get the same result in the browser window if we used app.get(‘/goals’, …) instead and visited http://localhost:8080/goals.
The second argument in app.get( … ) is a callback function that enables us to define what the server should do when the route given as the first argument is visited. In this function:
- req stands for the request: this is the information that the server receives from a client (for example this might come from someone using the front-end part of the website/app).
- res stands for response: this is the information that the server sends back to the user. This can be a webpage or some other data like an image, some JSON or some XML.
Nodemon
In the next parts of this tutorial we are going to make multiple changes to the file server.js. In order to avoid restarting the server manually each time to see the result, we can install nodemon.
Nodemon is a utility that will monitor for changes in your code and automatically restart the server. We are going to install it as a development only dependency using the tag save-dev:
npm install nodemon --save-dev
Now you can restart the server with the nodemon command instead of node:
nodemon server.js
2. The user stories
Before we move on to the part about NeDB, let’s pause for a moment to think about the business logic. In order to see what we need to implement, we start by defining a few user stories.
A user story is a very high-level definition of a requirement. User stories are useful for discussing the product in non-technical terms with a client, for estimating how much time and effort the implementation of a feature will take, for guiding the overall development of an application, and for doing Test Driven Development.
Here are the 4 user stories we’re going to use:
- As a user, I can save a new goal with its date of creation.
- As a user, I can access all the goals that have been saved.
- As a user, I can access the whole information about a goal.
- As a user, I can delete a goal.
In our case, the stories map one-to-one to the 4 CRUD operations that we are going to talk about in Part 4.
3. Using NeDB
The fact that NeDB is easy to install, well documented and uses the MongoDB’s API makes it perfect for getting started with developing Node.js applications on Android. There even is a tool to help you switch to MongoDB later on if need be (I haven’t tried it yet, though).
So let us add NeDB to the project:
$ npm install nedb --save
and add to server.js a few lines to setup the database and make sure we can save to it:
// server.js

// DEPENDENCIES AND SETUP
// ===============================================

var express = require('express'),
  app = express(),
  port = Number(process.env.PORT || 8080);

// DATABASE
// ===============================================

// Setup the database.
var Datastore = require('nedb');
var db = new Datastore({
  filename: 'goals.db', // provide a path to the database file
  autoload: true, // automatically load the database
  timestampData: true // automatically add and manage the fields createdAt and updatedAt
});

// Let us check that we can save to the database.
// Define a goal.
var goal = {
  description: 'Do 10 minutes meditation every day',
};

// Save this goal to the database.
db.insert(goal, function(err, newGoal) {
  if (err) console.log(err);
  console.log(newGoal);
});

// ROUTES
// ===============================================

// Define the home page route.
app.get('/', function(req, res) {
  res.send('Our first route is working. :)');
});

// START THE SERVER
// ===============================================

app.listen(port, function() {
  console.log('Listening on port ' + port);
});
A Datastore refers to what would be called a collection in Mongo. We could create multiple datastores if we needed several collections. As demonstrated in NeDB’s documentation, each collection would be saved in a separate file. Here we have chosen to store the goals collection in a file named goals.db.
Checking if it worked
If the server was started earlier with nodemon, it should have updated after the changes in server.js got saved. This means that db.insert(…) should have run and the goal should have been logged to the console:
$ nodemon server.js
[nodemon] 1.9.1
[nodemon] to restart at any time, enter `rs`
[nodemon] watching: *.*
[nodemon] starting `node server.js`
Listening on port 8080
[nodemon] restarting due to changes...
[nodemon] starting `node server.js`
Listening on port 8080
{ description: 'Do 10 minutes meditation every day',
 successes: [],
 failures: [],
 _id: 'ScfixKjsOqz9xBo5',
 createdAt: Fri Mar 18 2016 22:10:58 GMT+0000 (UTC),
 updatedAt: Fri Mar 18 2016 22:10:58 GMT+0000 (UTC) }
A new file called goals.db should also have been created.
$ ls
goals.db  node_modules/  package.json  server.js
And it should contain the goal that just got saved.
$ less goals.db
{"description":"Do 10 minutes meditation every day","_id":"ScfixKjsOqz9xBo5","createdAt":{"$$date":1458339058282},"updatedAt":{"$$date":1458339058282}}
Note that the fields _id, createdAt and updatedAt have been filled in automatically by NeDB because we set up the Datastore with the option timestampData set to true.
4. Building a RESTful API
Next, let’s build a RESTful API for the application. In a nutshell, this means that we want to use HTTP verbs and URIs in order to allow the client to perform CRUD operations (Create, Read, Update and Delete). These operations are also usually going to send back data to the client.
In CRUD terms we can :
- Create data with POST,
- Read data with GET,
- Update data with PUT or PATCH,
- Delete data with DELETE.
The HTTP verbs that we are going to use in this post are POST, GET and DELETE.
Our API
Here is a table showing the routes that we are going to set up, how they will be accessed (i.e. with which HTTP Verb) and what each one makes possible:
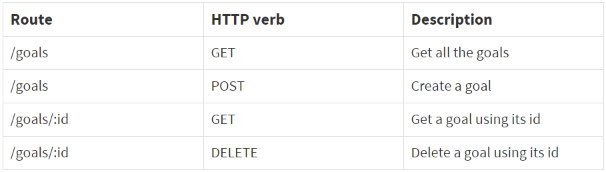
If you want to learn more about RESTful APIs, you could check out Designing a RESTful Web API by Mathias Hansen or Using HTTP Methods for RESTful Services.
Testing the API
We are going to test the API manually in the terminal using curl. If you are not on Android and would rather like to use a GUI to test the API, you could use POSTMAN.
Let see a first example of how to use curl. Make sure the server is running, open another terminal (in Termux swipe to the right from the left border and click on new session) and type:
$ curl -X GET "http://localhost:8080"
This should print to the console what we got in the browser window earlier on, that is: Our first route is working. :)
We will now add code to server.js bits by bits. In case you would rather like to see the ‘big’ picture first you can head over to the final server.js file.
Body-parser
To handle the requests that the server receives, we are going to install body-parser. It processes the incoming requests and makes it easier for us to access the relevant parts.
npm install body-parser --save
Add the body-parser setup code to the top of server.js (e.g. right after the setup of the port number):
var  bodyParser = require('body-parser'), // Middleware to read POST data

// Set up body-parser.
// To parse JSON:
app.use(bodyParser.json());
// To parse form data:
app.use(bodyParser.urlencoded({
  extended: true
}));
Getting all the goals
// GET all goals.
// (Accessed at GET http://localhost:8080/goals)
app.get('/goals', function(req, res) {
  db.find({}).sort({
    updatedAt: -1
  }).exec(function(err, goals) {
    if (err) res.send(err);
    res.json(goals);
  });
});
If the server receives a GET request at /goals, the callback will be executed and the database will be queried with db.find({}). Here the object passed to find() is empty. This means that no constraint is set to what we are looking for and all objects in the database should be returned.
Notice also that no callback has been specified to find(). Thus a Cursor object is returned, which can first be modified with sort, skip or limit before we use exec(callback) to finish the query. Here we are using sort to return the goals with the most recently updated ones at the top (i.e. the ones with the ‘greater’ date of last update).
If everything went well, the result of the query (in our case an array of goals) is sent back to the client formatted as JSON. In case something went wrong and an error is produced, the error message is sent back to the client instead.
Let us test if it works:
$ curl -X GET "http://localhost:8080/goals/"
This should print to the console an array containing the goal we saved to the database earlier on.
Creating a goal
// POST a new goal.
// (Accessed at POST http://localhost:8080/goals)
app.post('/goals', function(req, res) {
  var goal = {
    description: req.body.description,
  };
  db.insert(goal, function(err, goal) {
    if (err) res.send(err);
    res.json(goal);
  });
});
req.body contains key-value pairs of data that was submitted in the request body. By default, it is undefined and it gets populated by the body-parser middleware. In our case the request should contain a key-value pair whose key is named ‘description’ and whose value is thus retrieved by using req.body.description.
So first, the goal we want to insert into the database is built from the request using req.body.description. Then it can be inserted into the database and if there was no error the response is sent back to the server as JSON.
Now let us try to POST a new goal using curl:
$ curl -X POST -H "Content-Type: application/x-www-form-urlencoded" -d "description=Read about functional programming every day" "http://localhost:8080/goals/"
This should print the JSON representation of the goal that has been sent back to the client.
We post the data as x-www-form-urlencoded. This sends the data as query strings that are parsed by the body-parser.
Getting a goal using its id
// GET a goal.
// (Accessed at GET http://localhost:8080/goals/goal_id)
app.get('/goals/:id', function(req, res) {
  var goal_id = req.params.id;
  db.findOne({
    _id: goal_id
  }, {}, function(err, goal) {
    if (err) res.send(err);
    res.json(goal);
  });
});
req.params is an object containing properties mapped to the route “parameters”. Here it enables us to access the value of the goal’s id, which is supposed to come after /goals/ in the URL in the request. For this to work, we have to use a colon in the URI in front of the property that we want to access with req.params.
Apart from the fact that we are using findOne(…) instead of find(…), nothing new here. So let’s test it. For this, you might check what got printed to the console after we saved a new goal using POST and use its _“id” value. Here is my command with the id I got:
$ curl -X GET "http://localhost:8080/goals/JJtcFVQnoAxW7KXc"
This should print to the console the goal with the given id.
Deleting a goal using its id
// DELETE a goal.
// (Accessed at DELETE http://localhost:8080/goals/goal_id)
app.delete('/goals/:id', function(req, res) {
  var goal_id = req.params.id;
  db.remove({
    _id: goal_id
  }, {}, function(err, goal) {
    if (err) res.send(err);
    res.sendStatus(200);
  });
});
We use remove(…) to delete a goal from the database. If the deletion is successful, the response is sent with the HTTP status code 200 (200 means that the deletion was successful).
Wrapping it up
We have set up a server with Express and NeDB, and built a REST API. What we are still missing is a front-end and a bit of wiring.
This next step could take us down many different roads: Would we opt for a template engine and if yes which one? Bootstrap or a similar framework? Angular, React, Aurelia? The list just goes on and on.
In case you would like to have a look at a minimal implementation of a front-end — and maybe play around with it in your browser — you can see the code of a possible solution I have been implementing using Handlebars, Material Design Lite and the fetch API by visiting its repo on GitHub or by cloning it:
$ git clone --branch rest-and-view https://github.com/aurerua/goals-tracker.git --depth 1
Going further
The back-end that we have built still raises the question: how should the code be split into different files and folders for better modularity and maintainability?
In case you’re curious, I have also been writing another version of the app that uses a Model-View-Controller folder structure. Feel free to have a look:
$ git clone https://github.com/aurerua/goals-tracker-mvc.git
**Recommended Courses: **
The Complete NodeJS Course: Build a Full Business Rating App
☞ https://goo.gl/kqgTZF
Learn Nodejs by building 12 projects
☞ http://go.edupioneer.net/H1HGvbfgM
Node.js for beginners, 10 developed projects, 100% practical
☞ http://on.learn4startup.com/HkqcDyGgM
Learn To Build An Elearning Website Using NodeJS
☞ https://goo.gl/URDnHG
Node Js Projects
☞ http://on.learn4startup.com/Sk9f0i-lf
Suggest:
☞ JavaScript Programming Tutorial Full Course for Beginners
☞ Web Development Tutorial - JavaScript, HTML, CSS
☞ Learn JavaScript - Become a Zero to Hero
☞ Javascript Project Tutorial: Budget App
☞ E-Commerce JavaScript Tutorial - Shopping Cart from Scratch