Events, EventEmitter and the Event Loop in Node.js

In Part I Sync, Async, and Creating Your First Server with Nodejs. I walked you through install, and together we created your first server.
It was glorious:

Today’s lesson will cover:
- Why Node.js is an event driven language, and how this is important for asynchronous behavior
- How events in the DOM are similar to events in Node.js
- How the Event Loop processes requests
- Creating custom events using the EventEmitter
Event Driven Programming is Awesome
Since Node.js is single-threaded, in order for it to create concurrency and not be painfully slow — as the traditional client server model explained in Part I — it uses events to listen for requests.
This is different from say, Apache, a web server that uses multi-threaded HTTP. For every request Apache receives, it creates a new thread for handling it. This means that yes, while you can have more than one process running at the same time via threads, the downfall is that results from all the requests have to come back before serving the page.
On the other hand, Node.j’s event driven architecture allows for multiple requests to be processed on a single thread. For example, once a request event is triggered, callbacks and promises process these requests asynchronously.
This means if you have multiple requests coming in and request A is still doing its thing, request B will start fetching the results — the outcome being either request B responds to the client before request A or at the same time as Request A.
Since everything is processed faster, the client has a better user experience. Lets discuss this in more detail further in the lesson.
There are some downfalls to Node.js’s concurrency model but we’ll be covering this in the next few lessons.
Events in the DOM are like Events in Node.js
Think of events this way: just as events interact with DOM objects, many objects in Node.js emit events.
If you’ve done any type of DOM manipulation with JavaScript, then you understand that the DOM can have event listeners such as click, dblclick, submit, keydown, keyup and so on. Once triggered, the event is handled with a callback.
For example, when you set up a click event, you can have a callback say: “when something is clicked, turn the third div blue!”
Here’s a coded example.
In your index.html file:
<!DOCTYPE html>
<html>
<head>
  <meta charset = "UTF-8"/>
  <link rel="stylesheet" href="style.css">
</head>
<body>
  <!-- the three divs -->
  <div id="firstDiv" class='divs'></div>
  <div id="secondDiv" class='divs'></div>
  <div id="thirdDiv" class='divs'></div>

  <!--when we click this button the click event in main.js will hear it
  and trigger the callback-->
  <div style="text-align:center;">
    <button id='btn'>Click me!</button>
  </div>

  <script src="main.js"></script>
</body>
</html>
NodeSeriesPart2_1.html
In your main.js file:
NodeSeriesPart2_2.js
// The 'click' event which listens for a click.
document.getElementById('btn').addEventListener("click", turnThirdDivBlue);

// the function called as a callback above.
function turnThirdDivBlue() {
  document.getElementById("thirdDiv").style.background = 'blue';
  document.getElementById('btn').innerHTML = "Turned blue on click!"
}
And, if you want to test this out in your own browser here’s some CSS. This should go in style.css:
NodeSeriesPart2_3.css
.divs {
  margin: auto;
  padding: 30px;
  width: 50%;
  margin-bottom: 5px;
  border: solid grey 1px;
}

#btn {
  padding: 15px 63px;
}
When the client clicks the button, our click event is triggered, and our callback does something to the DOM. In this case, it turns the third div blue and changes the text inside the button.
Like the request event in Node.js, when the client clicks a button, it’s as if they are sending a request into the main.js file where the click event is listening — just as the request event would listen in for incoming requests.
Then, just like the response event would respond to the client with some information inside the callback, the callback of the DOM’s click event responds by changing the background color of the third div. It also changes the text in the button inside the html file.
The main difference between events in Node.js and events in the DOM is that DOM events stay primarily attached to the DOM object — on the client-side — while events for Node.js are focused more on the relationship between the client and the server.
Node.js emits events from objects — such as the web server object(http.createServer). Lucky for you, you’ve actually already used events back in Part I in STEP #1.5!
During this step, you saved the web server object in it’s own variable and listened for incoming requests via the request event attached to the http.createServer object in the first parameter.
Underneath this object is the EventEmitter constructor, which we’ll learn about very soon. For now, review the code we set up in Part I and see if you have a better grasp of what’s going after our event explanation.
Here it is again for reference:
NodeSeriesPart2_4.js
var http = require('http');

// STEP #1.5 Basic Server Continued...
var bunnyServer = http.createServer();
bunnyServer.on('request', function(req, res) {
  res.writeHead(200);
  res.end('<html><body><h1>Bunny Server is live!<br /><img src="https://cdn.meme.am/instances/400x/55347780.jpg"></h1></body></html>');
}).listen(3000);
The Event Loop
Ok so you have a basic understanding of events and how they relate with Node.js but how does Node.js actually work under the hood?
The first thing Node.js does when it reads your code is subscribe events you used, such as request, listen, connection or close. Once it’s done, it goes into the Event Loop and listens for these events continuously inside a single thread.
For example, in the server we previously created above, it’s only listening for the request event and thus the Event Loop thinks:
“Have any requests come in?”
“How about now?”
“…. “
“Now?”
“Now right?”

No worries, Node.js’s single threaded Event Loop is not Jules Winfield. It’s actually just patiently waiting and listening for events that it previously subscribed to in the background.
If a request does arrive, it triggers the request event and runs the callback we wrote — in our case, the mini html inside the end method in our previous server example. Also be aware that events can trigger other events.
But what if multiple requests come at the same time? Like the request and close event? The event loop will process these events one at time. So first the request event will be processed and then the close event. While they are being handled they don’t block more events from coming in. If they did, our code would run twice as long.
Lets dive further into what this all means
So when we say JavaScript is single-threaded we are saying it has only one Call Stack — something that keeps track of functions that will execute in your code. Each golden bar represents a function inside of the Call Stack. Last function added on top is the first function that executes and pops off.

If JavaScript was a synchronous language, and we had two requests coming in what do you think would happen? We would have to wait for the result of the first request to come back before we could process the second request. This means that the first request would stay in the Call Stack, blocking any other requests from coming in, until it’s necessary results returned.
Once the results are retrieved, the first request “pops off,” and only then would the second request go into the Call Stack and get executed:

JavaScript achieves its concurrency model by storing asynchronous functions somewhere else while other tasks that are much faster run first. Then, when our asynchronous function receives what it needs, it eventually executes. At least that’s the gist of it.
Lets dive deeper now that we know about the Call Stack.
When an asynchronous function with a callback or event comes into the Call Stack, it automatically moves into the Web API. The Web API is where events subscribed to the Event Loop are stored. They await orders from the Event Loop, which listens if any of the events are called.
Once someone triggers an event, for example, the request event, the callback of this event gets sent into an event queue. This queue is also called the callback queue or just task queue.
The reason we have multiple names for the queue is because the same process that happens for events happens for asynchronous functions — or methods — anything that has a callback, including DOM events and event functions not part of native JavaScript like ajax and setTimeout(Yep, they’re part of the Web API, not JavaScript).
Now the last thing that happens is the callback of the request event will wait inside of this event/callback/task queue for the Call Stack to empty. This has something to do with the way JavaScript processes memory — so basically just know once we get to this stage we have to wait until all the functions still running empty out before we can add the callback into the Call Stack and process it.
Here’s a visual demonstration of everything we just explained:
- JavaScript scans your code and stacks functions, events, and everything else on the Call Stack.
- The golden bars below are regular, non-asynchronous, functions. The last pink and green bars are two request events. These events are subscribed to Event Loop (played by Brigadier Fluffykins) and wait inside the Web API to be called.
- As the events wait, other functions are executed on the Call Stack.
- Once an event is triggered, the Event Loop hears it and that particular event’s callback moves into the queue. Although_,_ since this is the request event, it would first wait for any results it needs. And only then does it send the callback over into the queue.
- While there are still functions running and being executed on the Call Stack, the events have to wait for the Call Stack to empty in order for them to run. Brigadier Fluffykins lets them know if it’s A-OK to move into the Call Stack or not depending on if it’s empty or not.

Left: Call Stack. Top Right: Web API. Bottom Right: Queue. Brigadier Fluffykins is the Event Loop.
Lets Create Custom Events!
Event emitters are used extensively in Node.js libraries, so lets learn how to create our own and better understand how they work!
All objects that emit events are instances of the EventEmitter class and all events inherit from the EventEmitter constructor. We’ll be creating two events for the bunnyError event emitter — bunnyWarning and bunnyNeed.
Copy and paste this into a file called bunnyEmitter.js:
NodeSeries2_5.js
// First require in the EventEmitter Object
var EventEmitter = require('events').EventEmitter;
// Create a new instance of the EventEmitter
var bunnyError = new EventEmitter();

// This is where you create your bunnyError event
// and create a callback that will be triggered when
// bunnyError is called
bunnyError.on('bunnyWarning', function(warning) {
  console.log(`BUNNY WARNING: ${warning}`);
});

// Triggers bunnyError event.
bunnyError.emit('bunnyWarning', 'Not enough blueberries!!');
bunnyError.emit('bunnyWarning', 'You brought a dog!');
bunnyError.emit('bunnyWarning', 'Pooped on the carpet again.');

// Lets create another event!
bunnyError.on('bunnyNeed', function(need) {
  console.log(`I need ${need}`);
})

// Now lets trigger the bunnyNeed event!
bunnyError.emit('bunnyNeed', 'a potato.');
bunnyError.emit('bunnyNeed', 'a tomato.');
bunnyError.emit('bunnyNeed', 'hugs.');
Alright so what’s happening here?
First we require in Node.js’s EventEmitter object and then we create an instance of a new EventEmitter object that we will build custom events for. We call this instance bunnyError.
Then we create an event listener for our first event, bunnyWarning, with the on method, which listens for the event. We handle this event when it’s used by triggering a callback that simply prints “BUNNY WARNING: warning.”
Notice I used Template Literals — an ES6 feature. You can learn more them here. It’s the same as saying console.log(“BUNNY WARNING:” + message).
Lastly we use the emit method to trigger or call the event. Once the event is called the callback should run. We can do this as many times as we want.
Assuming the file is on your Desktop, type node bunnyEmitter.js in your shell:
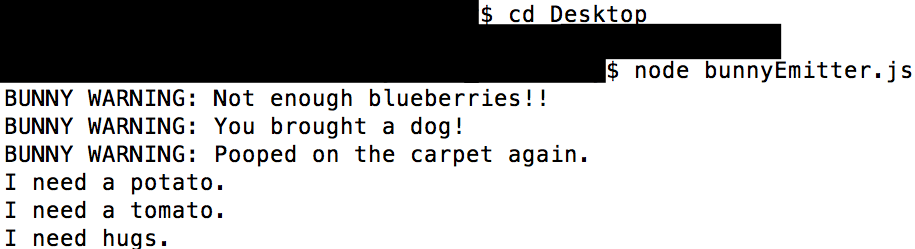
If you only want your event emitter to trigger one time, the EventEmitter object has a method called .once which you can use instead of .on:
yourEventEmitter.once(yourEvent, yourCallback)
With this, no matter how many times you emit yourEvent, it will only work one time.
It’s good practice to limit the number of event listeners you have. In fact if you have more than ten, you will get a warning:
"(node) warning: possible EventEmitter memory leak detected. 11 listeners added. Use emitter.setMaxListeners() to increase limit."
So far you’ve seen terms such as events, event listener, and event handler being used. Lets make the main differences clear before we move on:
The event listener is the event you create to listen for any incoming events. The event handler is the callback that will be triggered once the event listener hears the event.
In our custom event emitter example, the event listeners were bunnyWarning and bunnyNeeds and the event handlers were the callbacks of each event.
Check out these extra resources
- Node.js docs on events
- List of events for the DOM
- You learned to create an instance of an event emitter but what if you wanted to extend it and use it in different files? Check this tutorial out
- Learn more the methods on the EventEmitter object
- Want to learn more about the Event Loop?
Congrats! You’ve made it through Learn Node.js With Brigadier Fluffykins Part II! In today’s lesson you learned that Node.js is an event driven language and why this is useful for asynchronous behavior. You also learned how these events are processed via the Event Loop.
We also took a dive into learning about the similarities between DOM events and events in Node.js to help you ease into this new realm a bit more.
Lastly, we created out first EventEmitter and two awesome events!
Lets learn more about these topics as well as others we’ve only scratched in the next few lessons. Thank you for reading and stay tuned.
Recommended Courses:
☞ Building Nodejs & Mongodb applications from scratch 2018
☞ Selenium WebDriver - JavaScript nodeJS webdriver IO & more!
☞ Supreme NodeJS Course - For Beginners
☞ Learn Web Scraping with NodeJs in 2019 - The Crash Course
☞ NodeJS & MEAN Stack - for Beginners - In Easy way!
Suggest:
☞ Web Development Tutorial - JavaScript, HTML, CSS
☞ Javascript Project Tutorial: Budget App
☞ E-Commerce JavaScript Tutorial - Shopping Cart from Scratch
☞ Top 4 Programming Languages to Learn in 2019 to Get a Job