Build Youtube Clone with Vue JS, Webpack
Prerequisite
Vue is an awesome front-end JavaScript framework for building awesome user interfaces. Webpack is a module bundler for JavaScript which receives assets used in development and bundles them into single static assets. Having a hard time with positioning in CSS? Flexbox simplifies all that.
We shall be using these tools and techniques to build out a Youtube clone.
Getting started
With this tutorial we will be using webpack to build and run single file components. To get started make sure that you have vue-cli installed.
npm i -g vue-cli
Once vue-cli is installed we create a new project using the webpack build template shipped with the Vue CLI. In the command line, run:
vue init webpack vuetube
Answer all the prompted questions. We wont need vue-router for this project.
Create the Video Player component
Now that the project is created we can create our Video Player component. Open the project in the code editor of your choice (I recommend VS Code).
Head to the /src/components/ folder and add a new file called VideoPlayer.vue
Go ahead and edit the component to:
<template>
  <div class="video-player">
    Welcome to VueTube
  </div>
</template>

<script>
export default {
  name: 'VideoPlayer',
  data () {
    return {
    }
  }
}
</script>

<style scoped>
</style>
This is a barebones Vue single-file component. It includes a template for our view, a script section for our components logic and a style section that is scoped and only applies to our component.
We can now tell App.vue to show our VideoPlayer component instead of the out of the box HelloWorld component. To do that we will need to replace the App.vue file in /src with this one.
<template>
  <div id="app">
    <VideoPlayer/>
  </div>
</template>

<script>
import VideoPlayer from './components/VideoPlayer'

export default {
  name: 'App',
  components: {
    VideoPlayer
  }
}
</script>

<style>
#app {
  font-family: 'Avenir', Helvetica, Arial, sans-serif;
  -webkit-font-smoothing: antialiased;
  -moz-osx-font-smoothing: grayscale;
  color: #2c3e50;
}
</style>
Now we are importing the correct component and displaying it when the app starts up. Go ahead and start the application and let’s check out our progress so far. Run:
cd vuetube && npm run dev

Creating our data
Now that we have our app set up lets populate some video data. We are going to utilize the vue data object to store our video info. Inside the script tag lets create a variable named videos.
//VideoPlayer.vue
<script>
let videos = [];

export default {
...
We now have an empty array called videos. Let’s add five videos to the array. I am going to add 5 videos from the Tech Reviewer MKBHD. Feel free to use whatever videos you want.
//VideoPlayer.vue
let videos = [
 {
   id: 1,
   title: "18-core iMac Pro Review: Not a Trap!",
   thumbnail:
     "https://i.ytimg.com/vi/jn9mHzXJIV0/hqdefault.jpg?sqp=-oaymwEZCNACELwBSFXyq4qpAwsIARUAAIhCGAFwAQ==&rs=AOn4CLAvJvk4k_UNB9nst4pFP-txM1TLZA",
   youtubeURL: "https://www.youtube.com/embed/jn9mHzXJIV0",
   creator: "Marques Brownlee",
   likes: 0,
   views: 0
 },
 {
   id: 2,
   title: "Dope Tech: Camera Robots!",
   thumbnail:
     "https://i.ytimg.com/vi/UIwdCN4dV6w/hqdefault.jpg?sqp=-oaymwEZCNACELwBSFXyq4qpAwsIARUAAIhCGAFwAQ==&rs=AOn4CLDhlan32jHSvicGZezDFPjAOdXGUA",
   youtubeURL: "https://www.youtube.com/embed/UIwdCN4dV6w",
   creator: "Marques Brownlee",
   likes: 0,
   views: 0
 },
 {
   id: 3,
   title: "Let's Talk About Tesla Roadster 2020!",
   thumbnail:
     "https://i.ytimg.com/vi/ctx4YBEdOxo/hqdefault.jpg?sqp=-oaymwEZCNACELwBSFXyq4qpAwsIARUAAIhCGAFwAQ==&rs=AOn4CLBDnlrC2rVwXamNkicEEbc3Mf4T0w",
   youtubeURL: "https://www.youtube.com/embed/ctx4YBEdOxo",
   creator: "Marques Brownlee",
   likes: 0,
   views: 0
 },
 {
   id: 4,
   title: "Talking Tech with Neil deGrasse Tyson!",
   thumbnail:
     "https://i.ytimg.com/vi/pqQrL1K0Z5g/hqdefault.jpg?sqp=-oaymwEZCNACELwBSFXyq4qpAwsIARUAAIhCGAFwAQ==&rs=AOn4CLA5hTiwkz4Tr1w1hSMhPlwtmQeyYw",
   youtubeURL: "https://www.youtube.com/embed/pqQrL1K0Z5g",
   creator: "Marques Brownlee",
   likes: 0,
   views: 0
 },
 {
   id: 5,
   title: "The Apple Ecosystem: Explained!",
   thumbnail:
     "https://i.ytimg.com/vi/KB4_WIPE7vo/hqdefault.jpg?sqp=-oaymwEZCNACELwBSFXyq4qpAwsIARUAAIhCGAFwAQ==&rs=AOn4CLCCxXm7aoPShOwON74nhMlGYMUkHw",
   youtubeURL: "https://www.youtube.com/embed/KB4_WIPE7vo",
   creator: "Marques Brownlee",
   likes: 0,
   views: 0
 }
];
So we are storing 6 main attributes. Id, Title, URL, Creator, Likes and Views for each video. Now that we have our data we can start to display it on the screen. The first step is to set our videos variable to the data object.
export default {
  name: 'VideoPlayer',
  data () {
    return {
      videos
    }
  }
}
Looping through our data
Awesome, now we can loop through the data and show a list of the videos that exist on the player. To do that we are going to use v-for.
<div class="video-list">
    <div :key="video.id" v-for="video in videos" class="thumbnail">
        <div class="thumbnail-img">
          <img :src="video.thumbnail" />
        </div>
        <div class="thumbnail-info">
          <h3>{{video.title}}</h3>
          <p>{{video.creator}}</p>
          <p class="thumbnail-views">{{video.views}} Views</p>
        </div>
    </div>
</div>

What we are doing here is looping through the array of videos that we just created. So v-for=”video in videos” is looping through each object or “video” in the videos array.
Since we are looping through the array we can access the fields from each object. In our video list we want to display a thumbnail, creator, views and title. To access those fields within the template we can use the handlebar notation like {{video.title}}
Because the thumbnail needs to be displayed as an image we need to bind the field to the image src. For tags we can’t use the handlebar notation instead we use :src to bind the url.
Refresh your browser and check out what it looks like! You should see something similar to this:
Making the video list pretty
Awesome! Now that we have the video list lets format it. We want the video list to look like the right side of a Youtube video. To get that same look and feel we will be using Flexbox for the layout.
First we want the thumbnail image and the thumbnail info divs to be side by side. To do this we can add just one line to the thumbnail class
<style scoped>
  .thumbnail{
    display:flex;
  }
</style>
Great now we have them side by side let’s add the rest of the styling
.thumbnail img{
    width:168px;
}

.thumbnail-info{
    margin-left:20px;
}

.thumbnail h3{
    font-size:16px;
}

h3,
p{
    margin:0;
    padding:0;
}

.thumbnail-views{
    font-size:14px;
}
Now check out the updates in your browser!
Setting an active video
Our thumbnail list is all set up and now we can display our videos. When the app initially loads we can just display the first video in the array. To do that lets set create a field in the data object called activeVideo this is what we will use to display whatever video the user has picked. To set it to the first video when the page is loaded all we have to do is set activeVideo to videos[0]
export default {
  name: 'VideoPlayer',
  data () {
    return {
      videos,
      activeVideo: videos[0]
    }
  }
}

The active video is now part of the data object meaning that we can access it simply by referencing this.activeVideo inside the template. To show the youtube video we can create an iframe that is bound to the youtubeURL field of our video object.
<div class="video-container">
      <iframe width="640" height="360" :src="this.activeVideo.youtubeURL" frameborder="0" allow="autoplay; encrypted-media" allowfullscreen></iframe>
</div>
Let’s add the rest of the video information below the iframe tag.
<iframe ....>
<h3>{{this.activeVideo.title}}</h3>
<div class="row">
    <p>{{this.activeVideo.views}} views</p>
    <p>{{this.activeVideo.likes}} <button>Like</button></p>
</div>
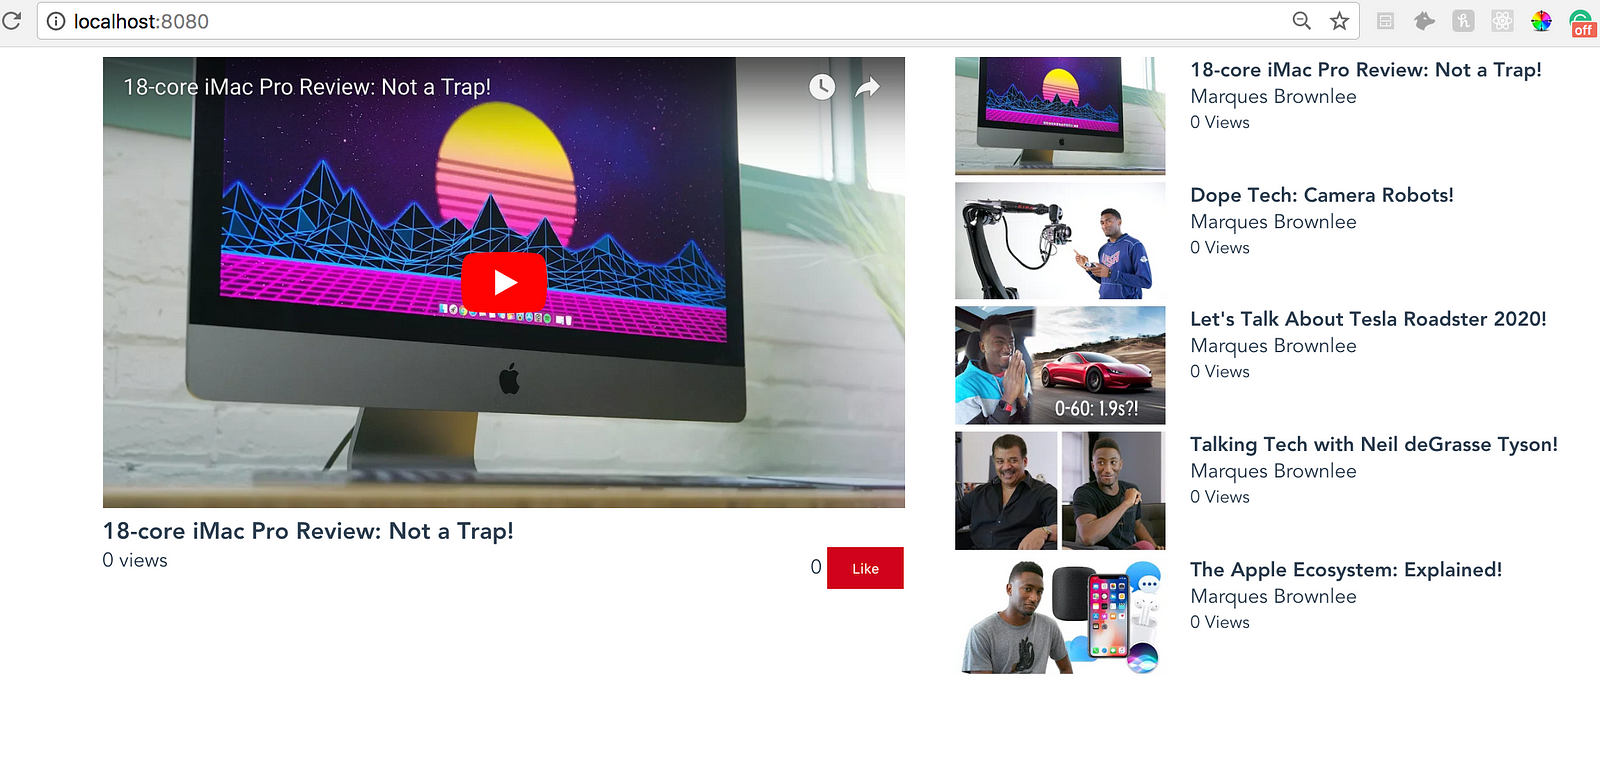
Awesome! We now have an active video that displays. Let’s make it look good.
.video-player{
    display:flex;
    width:1200px;
    margin:auto;
}

.video-container{
    margin-right:40px;
}

.row{
    display:flex;
    justify-content:space-between;
}

button{
    background:#D0021B;
    color:white;
    border:none;
    padding:10px 20px;
}
Refresh your browser and check it out!
Make it work!
Let’s make it possible for us to choose the video that we want to watch. To do that we will write a method in the script section.
methods:{
  chooseVideo(video){
      //SET VIDEO AS ACTIVE VIDEO
      this.activeVideo = video;
      //INCREASE THE VIDEOS VIEWS BY 1
      video.views += 1;
  }
}
So we have created a method called chooseVideo that takes a video parameter. This method will be used when a user chooses a thumbnail to watch from the video list. When a video is chosen we set the activeVideo to the video that was clicked and we also increase the videos view count by 1.
Now we have to bind the method to a click event on each video in the v-for loop
<div @click="chooseVideo(video)" :key="video.id" v-for="video in videos" class="thumbnail">
Try clicking on a video within the video list! If everything went well then you should be able to watch the video that you clicked on.
Set up the Like Button
Our last step is to set up the like button. We will create another method that adds one to the total likes when the button is clicked.
addLike(){
  this.activeVideo.likes += 1;
}
and then we can bind the addLike method to the like button in the template
<button @click="addLike">Like</button>
Refresh your browser and try to like your videos! You should see the counter going up and it should persist even when you choose a different video.

Add some finishing touches
For our last step we can add our new video players logo. Save the image below as logo.png into the assets folder.

Now we can add the logo to our App.vue file
<div id="app">
    <img style="width:140px; margin:14px;" src="./assets/logo.png"/>
    <VideoPlayer/>
</div>
Thanks for reading!
Thanks for making it this far. Hope you enjoyed the tutorial. If you have any questions or comments feel free to ask them below.
Recommended Courses:
Learn by Doing: Vue JS 2.0 the Right Way
☞ http://bit.ly/2KprScw
Learn Web Development Using VueJS
☞ http://bit.ly/2rNOtZB
Nuxt.js - Vue.js on Steroids
☞ http://bit.ly/2L0GLmM
Build Web Apps with Vue JS 2 & Firebase
☞ http://bit.ly/2KpD2xX
Suggest:
☞ Vue js Tutorial Zero to Hero || Brief Overview about Vue.js || Learn VueJS 2023 || JS Framework
☞ Learn Vue 2 in 65 Minutes -The Vue Tutorial for 2018
☞ Create Shopping basket page With Vuejs and Nodejs
☞ The Vue Tutorial for 2018 - Learn Vue 2 in 65 Minutes