Server-side rendering with React

Here’s what we will build in this tutorial:
We’ll use server-side rendering to deliver an HTML response when a user or crawler hits a page URL. We’ll handle the latter requests on the client side.
Why do we need it?
Let me guide you to the answer.
What’s the difference between client-side rendering and server-side rendering?
In Client-side rendering, your browser downloads a minimal HTML page. It renders the JavaScript and fills the content into it.
Server-side rendering, on the other hand, renders the React components on the server. The output is HTML content.
You can combine these two to create an isomorphic app.
Cons of Rendering React on the Server
- SSR can improve performance if your application is small. But it can also degrade performance if it is heavy.
- It increases response time (and it can be worse if the server is busy).
- It increases response size, which means the page takes longer to load.
- It increases the complexity of the application.
When should you use Server Side Rendering?
Despite these consequences of SSR, there are some situations in which you can and should use it.
1. SEO 👀
Every website wants to appear in searches. Correct me if I’m wrong!
Unfortunately, Search engine crawlers do not yet understand/render JavaScript.
This means they see a blank page, no matter how helpful your site is.
Many folks say that Google’s crawler now renders JavaScript.
To test this, I deployed the app on Heroku. Here is what I saw on the Google Search Console:
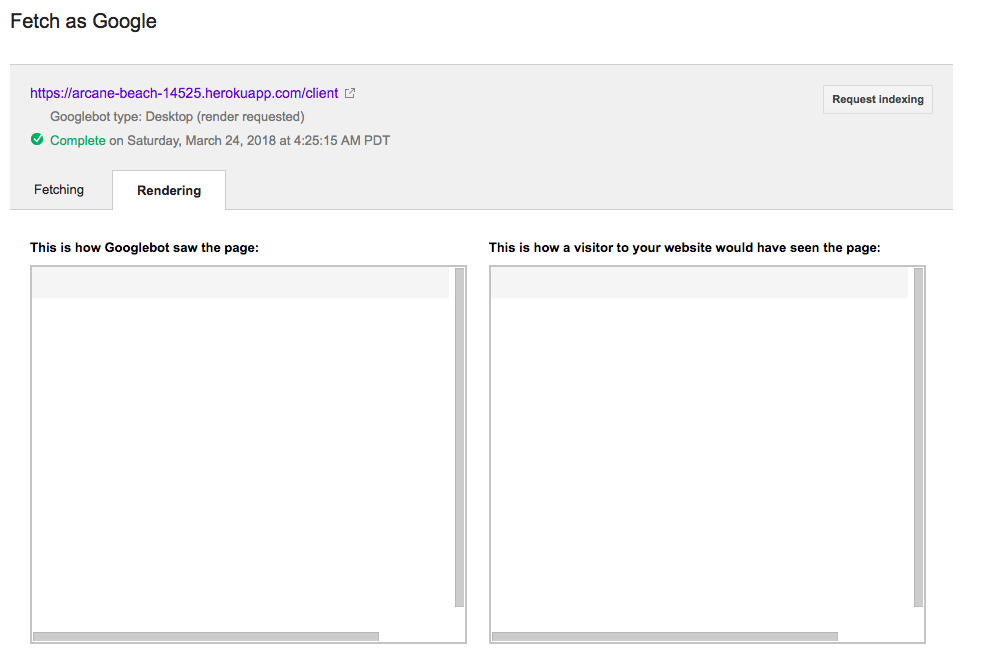
A blank page. 🔲 😢
This was the biggest reason I explored server-side rendering. Especially when it is a cornerstone page such as a landing page, blog, and so on.
To verify if Google renders your site, visit:
Search Console Dashboard > Crawl > Fetch as Google. Enter the page URL or leave it empty for the homepage.
Select FETCH AND RENDER. Once complete, click to see the result.
2. Improve performance 🚀
In SSR, the application performance depends on the server’s resources and user’s network speed. This makes it very useful for content-heavy sites.
For Example, say that you have a medium-price mobile phone with slow internet speed. You try to access a site that downloads 4MB of data before you can see anything.
Would you be able to see anything on your screen within 2–4 seconds?
Would you visit that site again?
I don’t think you would.
Another major improvement is in First User Interaction Time. This is the difference in time from when a user hits the URL to when they see content.
Here’s the comparison. I tested it on a development Mac.
React Rendered on Server

The first interaction time is 300ms. Hydrate finishes at 400ms. The load event exits at 500ms approximately. You can see this by checking out the image above.
React Rendered on Client’s Browser

The first interaction time is 400ms. The load event exits at 470ms 🤔.
The result speaks for itself. There’s a 100ms difference in the First User Interaction Time for such a small app. 🚂
How does it Work? — (4 Simple Steps)
- Create a fresh Redux Store on every request.
- Optionally dispatch some actions.
- Get the state out of the Store and perform SSR.
- Send the state obtained in the previous step along with the response.
We will use the state passed in the response for creating the initial state on client-side.
👋 Before you get started, clone/download the complete example from Github and use it for reference.
Getting Started by Setting up our App
First, open your favourite editor and shell. Create a new folder for your application. Let’s start.
npm init --yes
Fill in the details. After package.json is created, copy the dependencies and scripts below into it.
"scripts": {
    "start": "node index.js",
    "pack": "webpack --config webpack.config.js",
    "babel": "babel src -d views",
    "build": "npm run pack && npm run babel"
  },
  "dependencies": {
    "express": "^4.16.3",
    "react": "^16.5.2",
    "react-dom": "^16.5.2",
    "react-redux": "^5.0.7",
    "redux": "^3.7.2",
    "redux-thunk": "^2.3.0"
  },
  "devDependencies": {
    "@babel/cli": "^7.1.2",
    "@babel/core": "^7.1.2",
    "@babel/preset-env": "^7.1.0",
    "@babel/preset-react": "^7.0.0",
    "babel-loader": "^8.0.4",
    "webpack": "^4.20.2",
    "webpack-cli": "^3.1.2"
  }
package.json
Install all dependencies by running:
npm install
You need to configure Babel and webpack for our build script to work.
Babel transforms ESM and react into Node and browser-understood code.
Create a new file .babelrc and put the line below in it.
{
  "presets": ["@babel/env", "@babel/react"]
}
webpack bundles our app and its dependencies into a single file. Create another file webpack.config.js with the following code in it:
const path = require('path');
module.exports = {
  entry: {
    client: './src/client.js',
    bundle: './src/bundle.js'
  },
  output: {
    path: path.resolve(__dirname, 'assets'),
    filename: "[name].js"
  },
  module: {
    rules: [
      { test: /\.js$/, exclude: /node_modules/, loader: "babel-loader" }
    ]
 }
}
The build process output’s two files:
assets/bundle.js— pure client side app.assets/client.js— client side companion for SSR.
The src/ folder contains the source code. The Babel compiled files go into views/. views directory will be created automatically if not present. 😌
Why do we need to compile source files?
The reason is the syntax difference between ESM & CommonJS. While writing React and Redux, we heavily use import and export in all files.
Unfortunately, they don’t work in Node. Here comes Babel to rescue. The script below tells Babel to compile all files in the src directory and put the result in views.
"babel": "babel src -d views",
Now, Node can run them. 👏
Copy Precoded & Static files
If you have already cloned the repository, copy from it. Otherwise download ssr-static.zip file from Dropbox. Extract it and keep these three folders inside your app directory. Here’s what they contain.
- React
Appand components resides insrc/components. - Redux files in
src/redux/. assets/ & media/: Contain static files such asstyle.cssand images.
Server Side
Create two new files named server.js and template.js inside the src/ folder.
1. src/server.js
Magic happens here. This is the code you’ve been searching for.
import React from 'react'
import { renderToString } from 'react-dom/server'
import { Provider } from 'react-redux'
import configureStore from './redux/configureStore'
import App from './components/app'
module.exports = function render(initialState) {
  // Model the initial state
  const store = configureStore(initialState)
  let content = renderToString(
    <Provider store={store} >
       <App />
    </Provider>
  );
const preloadedState = store.getState()
return {content, preloadedState};
}
Instead of rendering our app, we need to wrap it into a function and export it. The function accepts the initial state of the application.
Here’s how it works.
- Pass
initialStatetoconfigureStore().configureStore()returns a new Store instance. Hold it inside thestorevariable. - Call
renderToString()method, providing our App as input. It renders our app on the server and returns the HTML produced. Now, the variablecontentstores the HTML. - Get the state out of Redux Store by calling
getState()onstore. Keep it in a variablepreloadedState. - Return the
contentandpreloadedState. We will pass these to our template to get the final HTML page.
2\. src/template.js
function template(title, initialState = {}, content = ""){
  let scripts = '';
  if(content){
    scripts = ` <script>
                   window.__STATE__ = ${JSON.stringify(initialState)}
                </script>
                <script src="assets/client.js"></script>
                `
  } else {
    scripts = ` <script src="assets/bundle.js"> </script> `
  }
  let page = `<!DOCTYPE html>
              <html lang="en">
              <head>
                <meta charset="utf-8">
                <title> ${title} </title>
                <link href="assets/style.css" rel="stylesheet">
              </head>
              <body>
                <div class="content">
                   <div id="app" class="wrap-inner">
                      <!--- magic happens here -->  ${content}
                   </div>
                </div>
                  ${scripts}
              </body>
              </html>
              `;

  return page;
}

module.exports = template;
template.js
template.js exports a function. It takes title, state and content as input. It injects them into the template and returns the final HTML document.
To pass along the state, the template attaches state to window.__STATE__ inside a <script> tag.
Now you can read state on the client side by accessing window.__STATE__.
We also include the SSR companion assets/client.js client-side application in another script tag.
If you request the pure client version, it only puts assets/bundle.js inside the script tag.
The Client Side
The client side is pretty straightforward.
1. src/bundle.js
This is how you write the React and Redux Provider wrap. It is our pure client-side app. No tricks here. 😅
import React from 'react'
import {render} from 'react-dom'
import {Provider} from 'react-redux'
import configureStore from './redux/configureStore'
import App from './components/app'
const store = configureStore()
render(
  <Provider store={store} >
     <App />
  </Provider>,
  document.querySelector('#app')
)
2. src/client.js
Looks familiar? Yeah, there is nothing special except window.__STATE__. All we need to do is grab the initial state from window.__STATE__ and pass it to our configureStore() function as the initial state.
Let’s take a look at our new client file:
import React from 'react'
import {hydrate} from 'react-dom'
import {Provider} from 'react-redux'
import configureStore from './redux/configureStore'
import App from './components/app'
const state = window.__STATE__;
delete window.__STATE__;
const store = configureStore(state)
hydrate(
  <Provider store={store} >
     <App />
  </Provider>,
  document.querySelector('#app')
)
Let’s review the changes:
- Replace
render()withhydrate().[hydrate()](https://reactjs.org/docs/react-dom.html#hydrate)is the same asrender()but is used to hydrate elements rendered by[ReactDOMServer](https://reactjs.org/docs/react-dom-server.html). It ensures that the content is the same on the server and the client. - Read the state from the global window object
window.__STATE__. Store it in a variable and delete thewindow.__STATE__. - Create a fresh store with
stateas initialState.
All done here.
Putting it all together
Index.js
This is the entry point of our application. It handles requests and templating.
const express = require('express'),
          app = express(),
     template = require('./views/template')
         path = require('path');


// Serving static files
app.use('/assets', express.static(path.resolve(__dirname, 'assets')));
app.use('/media', express.static(path.resolve(__dirname, 'media')));

// hide powered by express
app.disable('x-powered-by');
// start the server
app.listen(process.env.PORT || 3000);

// our apps data model
const data = require('./assets/data.json');

let initialState = {
  isFetching: false,
  apps: data
}

//SSR function import
const ssr = require('./views/server');

// server rendered home page
app.get('/', (req, res) => {
  const { preloadedState, content}  = ssr(initialState)
  const response = template("Server Rendered Page", preloadedState, content)
  res.setHeader('Cache-Control', 'assets, max-age=604800')
  res.send(response);
});

// Pure client side rendered page
app.get('/client', (req, res) => {
  let response = template('Client Side Rendered page')
  res.setHeader('Cache-Control', 'assets, max-age=604800')
  res.send(response);
});

// tiny trick to stop server during local development

  app.get('/exit', (req, res) => {
    if(process.env.PORT) {
      res.send("Sorry, the server denies your request")
    } else {
      res.send("shutting down")
      process.exit(0)
    }

  });
index.js
It also declares an initialState variable. I have modelled it with data in the assets/data.json file. We will pass it to our ssr() function.
Note: While referencing a file that is inside _src/_ from a file outside _src/_, use normal _require()_ and replace _src/_ by _views/_. You know the reason (Babel compile).
Routing
/: By default server-rendered homepage./client: Pure client-side rendering example./exit: Server stop button. Only available in development.
Build & Run
It’s time to build and run our application. We can do this with a single line of code.
npm run build && npm run start
Now, the application is running at http://localhost:3000.
Ready to become a React Pro?
I am starting a new series from next Monday to get your React skills blazing, immediately.

Thank you for reading this!
30s ad
☞ Master ReactJS: Learn React JS from Scratch
☞ Learn ReactJS: Code Like A Facebook Developer
☞ ReactJS Course: Learn JavaScript Library Used by Facebook&IG
☞ React: Learn ReactJS Fundamentals for Front-End Developers
Suggest:
☞ JavaScript for React Developers | Mosh
☞ Getting Closure on React Hooks
☞ React vs Vue - I Built the Same App in Both Frameworks
☞ Javascript Project Tutorial: Budget App
☞ React + TypeScript : Why and How
☞ Build a React.js application and add Authentication with Auth0