Building a GraphQL Server with Node.js and Express

In a previous article Building your first GraphQL Server, I’ve covered what different artefacts and types that make out a GraphQL server. In this article we will focus more on how to build a service, powered by GraphQL that clients can consume. We will also introduce a playground environment called GraphiQL that gives us a UI in which we can test our queries out.

A GraphQL Server consists of the following:
- a schema, the schema defines our entities but also what we can query or call a mutation on
- resolvers, resolver functions talks to a 3rd party API or our database and ends up returning data back to our user
Install dependencies
Let’s start off by installing our needed dependencies. We need the following:
- express, to create our web server
- graphql, to install graphql, our core lib that enables us to leverage graphql
- express-graphql, this library enables us to bind together graphql and express
express + graphql (only)
Let’s start off by only install graphql and express to understand what that gives us:
npm install express graphql
Thereafter let’s create an express HTTP server, like so:
// schema.mjs
import {
  graphql,
  GraphQLSchema,
  GraphQLObjectType,
  GraphQLString,
  GraphQLList
} from “graphql”;
let humanType = new GraphQLObjectType({
  name: “Human”,
  fields: () => ({
    id: { type: GraphQLString },
    description: { type: GraphQLString },
    name: { type: GraphQLString }
  })
});
import people from “./data/people”;
let schema = new GraphQLSchema({
  query: new GraphQLObjectType({
  name: “RootQueryType”,
  fields: {
    hello: {
      type: GraphQLString,
      resolve() {
        return “world”;
      }
    },
    person: {
      type: humanType,
      resolve() {
        return people[0];
      }
    },
    people: {
      type: new GraphQLList(humanType),
      resolve() {
        return people;
      }
    }
  }
})
});
export { graphql };
export default schema;
This is a pretty simple schema that declare hello, person and people as queryable keywords and it also creates humanType as a custom type.
Short comment on the file ending .mjs. What we are doing here is to leverage experimental support for ESM/EcmaScript modules. The way they are currently implemented in NodeJS forces us to have a file ending of .mjs.
Next up is the app itself that is just a basic express application looking like this:
// app.mjs
import express from “express”;
const app = express();
const port = 3000;
import schema, { graphql } from “./schema”;

app.get(“/”, (req, res) => {
  let query = `{ hello, person { name }, people { name, description } }`;
  graphql(schema, query).then(result => {
    res.json(result);
  });
});
app.listen(port, () => console.log(`Example app listening on port port!`));
Above we are declaring a default route by calling:
app.get("/", (req, res) => {
});
Then we add the graphql part by invoking it with parameters schema and query, like so:
graphql(schema, query).then(result => {
  res.json(result);
});
As we can see above invoking graphql means we get a promise back and on the then() callback we are able to see the result from our query. All together we can see how graphql and express can interact.
Lastly to run this we need to specify a start command in our package.json file that invokes the experimental support for ESM modules. It needs to look like so:
// excerpt from package.json
“start”: “node — experimental-modules app.mjs”
adding express-graphql
We just showed how we can use express and graphql and create a REST api, but we can do this better by adding express-graphql, so let’s do that as our next thing:
npm install express-graphql
Let’s do something else first, for ourselves, namely use the buildSchema() method and set up a schema that way, like so:
var { buildSchema } = require(“graphql”);
var schema = buildSchema(`
  type Product {
    name: String,
    id: Int
  },
  type Query {
    hello: String,
    products: [Product]
  }
`);
Above we can see that we define the custom type Product and we also define our queries being hello and products.
We also need some resolver functions with that which we define next:
var root = {
  hello: () => {
    return "Hello world!";
  },
  products: () => {
    return getProducts();
  }
};
Lastly, we are able to clean up our code a bit so our code for starting our server looks like this now:
var graphqlHTTP = require("express-graphql");
app.use(
  '/graphql',
  graphqlHTTP({
    schema: schema,
    rootValue: root,
    graphiql: true
  })
);
That’s it, we don’t actually need to define any routes but we leave that up to graphql. We can see that graphqlHTTP() is a function that we get from express-graphql
Now we have all the bits in place.
Graphiql
When we called our graphqlHTTP() function we provided it with a configuration object that had the following properties set:
- schema, our GraphQL schema
- rootValue, our resolver functions
- graphiql, a boolean stating wether to use
graphiql, we want that so we passtruehere
Next step is to try out graphiql which we do by navigating to http://localhost:4000/graphql and voila, this is what you should be seeing:
Ok great, a visual interface, now what?
Well now you can start creating Graphql queries. To know what to query for, have a look at what you defined in the schema.
We expect that we will be able to query for hello and products as we set those up in our schema. So let’s do that:
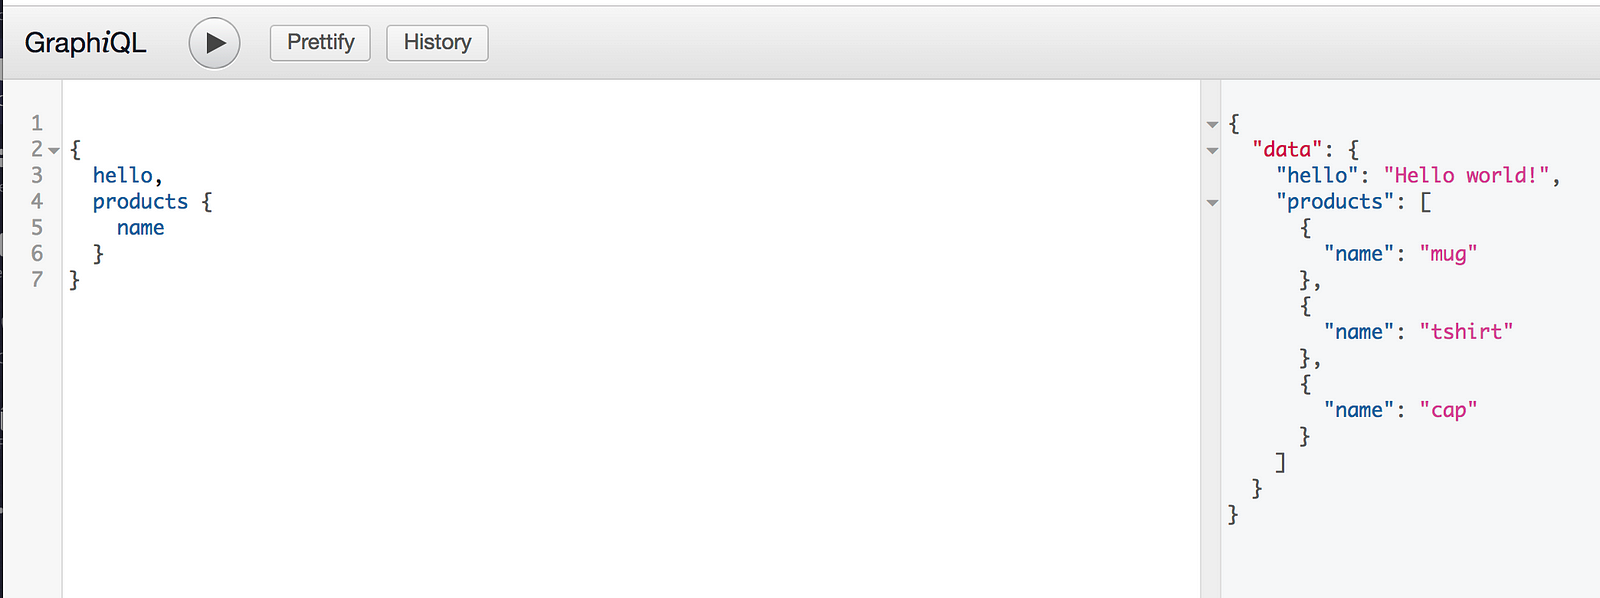
Ok then, you should be seeing the above by hitting the play icon. As you can see this is a very useful tool to debug your queries but it can also be used to debug your mutations.
Parameterized query
Let’s try to write a query with parameters in graphiql:
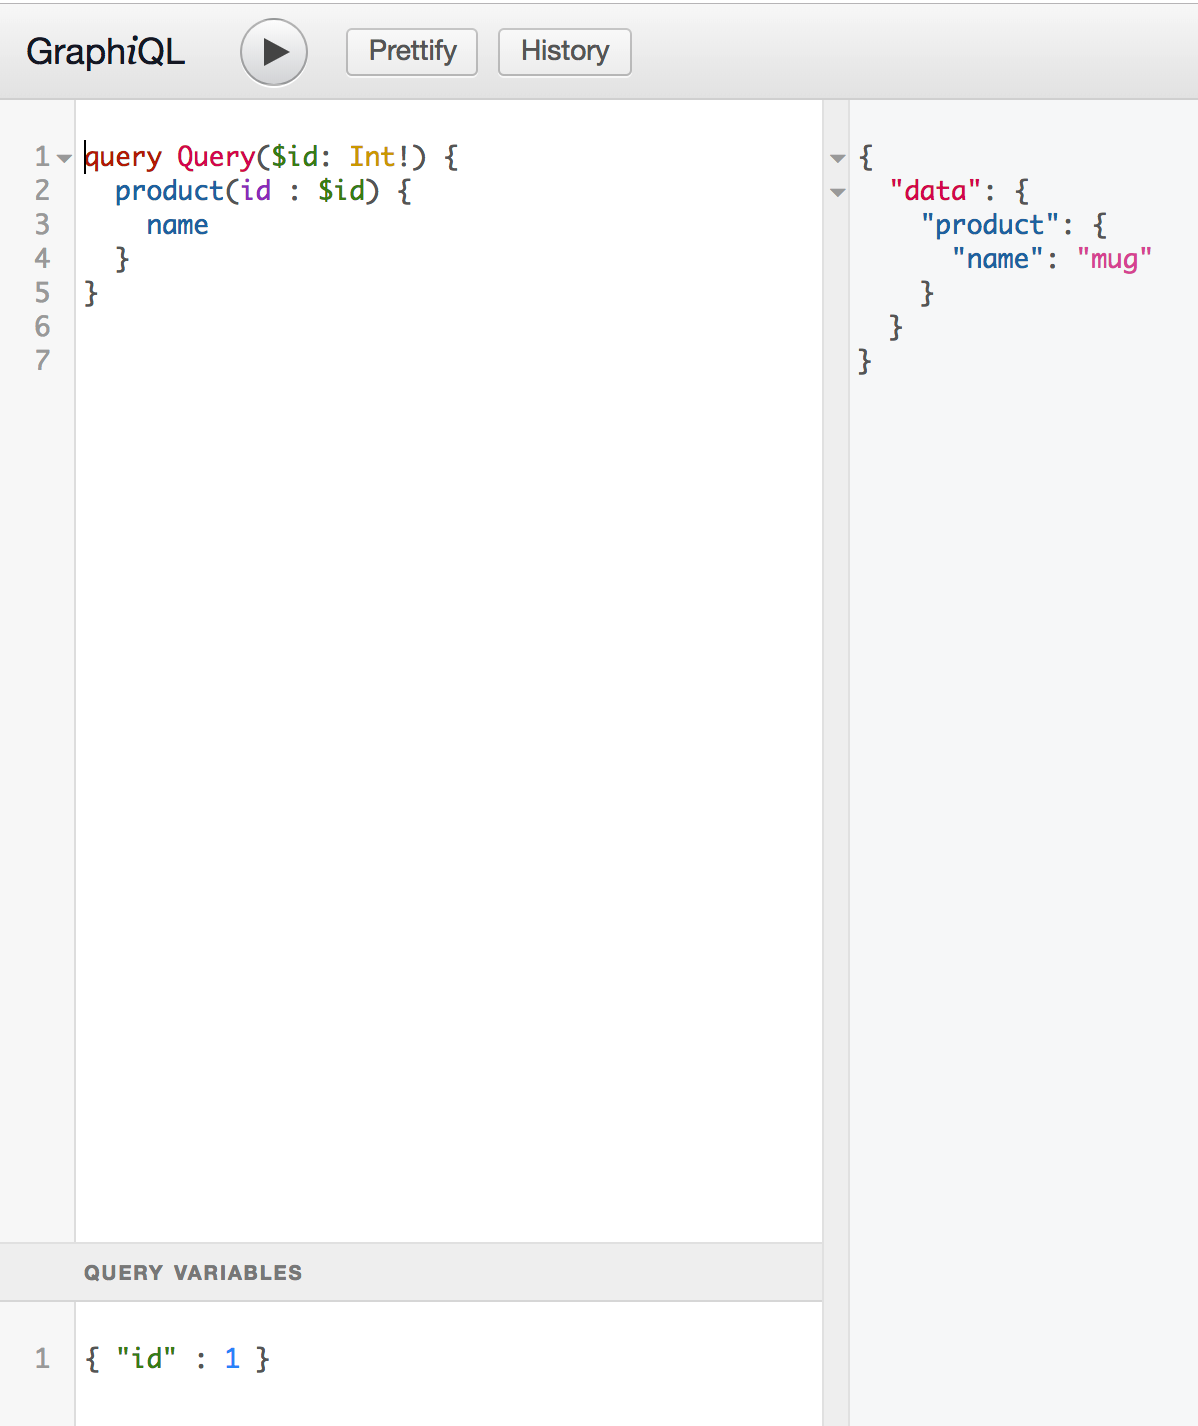
Above we can see how we define our query by using the keyword query. Thereafter we give it a name Query followed by parenthesis. Within the parenthesis we have the input parameter that we denote with <div class="section-inner sectionLayout--insetColumn" character. In this case we call our parameter id, which means its full name is $id`. Let’s look at what we got:
query Query($id: Int!) {
  // our actual query
}
Now it’s time to write our actual query, so let’s do that next:
product(id: $id) {
  name
}
As you can see we use the $id from our query construction and the full result looks like this:
query Query($id: Int!) {
  product(id: $id) {
    name
  }
}
NOTE: at the bottom of the screen we have a section called
query variablesthat let’s us define variables we want to use as input. So when we define something as$name_of_variableit will look into thequery variablessection
calling a Mutation
To invoke a mutation we need the mutation keyword. Let’s create our mutation invocation next:
mutation MyMutation {
  addProduct(name: "product", description: "description of a product")
}
NOTE: if we return a complex object we need to select what columns we want, like so
mutation MyMutation {
  addProduct(name: "product", description: "description of a product"){
    col1,
    col2
  }
}
Summary
To build an API we have used the NPM libraries express, graphql. However by adding express-graphql we have gained access to a visual environment called graphiql that enables us to pose queries and run mutations so we can verify that our API works as intended
If you want to look at an existing repo, have a look here Demo repo
30s ad
☞ ChatBots: Messenger ChatBot with API.AI and Node.JS
☞ Master the MEAN Stack - Learn By Example
☞ Build a Real Time web app in node.js , Angular.js, mongoDB
Suggest:
☞ JavaScript Programming Tutorial Full Course for Beginners
☞ Learn JavaScript - Become a Zero to Hero
☞ Learn GraphQL with Laravel and Vue.js - Full Tutorial
☞ Javascript Project Tutorial: Budget App
☞ Build A Restful Api With Node.js Express & MongoDB | Rest Api Tutorial