Create a Vue.js app using Single-File Components, without the CLI

How to create a Vue.js app using Single-File Components, without the CLI.
An understanding of Vue’s single-file components (SFCs) and Node Package Manager (NPM) will be helpful for this article.
A framework’s command line interface, or CLI, is the preferred method to scaffold a project. It provides a starting point of files, folders, and configuration. This scaffolding also provides a development and build process. A development process provides a way to see updates occurring as you edit your project. The build process creates the final version of files to be used in production.
Installing and running Vue.js (“Vue”) can be done with a script tag that points to the Vue content delivery network (CDN). No build or development process is necessary. But, if you use Vue single-file components (SFCs), you need to convert those files into something the browser can understand. The files need to be converted to Hyper-Text Markup Language (HTML), Cascading Style Sheets (CSS), and JavaScript (JS). In this case, a development and build process must be used.
Instead of relying on the Vue CLI to scaffold our project and provide us with a development and build process, we will build a project from scratch. We will create our own development and build process using Webpack.
What is Webpack?
Webpack is a module bundler. It merges code from multiple files into one. Before Webpack, the user included a script tag for each JavaScript file. Although browsers are slowly supporting ES6 modules, Webpack continues to be the preferred way to build modular code.
Besides being a module bundler, Webpack can also transform code. For example, Webpack can take modern JavaScript (ECMAScript 6+) and convert it into ECMAScript 5. While Webpack bundles the code itself, it transforms the code with loaders and plugins. Think of loaders and plugins as add-ons for Webpack.
Webpack and Vue
Single-file components allow us to build an entire component (structure, style, and function) in one file. And, most code editors provide syntax highlighting and linting for these SFCs.
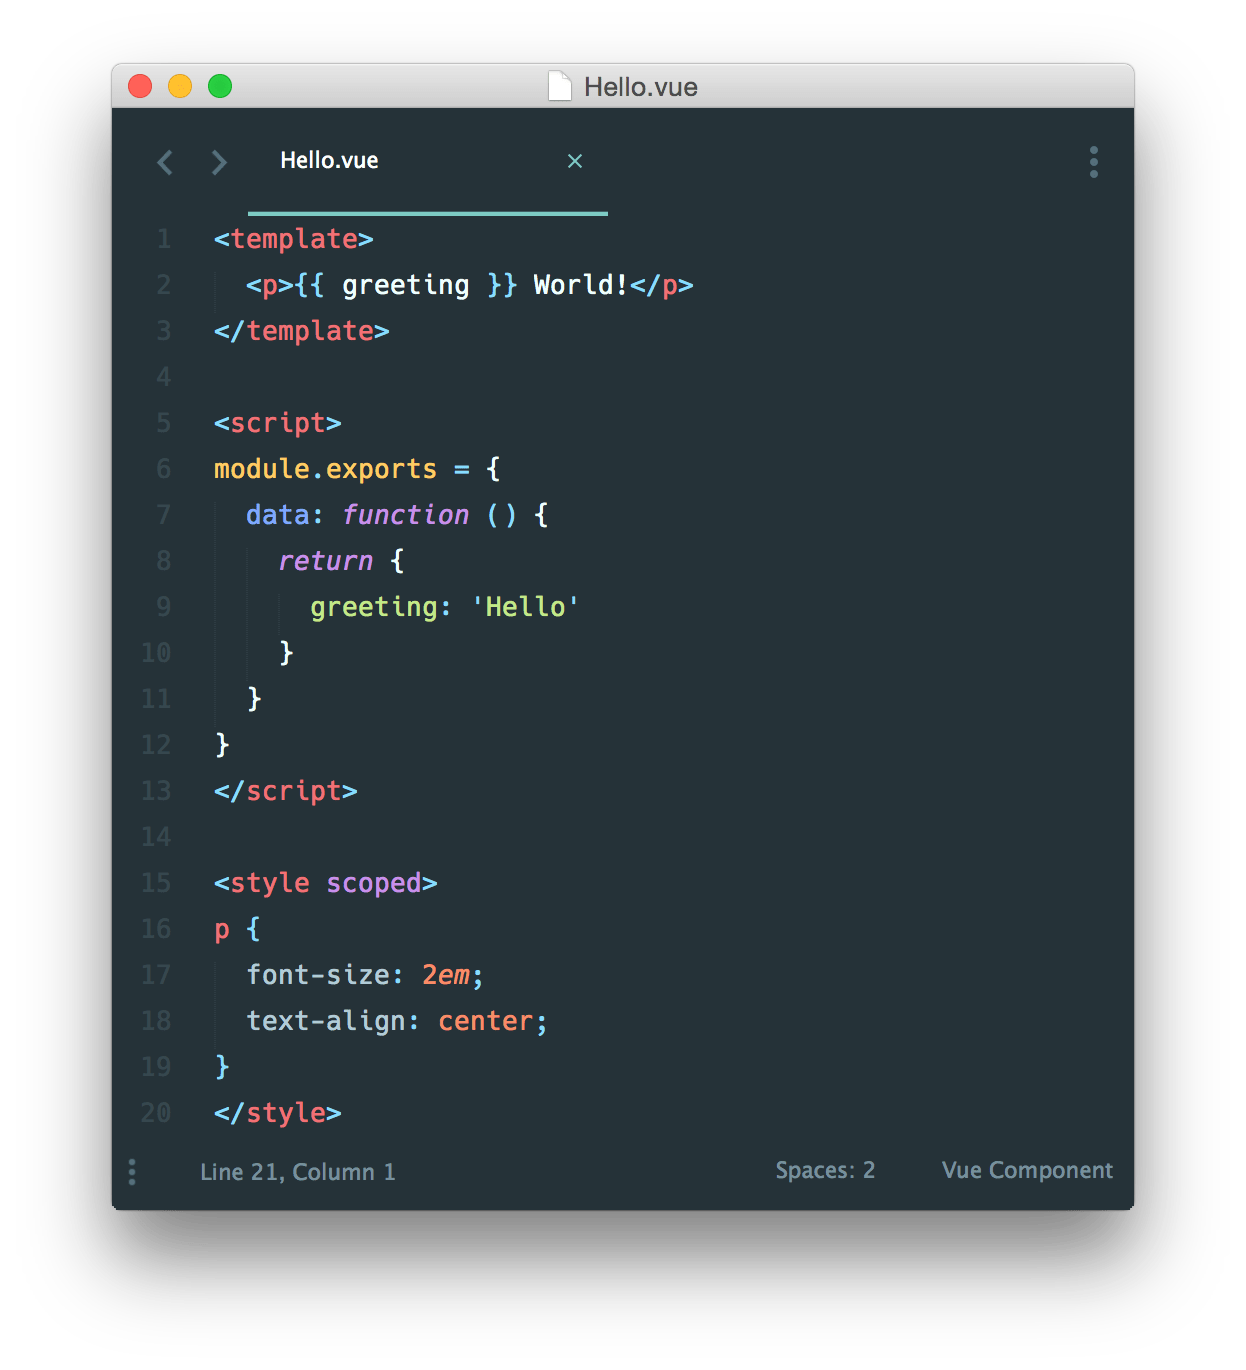
Notice the file ends with .vue. The browser doesn’t know what to do with that extension. Webpack, through the use of loaders and plugins, transforms this file into the HTML, CSS, and JS the browser can consume.
The Project: Build a Hello World Vue Application Using Single-File Components.
Step 1: Create the project structure
The most basic Vue project will include an HTML, JavaScript, and a Vue file (the file ending in .vue). We will place these files in a folder called src. The source folder will help us separate the code we are writing from the code Webpack will eventually build.
Since we will be using Webpack, we need a Webpack configuration file.
Additionally, we will use a compiler called Babel. Babel allows us to write ES6 code which it then compiles into ES5. Babel is one of those “add-on features” for Webpack. Babel also needs a configuration file.
Finally, since we are using NPM, we will also have a node_modules folder and a package.json file. Those will be created automatically when we initialize our project as an NPM project and begin installing our dependencies.
To get started, create a folder called hello-world. From the command line, change to that directory and run npm init. Follow the on-screen prompts to create the project. Then, create the rest of the folders (except for node_modules) as described above. Your project structure should look like this:

Step 2: Install the dependencies
Here is a quick rundown of the dependencies we are using:
vue: The JavaScript framework
vue-loader and vue-template-compiler: Used to convert our Vue files into JavaScript.
webpack: The tool that will allow us to pass our code through some transformations and bundle it into one file.
webpack-cli: Needed to run the Webpack commands.
webpack-dev-server: Although not needed for our small project (since we won’t be making any HTTP requests), we will still “serve” our project from a development server.
babel-loader: Transform our ES6 code into ES5. (It needs help from the next two dependencies.)
@babel/core and @babel/preset-env: Babel by itself doesn’t do anything to your code. These two “add-ons” will allow us to transform our ES6 code into ES5 code.
css-loader: Takes the CSS we write in our .vuefiles or any CSS we might import into any of our JavaScript files and resolve the path to those files. In other words, figure out where the CSS is. This is another loader that by itself won’t do much. We need the next loader to actually do something with the CSS.
vue-style-loader: Take the CSS we got from our css-loader and inject it into our HTML file. This will create and inject a style tag in the head of our HTML document.
html-webpack-plugin: Take our index.html and inject our bundled JavaScript file in the head. Then, copy this file into the distfolder.
rimraf: Allows us, from the command line, to delete files. This will come in handy when we build our project multiple times. We will use this to delete any old builds.
Let’s install these dependencies now. From the command line, run:
npm install vue vue-loader vue-template-compiler webpack webpack-cli webpack-dev-server babel-loader @babel/core @babel/preset-env css-loader vue-style-loader html-webpack-plugin rimraf -D
Note: The “-D” at the end marks each dependency as a development dependency in our package.json. We are bundling all dependencies in one file, so, for our small project, we have no production dependencies.
Step 3: Create the files (Except for our Webpack configuration file).
<template>
  <div id="app">
    {{ message }}
  </div>
</template>

<script>
export default {
  data() {
    return {
      message: 'Hello World',
    };
  },
};
</script>

<style>
#app {
  font-size: 18px;
  font-family: 'Roboto', sans-serif;
  color: blue;
}
</style>
a1-App.vue
<html>
  <head>
    <title>Vue Hello World</title>
  </head>
  <body>
    <div id="app"></div>
  </body>
</html>
a1-index.html
import Vue from 'vue';
import App from './App.vue';

new Vue({
  el: '#app',
  render: h => h(App),
});
a1-main.js
module.exports = {
  presets: ['@babel/preset-env'],
}
a1-.babelrc.js
Up to this point, nothing should look too foreign. I’ve kept each file very basic. I’ve only added minimal CSS and JS to see our workflow in action.
Step 4: Instructing Webpack what to do
All the configuration Webpack needs access to is now present. We need to do two final things: Tell Webpack what to do and run Webpack.
Below is the Webpack configuration file (webpack.config.js). Create this file in the projects root directory. Line-by-line we’ll discuss what is occurring.
const HtmlWebpackPlugin = require('html-webpack-plugin');
const VueLoaderPlugin = require('vue-loader/lib/plugin');

module.exports = {
  entry: './src/main.js',
  module: {
    rules: [
      { test: /\.js$/, use: 'babel-loader' },
      { test: /\.vue$/, use: 'vue-loader' },
      { test: /\.css$/, use: ['vue-style-loader', 'css-loader']},
    ]
  },
  plugins: [
    new HtmlWebpackPlugin({
      template: './src/index.html',
    }),
    new VueLoaderPlugin(),
  ]
};
a1-webpack.config.js
Lines 1 and 2: We are importing the two plugins we use below. Notice, our loaders don’t normally need to be imported, just our plugins. And in our case, thevue-loader (which we use in line 9) also needs a plugin to work (however, Babel, for example, does not).
Line 4: We export our configuration as an object. This gives us access to it when we run the Webpack commands.
Line 5: This is our entry module. Webpack needs a place to start. It looks in our main.js file and then starts to comb through our code from that point.
Line 6 and 7: This is the module object. Here, we primarily pass in an array of rules. Each rule tells Webpack how to handle certain files. So, while Webpack uses the entry point of main.js to start combing through our code, it uses the rules to transform our code.
Line 8 (rule): This rule instructs Webpack to use the babel-loader on any files which end with .js. Remember, Babel will transform ES6+ to ES5.
Line 9 (rule): This rule instructs Webpack to use vue-loader(and don’t forget the associated plugin on line 17) to transform our .vue files into JavaScript.
Line 10 (rule): Sometimes we want to pass a file through two loaders. Counterintuitively, Webpack will pass the file from right to left instead of left to right. Here we are using two loaders and saying to Webpack: “get my CSS from my Vue file or any JavaScript files(css-loader) and inject it into my HTML as a style tag (vue-style-loader).
Lines 11 and 12: Close out our rules array and module object.
Lines 13: Create a plugins array. Here we will add the two plugins we need.
Line: 14 -16 (plugin): The HtmlWebpackPlugin takes the location of our index.html file and adds our bundled JavaScript file to it via a script tag. This plugin will also copy the HTML file to our distribution folder when we build our project.
Line 17 (plugin): The VueLoaderPlugin works with our vue-loader to parse our .vue files.
Line 18: Close out the plugins array.
Line 19: Close out the Webpack object that we are exporting.
Step 5: Setting up our package.json file so we can run Webpack
Our configuration is complete, now we want to see our application. Ideally, as we make changes to our application, the browser would update automatically. This is possible with webpack-dev-server.
Delete the test script in our package.json file, and replace it with a script to serve our application:
{
  "name": "hello-world",
  "version": "1.0.0",
  "description": "",
  "main": "main.js",
  "scripts": {
    "serve": "webpack-dev-server --mode development"
  },
  "author": "",
  "license": "ISC",
  "devDependencies": {
    "@babel/core": "^7.1.6",
    "@babel/preset-env": "^7.1.6",
    "babel-loader": "^8.0.4",
    "css-loader": "^1.0.1",
    "html-webpack-plugin": "^3.2.0",
    "rimraf": "^2.6.2",
    "vue": "^2.5.17",
    "vue-loader": "^15.4.2",
    "vue-style-loader": "^4.1.2",
    "vue-template-compiler": "^2.5.17",
    "webpack": "^4.26.0",
    "webpack-cli": "^3.1.2",
    "webpack-dev-server": "^3.1.10"
  },
  "dependencies": {}
}
a1-package.json
The name of this command is your choice. I chose to call mine serve since we will be serving our application.
From our terminal or command line, we can run npm run serve and that in turn will run webpack-dev-server --mode development .
The _--mode development_ is what’s called a flag or option. We haven’t talked about this, but it essentially instructs Webpack that you are in development mode. We can also pass in _--mode production_ which we will do when we build our project. These aren’t necessarily required for Webpack to work. Without these, you will get a warning message telling you to provide a mode when you run Webpack .
I say “necessarily required” because Webpack will minimize our code in production mode but not in development. So, don’t think those commands don’t do anything–they do.
Let’s run npm run serve and see what happens.
When we run npm run serve we get some output in our terminal. And, if everything goes well:

And if we scroll up a bit:

Point your browser to http://localhost:8080. You will see your Blue Hello World message in Roboto font.

Now, let’s update the project and change the message to Hello Universe. Notice that the webpage refreshes automatically. That’s great, right? Can you think of a downside?
Let’s change the application just a bit and include an input which we will bind a variable to (with v-model). We will output the variable in an <h2>tag below the input. I’ve also updated the styling section to style the message now. Our App.vuefile should look like this:
<template>
  <div id="app">
    <input
      v-model="message"
      type="text">
      <h2 class="message">{{ message }}</h2>
  </div>
</template>

<script>
export default {
  data() {
    return {
      message: 'Hello world!',
    };
  },
};
</script>

<style>
.message {
  font-size: 18px;
  font-family: 'Roboto', sans-serif;
  color: blue;
}
</style>
a11-App.vue
When we serve our application, we will have an input with a message of Hello World below it. The input is bound to the message variable, so as we type, we change the <h2> content. Go ahead, type into the input to change the <h2>content.
Now go back to your editor, and below the <h2>tag, add the following:
<h3>Some Other Message</h3>
Save your App.vue and watch what happens.
The h2 we just updated by typing in our input reverted back to Hello World. This is because the browser actually refreshes, and the script tag and page are loaded again. In other words, we were not able to maintain the state of our application. This may not seem like a big deal, but as you are testing your application and adding data to it, it will be frustrating if your app “resets” every time. Fortunately, Webpack offers us a solution called Hot Module Replacement.
The hot module replacement is a plugin provided by Webpack itself. Up until this point, we have not used the Webpack object itself in our configuration file. However, we will now import Webpack so we can access the plugin.
In addition to the plugin, we will pass one additional option to Webpack, the devServer option. In that option, we will set hot to true. Also, we will make an (optional) update to our build workflow: We will open the browser window automatically when we run npm run serve. We do this by setting open to true which is also inside the devServer option.
const HtmlWebpackPlugin = require('html-webpack-plugin');
const VueLoaderPlugin = require('vue-loader/lib/plugin');
const webpack = require('webpack');

module.exports = {
  entry: './src/main.js',
  module: {
    rules: [
      { test: /\.js$/, use: 'babel-loader' },
      { test: /\.vue$/, use: 'vue-loader' },
      { test: /\.css$/, use: ['vue-style-loader', 'css-loader']},
    ]
  },
  devServer: {
    open: true,
    hot: true,
  },
  plugins: [
    new HtmlWebpackPlugin({
      template: './src/index.html',
    }),
    new VueLoaderPlugin(),
    new webpack.HotModuleReplacementPlugin(),
  ]
};
a11-webpack.config.js
Notice that we’ve imported Webpack so we could access the hotModuleReplacementPlugin. We’ve added that to the plugins array, and then told Webpack to use it with hot: true. We open the browser window automatically when we serve the application with open: true.
Run npm run serve:
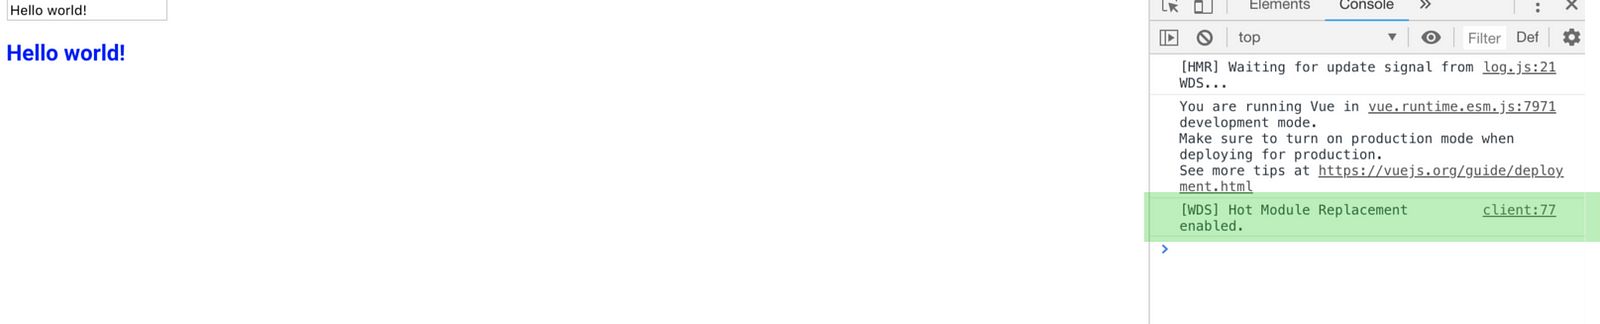
The browser window should open, and if you open your dev tools, you should notice a slight change in the output. It now tells us hot module replacement is enabled. Let’s type in our input to change the <h2> content. Then, change theh3 tag to read: One More Message.
Save your file and notice what happens.
The browser doesn’t refresh, but our <h3>change is reflected! The message we typed in the input remains, but the h3 updates. This allows our application to keep it’s state while we edit it.
Step 7: Building our project
So far, we’ve served our application. But, what if we want to build our application so we can distribute it?
If you noticed, when we serve our application, no files are created. Webpack creates a version of these files that only exist in temporary memory. If we want to distribute our Hello World app to our client, we need to build the project.
This is very simple. Just like before, we will create a script in our package.json file to tell Webpack to build our project. We will use webpack as the command instead of webpack-dev-server. We will pass in the --mode production flag as well.
We will also use the rimraf package first to delete any previous builds we may have. We do this simply by rimraf dist.
_dist_ is the folder Webpack will automatically create when it builds our project. “Dist” is short for distribution–i.e. we are “distributing” our applications code.
The rimraf dist command is telling therimraf package to delete the dist directory. Make sure you don’t rimraf src by accident!
Webpack also offers a plugin that will accomplish this cleaning process called _clean-webpack-plugin_. I chose _dist_ show an alternative way.
Our package.json file should look like this:
{
  "name": "hello-world",
  "version": "1.0.0",
  "description": "",
  "main": "main.js",
  "scripts": {
    "clean": "rimraf dist",
    "build": "npm run clean && webpack --mode production",
    "serve": "webpack-dev-server --mode development"
  },
  "author": "",
  "license": "ISC",
  "devDependencies": {
    "@babel/core": "^7.1.6",
    "@babel/preset-env": "^7.1.6",
    "babel-loader": "^8.0.4",
    "css-loader": "^1.0.1",
    "html-webpack-plugin": "^3.2.0",
    "rimraf": "^2.6.2",
    "vue": "^2.5.17",
    "vue-loader": "^15.4.2",
    "vue-style-loader": "^4.1.2",
    "vue-template-compiler": "^2.5.17",
    "webpack": "^4.26.0",
    "webpack-cli": "^3.1.2",
    "webpack-dev-server": "^3.1.10"
  },
  "dependencies": {}
}
a11-package.json
There are three things to notice:
- I’ve created a separate
cleanscript so we can run it independently of our build script. npm run buildwill call the independentcleanscript we’ve created.- I have
&&betweennpm run cleanandwebpack. This instruction says: “runnpm run cleanfirst, then runwebpack”.
Let’s build the project.
npm run build
Webpack creates a dist directory, and our code is inside. Since our code makes no HTTP requests, we can simply open our index.html file in our browser and it will work as expected.
If we had code that was making HTTP requests, we would run into some cross-origin errors as we made those requests. We would need to run that project from a server for it to work.
Let’s examine the index.html that Webpack created in the browser and the code editor.

If we open it in our editor or take a look at the source code in our dev tools you will see Webpack injected the script tag. In our editor though, you won’t see the styles because the style tag is injected dynamically at runtime with JavaScript!
Also, notice our development console information is no longer present. This is because we passed the --production flag to Webpack.
Conclusion
Understanding the build process behind the frameworks you use will help you to better understand the framework itself. Take some time to try to build an Angular, React or another Vue Project without the use of the respective CLIs. Or, just build a basic three-file site (index.html, styles.css, and app.js), but use Webpack to serve and build a production version.
Thanks for reading!
30s ad
☞ Vuejs 2 y Vuex desde 0 con las mejores prácticas
☞ Secure Your VueJs Applications With Auth0
☞ Crea Sistemas de Compras - Ventas con Laravel 5.7 y VuejS
☞ Desarrolla sistemas Web en ASP Net Core, SQL Server y Vuejs
☞ Desarrollo web en PHP con Laravel 5.6, VueJS y MariaDB Mysql
Suggest:
☞ JavaScript Programming Tutorial Full Course for Beginners
☞ Learn JavaScript - Become a Zero to Hero
☞ Javascript Project Tutorial: Budget App
☞ E-Commerce JavaScript Tutorial - Shopping Cart from Scratch