File upload with Laravel and VueJS
At some point in the development of a system, every developer will come across file uploads. Of course, for those with less experience, this can be a bit tricky. And when you want to make the system simpler and more practical for the end user, this task can give you some headaches. This tutorial aims to be an initial step by step to facilitate the development of this process.
Prerequisites
For this tutorial I will assume that you already have a Laravel project and have basic knowledge in PHP, VueJS, and Laravel itself.
I will also assume that you will be using a modern browser with support for objects of the FormData type.
The Backend
First of all, our system should save our files to some directory. Laravel has a powerful file system that is very simple to configure. We can use our local directory to store our files, or use servers in the cloud, like Amazon S3, for example. For this tutorial, we will use the local directory driver.
In your Laravel project, open the config/filesystems.php file. Find the “disks” index. There you will find several preconfigured disks to use. Let’s then create our new disk, which will store our new files. Below the local disk, enter the following code:
'uploads' => [
    'driver' => 'local',
    'root' => storage_path().'/files/uploads',
],
We will call our new disk of “uploads”. It will use the “local” driver, ie the files will be stored on your computer, or on the server itself. And finally, it will be located in storage/files/uploads, in your Laravel project.
Now that we have our space to store the files, we also want to save your reference in the database, so that we can access them more easily in the system.
At the terminal, type the following command:
php artisan make:migration create_file_entries_table
This command will generate your migration file in the database/migrations directory to create its table in the database. Adding the desired fields, the migration file should look like this:
class CreateFileEntriesTable extends Migration
{
    /**
     * Run the migrations.
     *
     * @return void
     */
    public function up()
    {
        Schema::create('file_entries', function (Blueprint $table) {
            $table->increments('id');
            $table->string('filename');
            $table->string('mime');
            $table->string('path');
            $table->integer('size');
            $table->timestamps();
        });
    }

    /**
     * Reverse the migrations.
     *
     * @return void
     */
    public function down()
    {
        Schema::dropIfExists('file_entries');
    }
}
I called our table of file_entries, but you can put the name you want. In it, besides the default id and timestamps (created_at and updated_at), we have the following fields:
- filename: Original name of the file;
- mime: Mimetype of the file;
- path: Internal directory that the file will be saved (I’ll explain why)
- size: Size of the file.
Now, we need our Model and also our Controller to manage our uploaded files. At the terminal enter the following commands:
php artisan make:model FileEntry
php artisan make:controller FileEntriesController
In the model, we should add the fields that will be filled in our database table whenever we upload files. It should look like this:
class FileEntry extends Model
{
    protected $fillable = ['filename', 'mime', 'path', 'size'];
}
In our controller, we must create the method you want to receive the post from our file upload form, and treat it, saving in the correct place and also in the database. Open the app/Http/Controllers/FileEntriesController.php controller and create the uploadFile method as follows:
public function uploadFile(Request $request) {
        $file = Input::file('file');
        $filename = $file->getClientOriginalName();

        $path = hash( 'sha256', time());

        if(Storage::disk('uploads')->put($path.'/'.$filename,  File::get($file))) {
            $input['filename'] = $filename;
            $input['mime'] = $file->getClientMimeType();
            $input['path'] = $path;
            $input['size'] = $file->getClientSize();
            $file = FileEntry::create($input);

            return response()->json([
                'success' => true,
                'id' => $file->id
            ], 200);
        }
        return response()->json([
            'success' => false
        ], 500);
    }
First, we will receive the data from the file sent by the form in $file = Input::file(‘file’), where ‘file’ should be the field name in the form. Next, we get the original file name in $filename = $file->getClientOriginalName(). Then we will create the path that will store the file inside our disk: $path = hash( ‘sha256’, time()). I choose to create a path in this way, with a random hash based on the current time and date, so that the files are safer from direct access, since the address of the files will be, for example, as follows: storage/files/uploads/3e8f4a2e6d26c205e52ebcf6518e84bba96ccc9499f01c24448e939cbcb9f8d4/filename.jpg.
Next, we will select our newly created disk (uploads), get the file uploaded (File::get($file)), and save it in the correct location ($path.’/’.$filename) with put method: Storage::disk(‘uploads’)->put($path.’/’.$filename, File::get($file)).
If successful, we will save the data in our table using the create method: $file = FileEntry::create($input), and return a JSON response confirming success with the id of the newly created file. If the upload fails, a JSON will be returned informing you that a failure has occurred.
Now the Frontend
To streamline project development, and focus on uploading files, I’ll use the default CSS that comes with Laravel. First, to make our system secure and import the default layout, run the following command on the terminal:
php artisan make:auth
It will create login, registry and password recovery pages.
Now create the directory resources/views/files and inside it the index.blade.php file with the following code:
@extends('layouts.app')

@section('content')
<div class="container">
    <div class="row justify-content-center">
        <div class="col-md-8">
            <div class="card">
                <div class="card-header">Files <a href="{{ url('files/create') }}" class="btn btn-info">Add files</a> </div>

                <div class="card-body">
                    @if($files->count())
                        <table class="table">
                            <th>Name</th>
                            <th>Size</th>
                            @foreach($files as $file)
                                <tr>
                                    <td>{{ $file->filename }}</td>
                                    <td>{{ $file->size }} Bytes</td>
                                </tr>
                            @endforeach
                        </table>
                    @else
                        You have no files yet!
                    @endif
                </div>
            </div>
        </div>
    </div>
</div>
@endsection
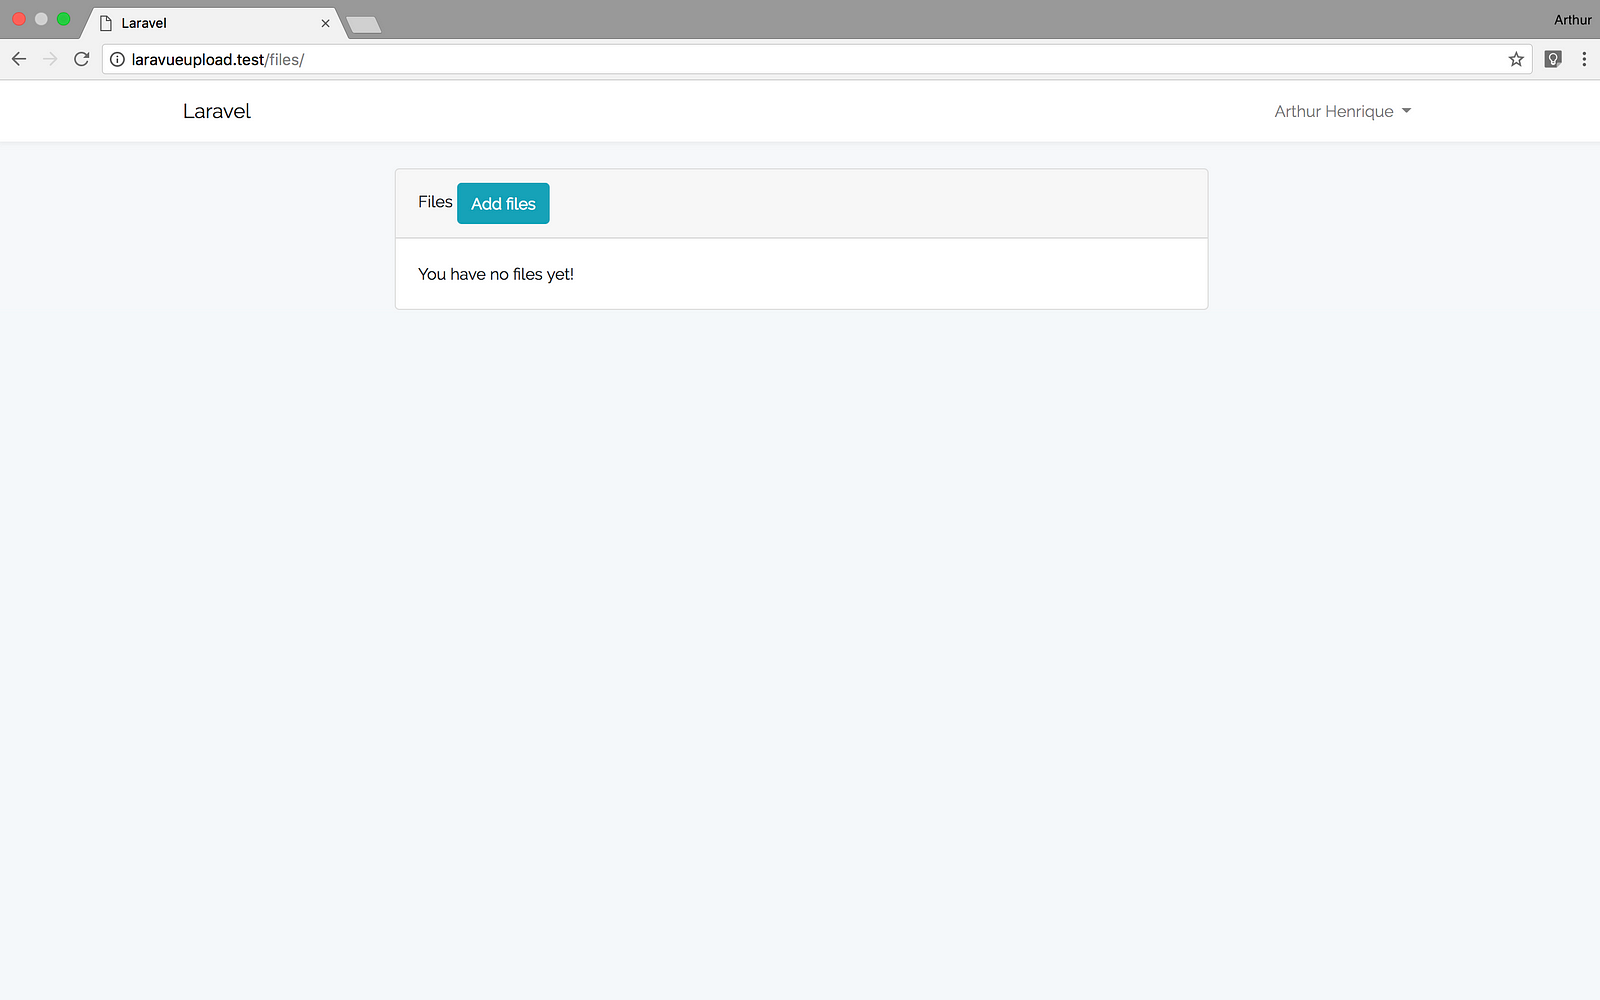
Basically our index will get all the files saved in the database and list them in an HTML table.
In the controller app/Http/Controllers/FileEntriesController.php create the index method as follows:
public function index() {
    $files = FileEntry::all();

    return view('files.index', compact('files'));
}
Here we are taking all the files saved in the database and writing to the files variable ($files = FileEntry::all()), and then returning it to our view (return view(‘files.index’, compact(‘files’))).
Finally, we’ll need to register our route to be accessible via the URL. In the routes/web.php file add the following code snippet:
Route::group(['middleware' => 'auth'], function () {
    Route::get('files', 'FileEntriesController@index');
});
The Route::group([‘middleware’ => ‘auth’], function () {}) section will protect our new view, allowing only authenticated users access. Inside it, we add our “get”, Route::get(‘files’, ‘FileEntriesController@index’), where the first parameter is the name of the route, and the second is the method in the controller that will reference this route.
Accessing the url in the browser, the following screen should appear:
Working with VueJS
Now it’s time to make our vue component that will assist us in our uploading files, in addition to making it practical, beautiful and simple for our end-user.
Before starting with our development in VueJS, we must install the necessary dependencies. To do this, just enter the following command at the root of our project:
npm install
Wait a while. It’ll download and install all the dependencies in the project. Note: When deploying to the web, you must run the command again on the server.
Now, create the file resources/assets/js/components/UploadFiles.vue.
Componentes Vue have the following basic structure:
<template>

</template>

<script>
    export default {

    }
</script>

<style scoped>

</style>
The tags delimit the HTML code that will be displayed in our view. The tags define where the programming will go. The tags define where the custom CSS for our component will go. The latter is optional.
Template
In our file, inside the tags, add the following code:
<template>
    <div class="container">
        <div class="large-12 medium-12 small-12 filezone">
            <input type="file" id="files" ref="files" multiple v-on:change="handleFiles()"/>
            <p>
                Drop your files here <br>or click to search
            </p>
        </div>

        <div v-for="(file, key) in files" class="file-listing">
            <img class="preview" v-bind:ref="'preview'+parseInt(key)"/>
            {{ file.name }}
            <div class="success-container" v-if="file.id > 0">
                Success
            </div>
            <div class="remove-container" v-else>
                <a class="remove" v-on:click="removeFile(key)">Remove</a>
            </div>
        </div>

        <a class="submit-button" v-on:click="submitFiles()" v-show="files.length > 0">Submit</a>
    </div>
</template>
Now we have some points to highlight:
Input
First of all, in we have the attribute “ref”, which names the input, so that we can access it and work in VueJS. Next, we have the “handleFiles” method that is executed in v-on:change whenever there are changes in the field.
Preview and Remove
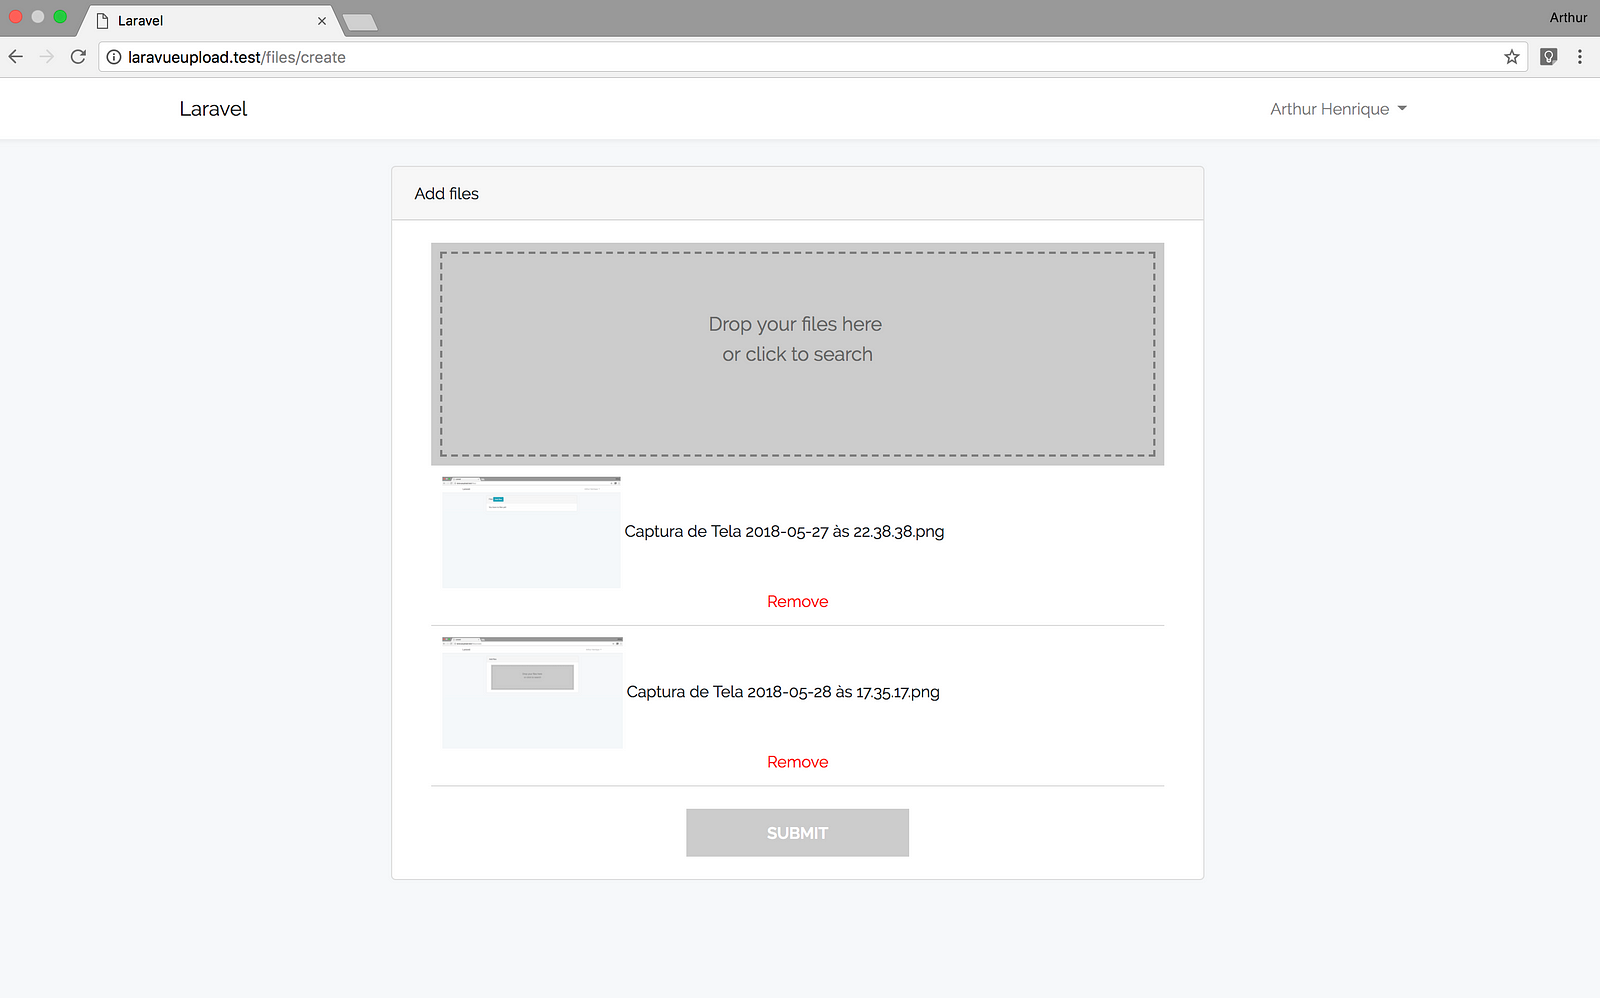
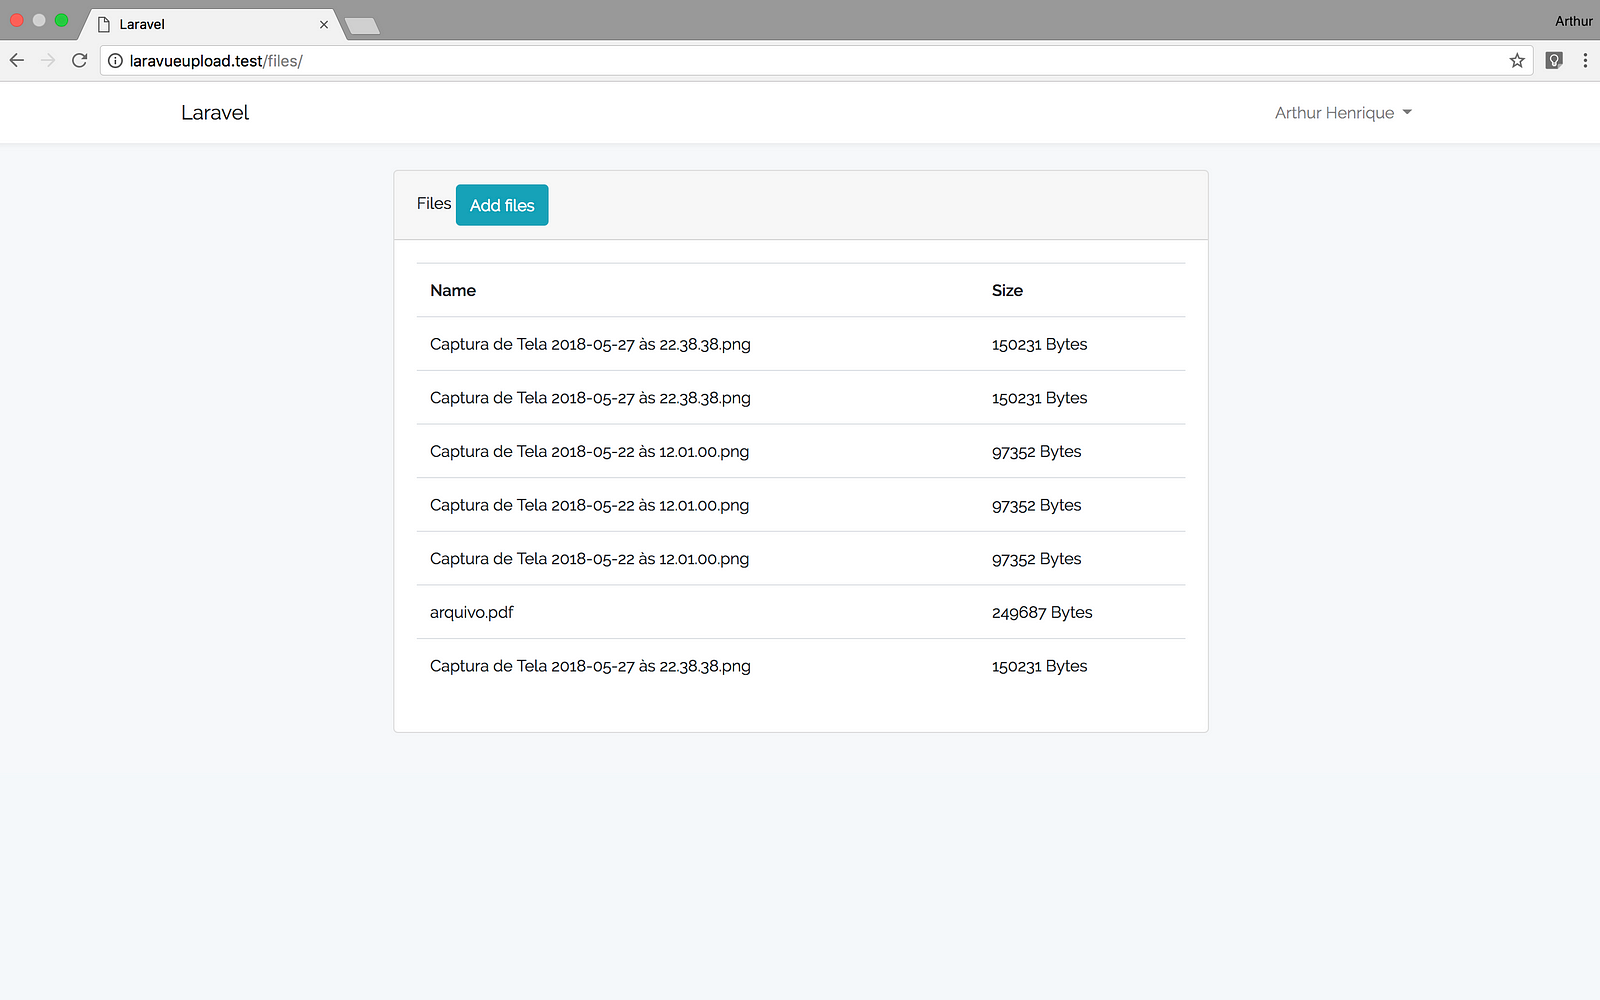
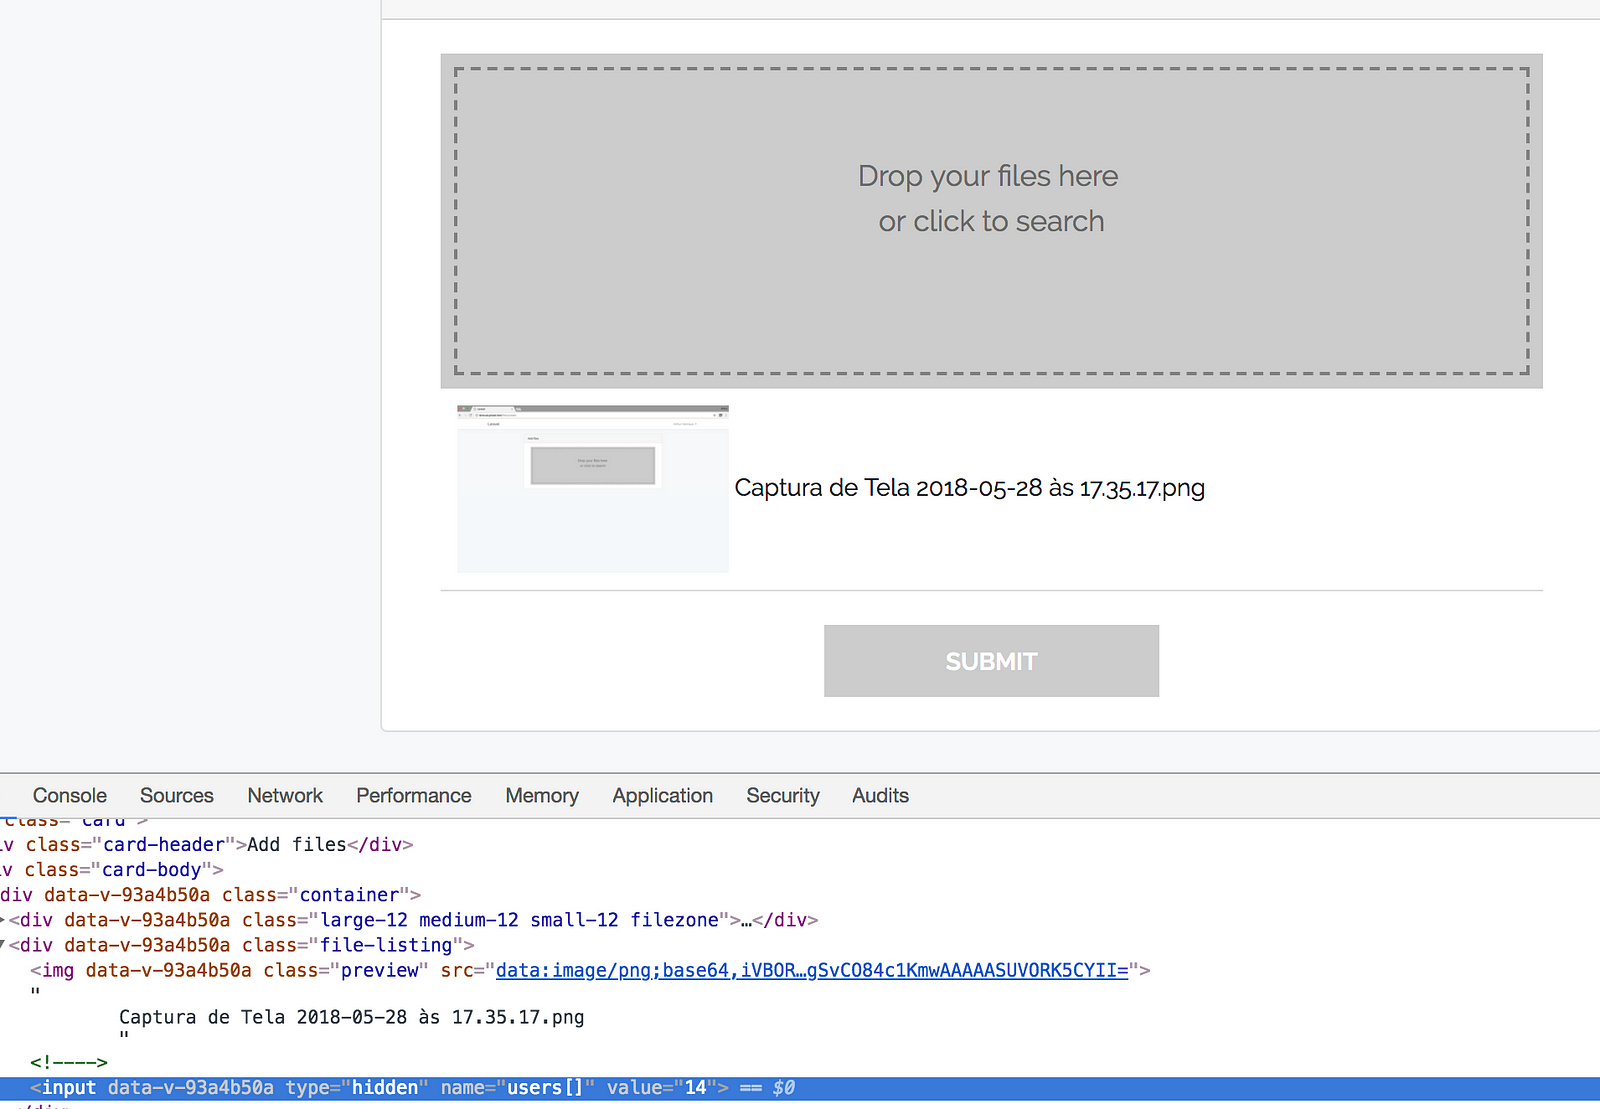
The following is a for loop in a Finally, we create the submit button with the “submitFiles” method that is executed whenever it is clicked (v-on: click). This button is shown only while there are files to submit, according to the Vue v-show. First of all, let’s instantiate the variables that we will work on: files is an array that will store the uploaded files. It starts empty. Next, we have our methods, which should be within: The first is handleFiles(): It is responsible for receiving all the files added to the input and arranging them in the file array. At the end, it will call the following method, getImagePreviews, which will show the preview of the files. Basically, it walk through the entire array of files and first checks to see if it is an image. If affirmative, it generates a preview of that file and adds it to be displayed in the respective file div. If not, it displays a default image as preview. The image I am using is available below. Save it to public public/img/generic.png. The following is the method of removing files: It just removes the chosen file from the array of files and updates the previews of the images. Finally, we have the submit method: It walk through the array of files, verifies that the file has not been sent (if it has an id, has already been sent) and sends them one by one. If successful, it updates array files to be reloaded in the template. Let’s take a closer look at what happens here: First we create the form with let formData = new FormData(). Next we add the file to the form to be sent: formData.append(‘file’, this.files[i]). Now we send the form through a request using axios. For this, we will use the “post” method. In it we have three parameters. The first is the destination url, which in our case is “/files/upload-file”. The second parameter is what we want to send, which in this case is the formData form that we created earlier. In the third parameter we add the header, which contains ‘Content-Type’: ‘multipart/form-data’ so that it is possible to send files through the form. Finally, we have the callback methods for success and error. Note that no success (then) will be taking the id of the newly uploaded file and updating the array files with the new information. I will not delve into the CSS for the article does not get too big, but basically it hides the input from the files and instead, renders the dashed box where the files can be dragged and dropped. Now that we have completed our Vue component, we must register the name that we will use in our view to call it. To do this open the resources/assets/js/app.js file and add the following after the example component: You can assign the name you want. In this tutorial, I chose to choose “upload-files”. Once coding is complete, we must now compile our Vue project. At the root of your Laravel project, run the following command: npm run watch We could use run dev or run build, but while we are still developing, I prefer to use the watch, because with every change made in the code, it will be recompiled without having to run again. Now that we have our component developed, we can now create the file upload view in Laravel. To do this, create the file resources/views/files/create.blade.php and add the following code: Notice that we have added our new We now only need to create the respective method in the controller and its route. In the FileEntriesController add the following method: And in the routes/web.php add the route for this view, and also the route that will receive the POST request of Axios: By testing our new feature, it looks like this: Our script is now submitting the files and saving them to the database. If we return to the view index, the file listing will be displayed: If you want to download the file when click on name, just add the following route: And at the filename: Our component is working perfectly and saving the files in the respective files table, but generally we want to associate the files sent to some other model such as personal documents of the user. By adding a small change to our code, we can leave the newly created component versatile and reused throughout the project. For this, in our Vue component, we must create some parameters that will be sent through the view. They are necessary because for each model, the address where the files will be sent by Axios may change, and also the “name” of the input may change. Open resources/assets/js/components/UploadFiles.vue and make the following bold change in the template: Notice that we have added an input that will only be displayed if the file has an id, ie it was sent correctly. This input is named “input_name” and its name will be sent through the VueJS props. As the file upload URL may change too, depending on the model, we will create a props called “post_url” to receive it. To do this, add the following bold code at the beginning of the script: Now, we’ll add the URL prop in our Axios call. The newly uploaded file id was previously saved, so it does not change. The submitFiles method should look like this: Now that we add these two props in our Vue component, whenever we use the created component, we should pass them as a parameter as follows: Where, in this example, our custom input will be users[] and our submission URL will be files/upload-file. It is now ready to be used in any form, simply informing the name of the input (as the upload can be of several files, we should use brackets [] to indicate array), and which URL will be submitted to the files. For each successfully uploaded file, your IDs will be stored in an input to be sent on the form and thus be associated with your model, as highlighted in the image below: To treat the result of the form in the submission, you should do something like this: That’s all. Hope this helps. Feel free to ask your questions in the comments below. Next I make available the project link of this tutorial in GITHUB for those who want to visualize. 30s ad ☞ Learn Web Development Using VueJS ☞ Vuejs 2 + Vuex con TypeScript Nivel PRO ☞ Curso de Vuejs 2, Cognito y GraphQL ☞ Learn VueJS from Scratch: The Complete 1 Hour Crash Course! ☞ PHP Tutorial for Absolute Beginners - Learn PHP from Scratch - ☞ Laravel Tutorial - Abusing Laravel ☞ Restful controllers in LaravelSubmit
Script
data() {
    return {
        files: []
    }
}
methods: {
    // your methods here
}
handleFiles() {
    let uploadedFiles = this.$refs.files.files;

    for(var i = 0; i < uploadedFiles.length; i++) {
        this.files.push(uploadedFiles[i]);
    }
    this.getImagePreviews();
},
getImagePreviews(){
    for( let i = 0; i < this.files.length; i++ ){
        if ( /\.(jpe?g|png|gif)$/i.test( this.files[i].name ) ) {
            let reader = new FileReader();
            reader.addEventListener("load", function(){
                this.$refs['preview'+parseInt(i)][0].src = reader.result;
            }.bind(this), false);
            reader.readAsDataURL( this.files[i] );
        }else{
            this.$nextTick(function(){
                this.$refs['preview'+parseInt(i)][0].src = '/img/generic.png';
            });
        }
    }
},

removeFile( key ){
    this.files.splice( key, 1 );
    this.getImagePreviews();
},
submitFiles() {
    for( let i = 0; i < this.files.length; i++ ){
        if(this.files[i].id) {
            continue;
        }
        let formData = new FormData();
        formData.append('file', this.files[i]);

        axios.post('/' + this.post_url,
            formData,
            {
                headers: {
                    'Content-Type': 'multipart/form-data'
                }
            }
        ).then(function(data) {
            this.files[i].id = data['data']['id'];
            this.files.splice(i, 1, this.files[i]);
            console.log('success');
        }.bind(this)).catch(function(data) {
            console.log('error');
        });
    }
}
Style
<style scoped>
    input[type="file"]{
        opacity: 0;
        width: 100%;
        height: 200px;
        position: absolute;
        cursor: pointer;
    }
    .filezone {
        outline: 2px dashed grey;
        outline-offset: -10px;
        background: #ccc;
        color: dimgray;
        padding: 10px 10px;
        min-height: 200px;
        position: relative;
        cursor: pointer;
    }
    .filezone:hover {
        background: #c0c0c0;
    }

    .filezone p {
        font-size: 1.2em;
        text-align: center;
        padding: 50px 50px 50px 50px;
    }
    div.file-listing img{
        max-width: 90%;
    }

    div.file-listing{
        margin: auto;
        padding: 10px;
        border-bottom: 1px solid #ddd;
    }

    div.file-listing img{
        height: 100px;
    }
    div.success-container{
        text-align: center;
        color: green;
    }

    div.remove-container{
        text-align: center;
    }

    div.remove-container a{
        color: red;
        cursor: pointer;
    }

    a.submit-button{
        display: block;
        margin: auto;
        text-align: center;
        width: 200px;
        padding: 10px;
        text-transform: uppercase;
        background-color: #CCC;
        color: white;
        font-weight: bold;
        margin-top: 20px;
    }
</style>
Registering the component and compiling
Vue.component('upload-files', require('./components/UploadFiles.vue'));
Submitting files
@extends('layouts.app')

@section('content')
<div class="container">
    <div class="row justify-content-center">
        <div class="col-md-8">
            <div class="card">
                <div class="card-header">Add files</div>

                <div class="card-body">
                    <upload-files></upload-files>
                </div>
            </div>
        </div>
    </div>
</div>
@endsection
public function create() {
    return view('files.create');
}
Route::get('files/create', 'FileEntriesController@create');
Route::post('files/upload-file', 'FileEntriesController@uploadFile');
Route::get('files/{path_file}/{file}', function($path_file = null, $file = null) {
    $path = storage_path().'/files/uploads/'.$path_file.'/'.$file;
    if(file_exists($path)) {
        return Response::download($path);
    }
});
<a href="{{ url('files/'.$file->path.'/'.$file->filename) }}">{{ $file->filename }}</a>
Bonus: Adding Files to Other Models
<template>
    <div class="container">
        <div class="large-12 medium-12 small-12 filezone">
            <input type="file" id="files" ref="files" multiple v-on:change="handleFiles()"/>
            <p>
                Drop your files here <br>or click to search
            </p>
        </div>
        <div v-for="(file, key) in files" class="file-listing">
            <img class="preview" v-bind:ref="'preview'+parseInt(key)"/>
            {{ file.name }}
            <div class="success-container" v-if="file.id > 0">
                Success
                <input type="hidden" :name="input_name" :value="file.id"/>
            </div>
            <div class="remove-container" v-else>
                <a class="remove" v-on:click="removeFile(key)">Remove</a>
            </div>
        </div>
        <a class="submit-button" v-on:click="submitFiles()" v-show="files.length > 0">Submit</a>
    </div>
</template>
<script>
    export default {
        props: ['input_name', 'post_url'],
        data() {
            return {
                files: []
            }
        },
submitFiles() {
    for( let i = 0; i < this.files.length; i++ ){
        if(this.files[i].id) {
            continue;
        }
        let formData = new FormData();
        formData.append('file', this.files[i]);
        axios.post('/' + this.post_url,
            formData,
            {
                headers: {
                    'Content-Type': 'multipart/form-data'
                }
            }
        ).then(function(data) {
            this.files[i].id = data['data']['id'];
            this.files.splice(i, 1, this.files[i]);
            console.log('success');
        }.bind(this)).catch(function(data) {
            console.log('error');
        });
    }
}
<upload-files :input_name="'users[]'" :post_url="'files/upload-file'"></upload-files>
foreach($input['users'] as $file) {
    //some action to save the file_id
}
Suggest: