Vue Authentication with Firebase UI

This might very well be a good idea: Firebase is really easy to use and has quite a generous free plan. Of course nothing is completely free. If whatever you are working on does take off it could get expensive. But that’s perhaps a bit of a luxury problem.
One thing I really like about Firebase is the authentication UI. Authentication is a crucial part of most web and mobile apps today and something I prefer to not mess around with. It’s quite a big commitment to build a good, secure, user friendly, well designed authentication solution and of course maintain it.
Setting up Firebase UI (what a completely non descriptive name!) for a regular web application is incredibly simple. It’s easy in Vue JS too, but there are a couple of steps to figure out.
So just follow along!
Scaffold the Vue project
Begin by scaffolding the app and adding a few files:
$ vue init webpack-simple fb-test-app
$ cd fb-test-app
$ npm install
$ npm install --save firebase firebaseui vue-router
$ mkdir src/components
$ mkdir src/helpers
$ touch src/helpers/firebaseConfig.js
$ touch src/components/Auth.vue
$ touch src/components/AuthSuccess.vue
$ touch src/router.js
Set up Firebase
Head over to the Firebase console and either create a new project or reuse some old test project you have lying around. Firebase has a generous free plan, but there is a limit in the number of projects you can create. Strangely there’s no fixed limit. Instead some algorithm works out how many projects you can create depending on your relation to Google. Usually it’s somewhere between five and ten, so don’t waste them.
Click on Authentication when you have a project set up. Then hit the big blue button saying Set up sign in method. Enable Email/Password and Google. If you wonder how to do that, just hover over the the line and an edit icon will appear.
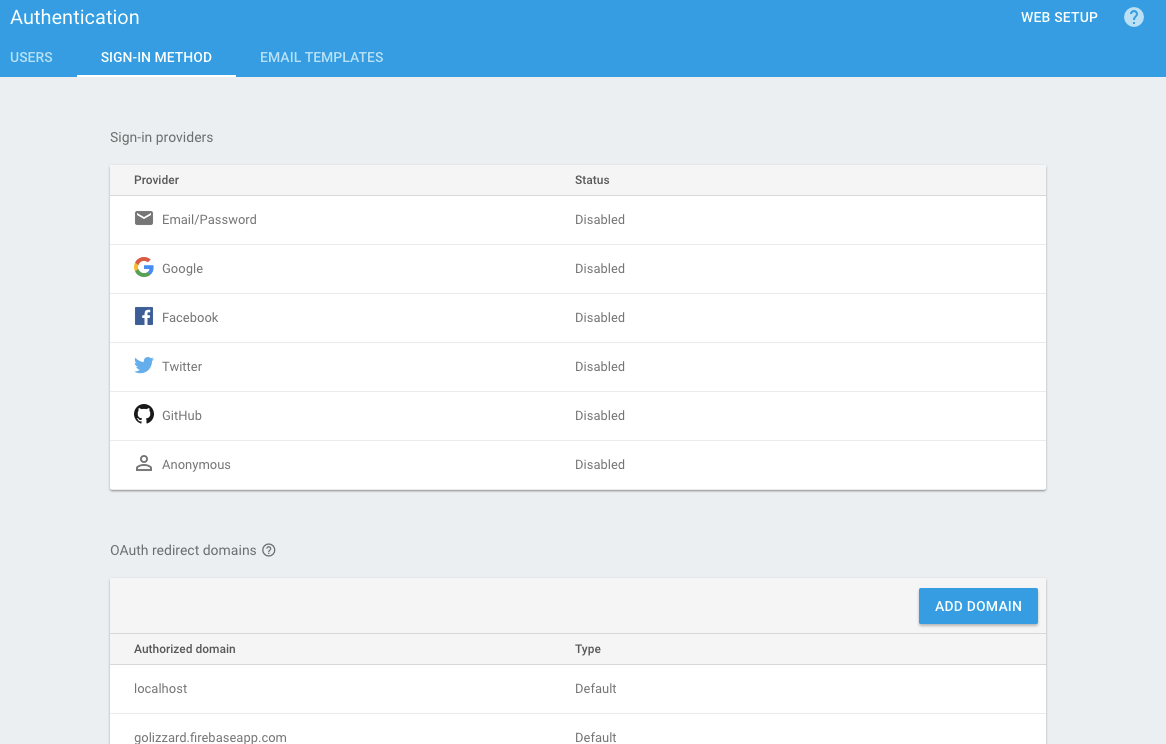
At the bottom of the screen you can restrict which domains login will be permitted from. By default localhost and Firebase hosted apps are permitted.
Next, click on Web setup and copy the authentication keys. You won’t need the other stuff.
Time to write some code!
We’ll begin with firebaseConfig.js. This is where you’ll use the keys you just copied:
export const config = {
  apiKey: "AIzaSyCX-r4B1Hs8uNaySWZOdmUP4a9DS_C2OFE",
  authDomain: "medium-demo.firebaseapp.com",
  databaseURL: "https://medium-demo.firebaseio.com",
  storageBucket: "medium-demo.appspot.com",
  messagingSenderId: "1039269062579"
};
Second, just clean up the App.vue:
<template>
  <div id=”app”>
    <router-view></router-view>
  </div>
</template>
<script>
  export default {
    name: ‘app’,
  }
</script>
We’ll use the style sheet supplied by Firebase. Just paste it in the index.html:
<link type="text/css" rel="stylesheet" href="node_modules/firebaseui/dist/firebaseui.css" />
Then over to the router. Add this to the router.js file. Nothing revolutionary going on here.
import VueRouter from 'vue-router';
import Auth from './components/Auth.vue';
import AuthSuccess from './components/AuthSuccess.vue';
const router = new VueRouter({
  mode: 'history',
  routes: [
    { path: '/', component: Auth },
    { path: '/auth', component: Auth },
    { path: '/success', component: AuthSuccess }
  ]
});
export default router;
Main.js is where the interesting stuff happens. Start by doing the imports at the top of the file:
import Vue from 'vue'
import App from './App.vue'
import VueRouter from 'vue-router'
import firebase from 'firebase'
import firebaseui from 'firebaseui';
import router from './router'
import {config} from './helpers/firebaseConfig'
Vue.use(VueRouter)
And then for the magic:
new Vue({
  router,
  created() {
    firebase.initializeApp(config);
    firebase.auth().onAuthStateChanged((user) => {
      if(user) {
        this.$router.push('/success')
      } else {
        this.$router.push('/auth')
      }
     });
    },
  el: '#app',
  render: h => h(App)
});
Wow, that’s quite a bit going on in created! First of all, obviously, Firebase is initialized with the config keys. What happens next is interesting. Firebase auth will watch for the user object. If there is a user -i.e. someone is logged in- push the router to success. If not, push the router to the login page. We’ll create these two pages straight away.
First of all Auth.vue:
<template lang="html">
  <div id="firebaseui-auth-container"></div>
</template>
<script>
import firebase from 'firebase';
import firebaseui from 'firebaseui'
import {config} from '../helpers/firebaseConfig';
export default {
  name: 'auth',
  mounted() {
    var uiConfig = {
      signInSuccessUrl: '/success',
      signInOptions: [
        firebase.auth.GoogleAuthProvider.PROVIDER_ID,
        firebase.auth.EmailAuthProvider.PROVIDER_ID
        ]
      };
    var ui = new firebaseui.auth.AuthUI(firebase.auth());
    ui.start('#firebaseui-auth-container', uiConfig);
    },
}
</script>
In the template we just use the ui provided by Firebase. In the script we configure the UI to use Google and Email sign in (remember, we set those up in console earlier). What is really important is that this must be done in mounted. If you do it in created it won’t work.
And finally AuthSuccess.vue. First of all the template:
<template>
  <div>
    <h1>Signup succeeded</h1>
    <button @click=’logOut’>Log out</button>
    <hr>
    <img :src=”photo” style=”height: 120px”> <br>
    <p>{{name}}</p>
    <p>{{email}}</p>
    <p>{{userId}}</p>
    <hr>
    <pre>{{user}}</pre>
  </div>
</template>
We’ll have a log out button, just to check out how that works. If you sign in with Google and have an avatar set the photo will be displayed. Then of course we just print the name, email and user id. Finally, just dump the whole user object on the screen.
Then for the code. Start by importing Firebase and defining the data:
<script>
import firebase from ‘firebase’
export default {
 data(){
   return {
     photo: ‘’,
     userId: ‘’,
     name: ‘’,
     email: ‘’,
     user: {}
   }
 },
};
</script>
Next, the created method. When the view is created the app checks if there is a user. If there is, the properties are read and assigned to the variable previously declared.
created() {
  this.user = firebase.auth().currentUser;
  if(this.user) {
    this.name = this.user.displayName;
    this.email = this.user.email;
    this.photo = this.user.photoURL;
    this.userId = this.user.uid;
  }
},
And finally it’s just the log out method left. All we have to do is tell Firebase to sign out. Remember, in the created method of main.js we said that the application should redirect to the sign in page if the user state is changed and there is no user.
methods: {
  logOut() {
    firebase.auth().signOut();
  }
},
Playtime!
Just run the app with npm run dev and hopefully you’ll have the Auth view on your screen after a couple of seconds. Click on shiny red Google button and permit the application to sign in with Google. Give it a couple of seconds and something like this should be on your screen:
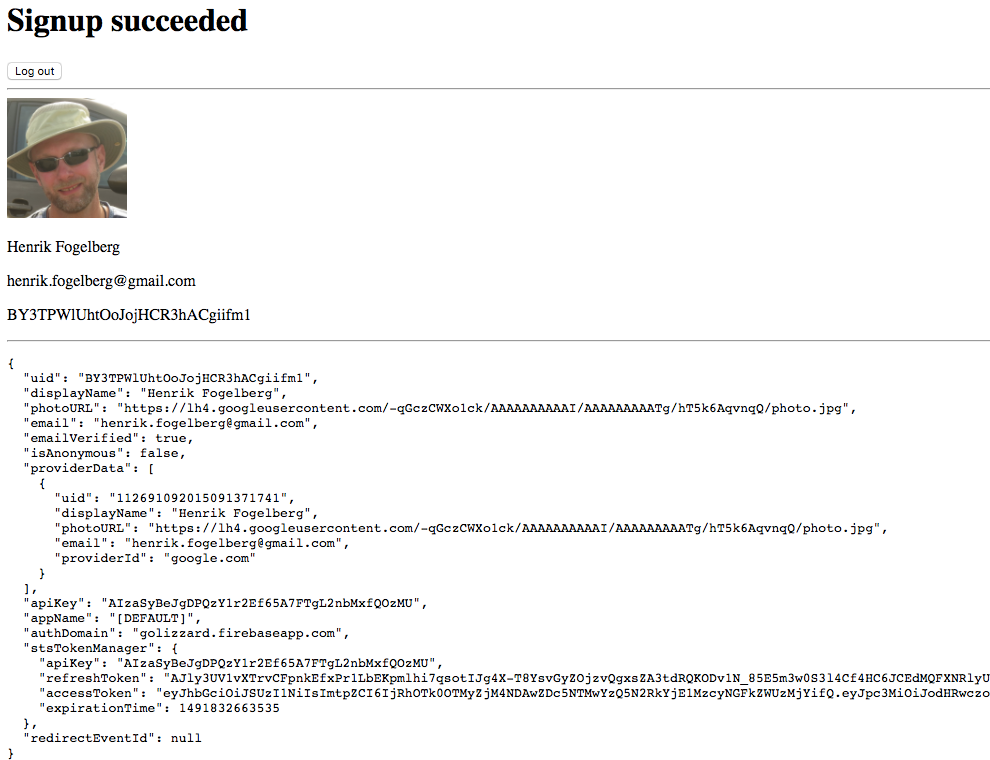
If you are running on Chrome open the dev-tools, click on Application and choose Local storage in the menu. There you will find the firebase token
Finally, click on Sign out and you should be sent back to the Sign in screen. Not bad, eh?
The code for this tutorial is available on Github.
30s ad
☞ Getting started with Vuejs for development
☞ Vuejs 2 + Vuex + Firebase + Cloud Firestore
☞ Building Applications with VueJs, Vuex, VueRouter, and Nuxt
☞ Ethereum and Solidity: Build Dapp with VueJS
☞ Learn Web Development Using VueJS
Suggest:
☞ JavaScript Programming Tutorial Full Course for Beginners
☞ Learn JavaScript - Become a Zero to Hero
☞ Javascript Project Tutorial: Budget App
☞ Firebase - Ultimate Beginner's Guide
☞ E-Commerce JavaScript Tutorial - Shopping Cart from Scratch