How To Setup Python3 and Flask on AWS EC2
First you will have to register in order to use the AWS Free Tier which is free to use for 12 months. The registration steps are very simple but you will need to enter your credit card, which will be charged later after the free period expires.
1. Create and Launch EC2 Instance
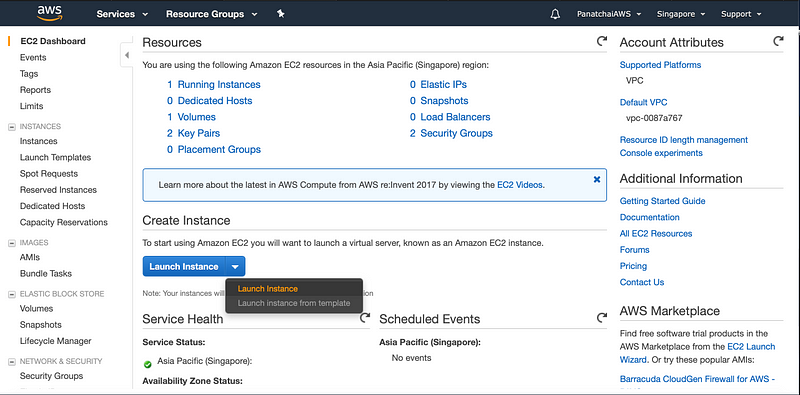
Let’s start by creating a new EC2 instance. No matter where you are, click on the aws logo at the top-left corner to go the home screen. You should be able to see the screen similar to what is shown below.

Click on EC2 and then click Launch Instance as shown below.
You will be presented with many Amazon Machine Image (AMI) options and, in this case, you will need to select Ubuntu Server as shown below. Please note that if you select any other AMI, this guide might not work.

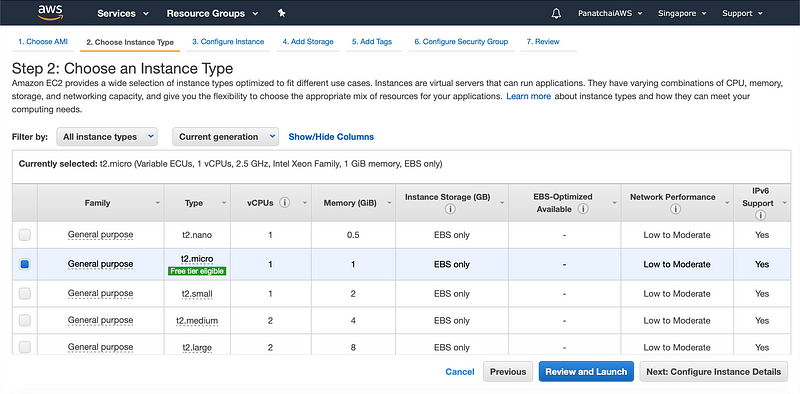
As you can see, we are now at the step 2, Choose Instance Type and there is no need to do anything else. Click Review and Launch, which is the blue button at the bottom of the screen as shown below.
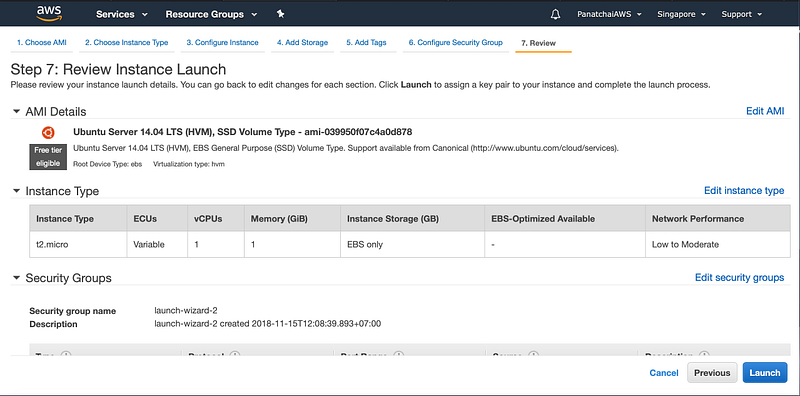
Next just click the blue Launch button.
The next step is very important. You will be ask to either use the existing or creating a new key pair. Since this is the your first time, you will require to Create aNew Key Pair, Download, and Save To Local Machine.
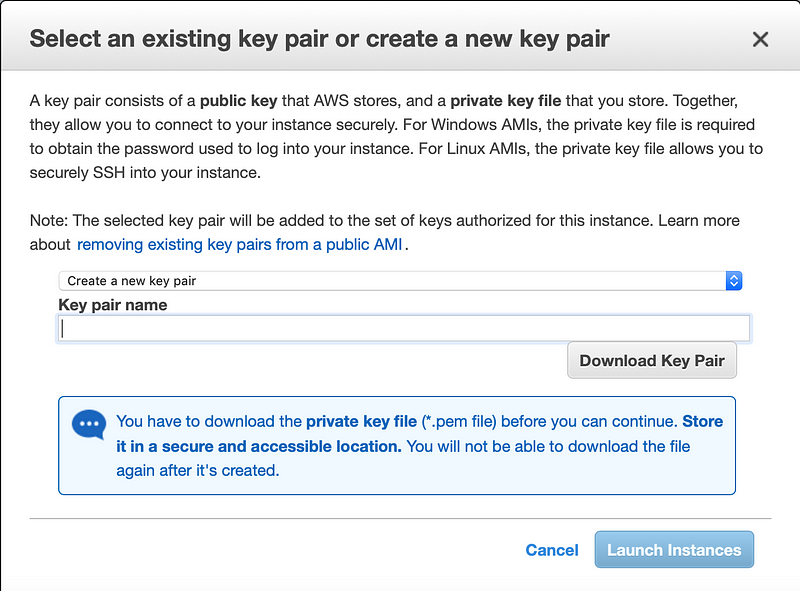
Enter any names you like but…
! DO NOT FORGET TO DOWNLOAD THE KEY PAIR
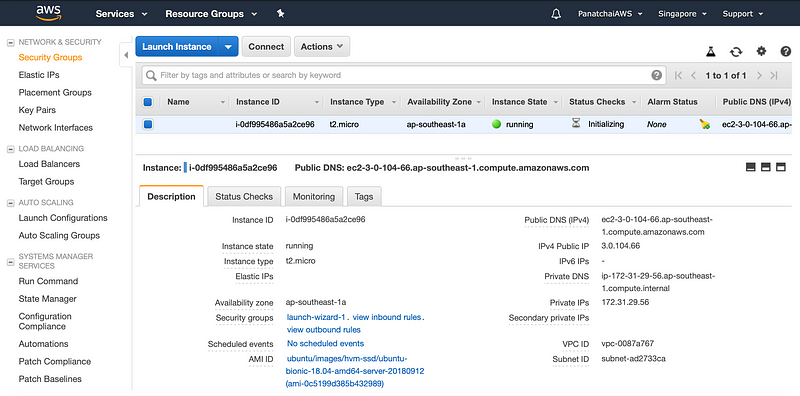
Congratulations! you have successfully created and run an EC2 instance but we are not done yet. On the left-hand side of the screen, scroll down until you find NETWORK & SECURITY → Security Groups.
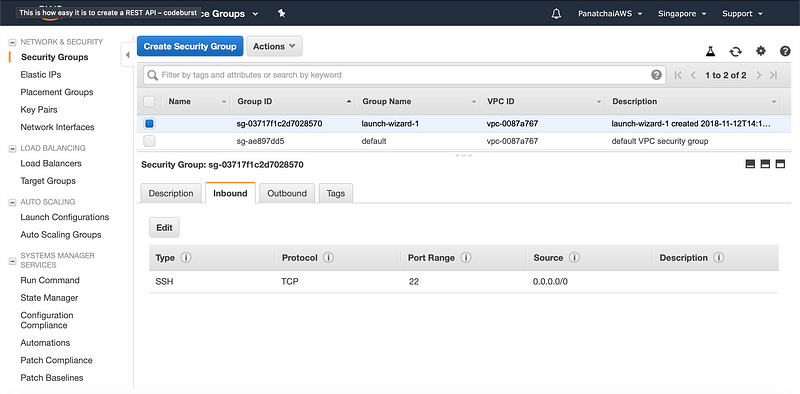
You should already have a security group that is created by the wizard. The security group name could be different from what is shown below, however, the name should be pretty obvious if you have just created EC2 instance for the first time.
Select launch-wizard-1 and, once it is selected, there will be the blue rectangle dot in front of it as highlighted and shown below.
Then click Inbound tab and then click Edit. If you have never setup anything beforehand, you should see something like this.
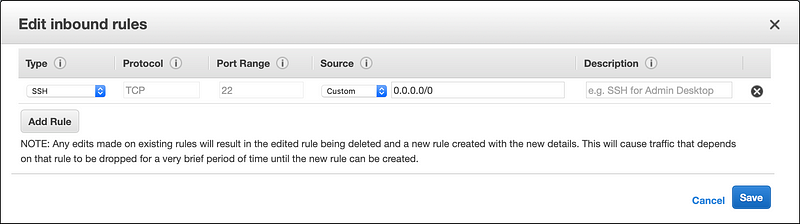
Then click Add Rule and, in the newly inserted row, select HTTP.
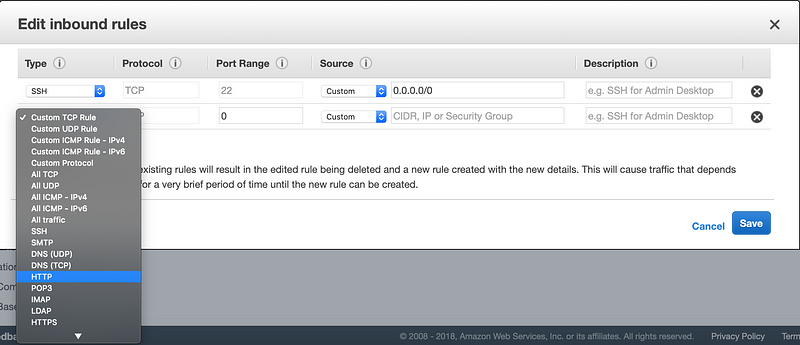
If you have done this right then you should have
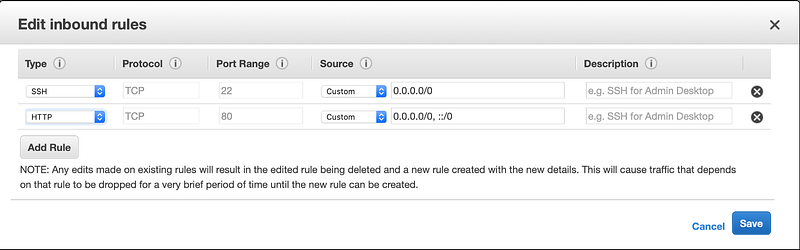
Type: HTTP
Protocol: TCP
Port Range: 80
Source: 0.0.0.0/0, ::/0
Which will allow our EC2 to be accessed from anywhere on TCP protocol, port 80. Click the blue Save button and finally the result is shown below.

2. Setup the instance
Now we already have our EC2 instance, which allows the HTTP/TCP connection on port 80 from anywhere, up and running. Next I will show you how to setup Apache, Python3, and Flask. First we need to connect to the EC2 instance that we have just created in the previous step using ssh and here is how to do it.
First open your command prompt, CMD on Windows and Terminal on Mac, and go to the directory where the Key Pair is saved. In my case, on my Mac,
cd $HOME/.ssh/aws
Inside the directory, I have
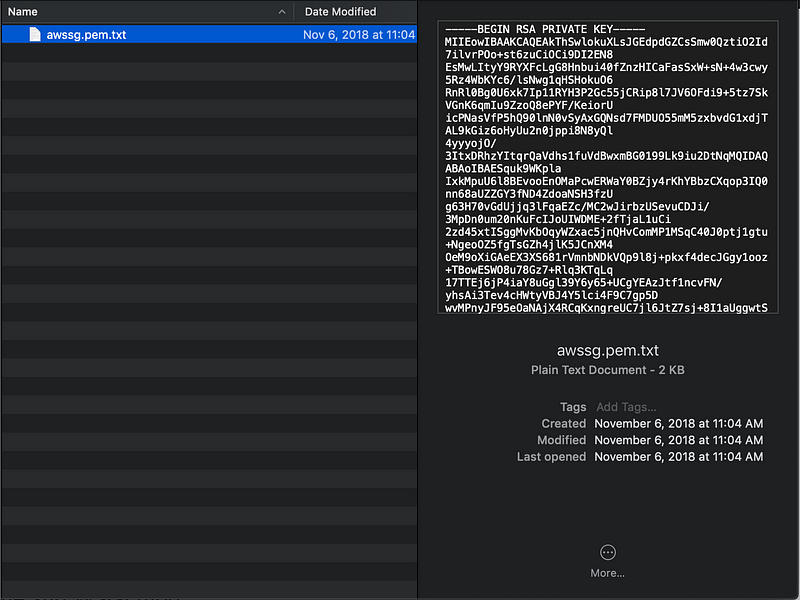
Remove .txt extension and, if you do this right, you should have

Next you will need to change the permission of the file using
chmod 400 awssg.pem

Now go back to the AWS console webpage and navigate to Instances.

Click on Connect and you should be able to see
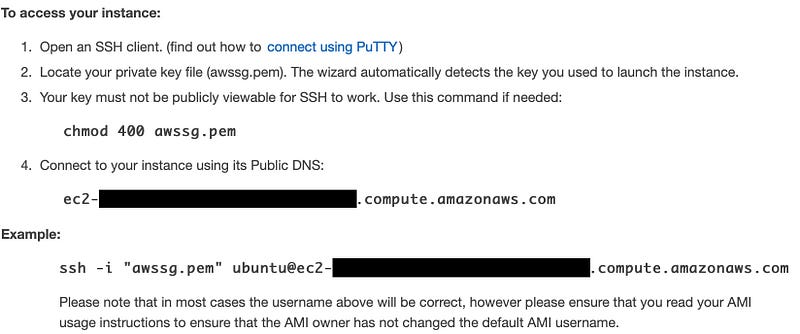
Go back to the command prompt and execute the following command by replacing [email protected] with yours public DNS.
ssh -i "awssg.pem" [email protected]
Once successfully connect, you should see

Next install Apache and WSGI mod by executing the following commands
sudo apt-get update
sudo apt-get install apache2
sudo apt-get install libapache2-mod-wsgi-py3
To test if this works, point your browser to your public DNS and you should see the default page.
http://[email protected]
Next install Python3
sudo apt-get install python3.6
As of Nov 2018, the latest version is Python 3.6. You may replace this version with any versions you wish and you may find the available Python version using the following command
apt-cache search python*
and look for something like this
python3.6 — Interactive high-level object-oriented language (version 3.6)
The next is also an important step which is to update your python command line to use the version that we have just installed using
sudo ln -sT /usr/bin/python3 /usr/bin/python
python --version
This will create a symbolic link to your newly installed Python. If you do this right then you should have the link that points to your latest version. In my case, it is Python 3.6.6.

Next install Pip for Python3
sudo apt-get install python3-pip
sudo ln -sT /usr/bin/pip3 /usr/bin/pip
If you do this right then you should have pip for the latest Python version you have just installed above.

Next install Flask and Virtualenv
sudo pip install flask
sudo apt-get install virtualenv
If you do this right then you should have

Now we have all necessary components. Next step is to create your Flask application.
mkdir ~/flaskapp
sudo ln -sT ~/flaskapp /var/www/html/flaskapp
cd ~/flaskapp
virtualenv flask
vi flaskapp.py
Once inside VI, press “i” to edit and start typing
from flask import Flask
app = Flask(__name__)
@app.route('/')
def hello_world():
  return 'Hello From Flask!'
if __name__ == '__main__':
  app.run()
As shown below

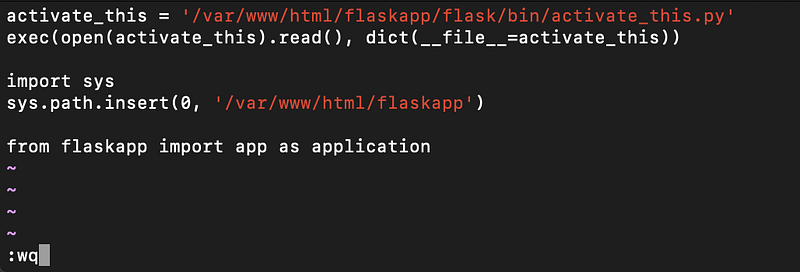
Once done, press “esc” and type
:wq

Now create WSGI file
vi flaskapp.wsgi
Once inside VI, press “i” to edit and start typing
activate_this = '/var/www/html/flaskapp/flask/bin/activate_this.py'
exec(open(activate_this).read(), dict(__file__=activate_this))
import sys
sys.path.insert(0, '/var/www/html/flaskapp')
from flaskapp import app as application
Next is to enable mod_wsgi
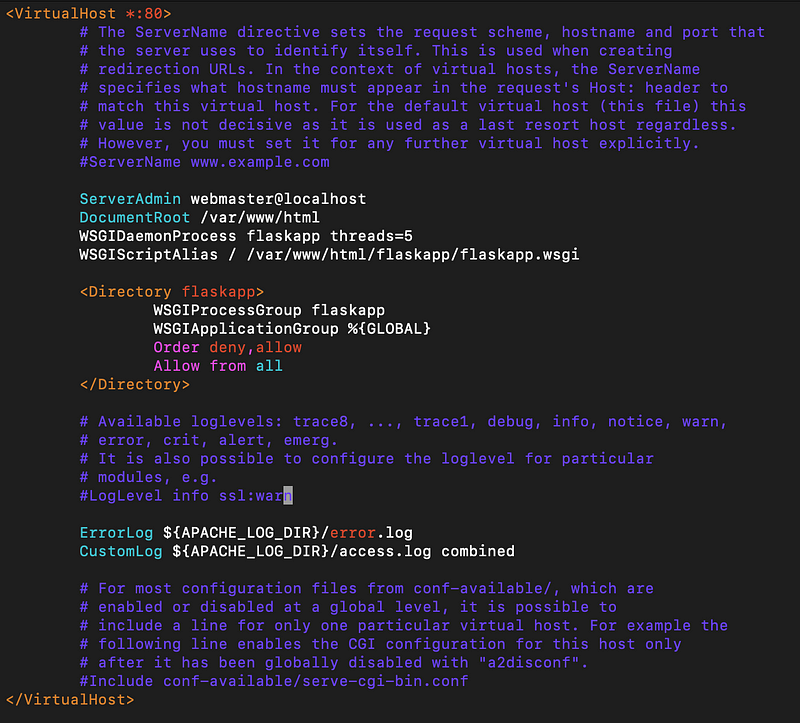
vi /etc/apache2/sites-enabled/000-default.conf
and right under the
DocumentRoot /var/www/html
Type the following
WSGIDaemonProcess flaskapp threads=5
WSGIScriptAlias / /var/www/html/flaskapp/flaskapp.wsgi

<Directory flaskapp>
        WSGIProcessGroup flaskapp
        WSGIApplicationGroup %{GLOBAL}
        Order deny,allow
        Allow from all
</Directory>
Finally if you do it right, you should have the following
Now restart the apache by executing this command
sudo apachectl restart
Test if this works by navigating to
http://[email protected]

Congratulations! you have successfully setup and configured Python3, Flask, and Apache2 on AWS EC2. Thanks for reading this far and I hope this helps.
30s ad
☞ The Python 3 Bible™ | Go from Beginner to Advanced in Python
☞ Introduction to Python for Beginners
☞ The Developers Guide to Python 3 Programming
☞ Selenium WebDriver With Python 3.x - Novice To Ninja
☞ Python for Beginners: Become a Certified Python Developer
Suggest:
☞ Python Tutorials for Beginners - Learn Python Online
☞ Complete Python Tutorial for Beginners (2019)
☞ Learn Python in 12 Hours | Python Tutorial For Beginners
☞ Learn Flask for Python - Full Tutorial
☞ Python Programming Tutorial | Full Python Course for Beginners 2019