Web Scraping 101 in Python
In this post, which is a follow up to my ultimate web scraping guide, we will cover almost all the tools Python offers you to scrape the web. We will go from more basic to the most advanced ones, and cover the pros and cons of each.
Of course we won’t be able to cover all aspects of every tool we discuss. But this post should be enough to give you a good idea of which tools do what, and when to use each.
Summary:
- Web Fundamentals
- Manually opening a socket and sending the HTTP request
- urllib3 & LXML
- requests & BeautifulSoup
- Scrapy
- Selenium & Chrome —headless
- Conclusion
Web Fundamentals
The internet is really complex–there are many underlying technologies and concepts involved to view a simple web page in your browser. I’m not going to explain everything, but I will show you the most important things you have to understand in order to extract data from the web.
HyperText Transfer Protocol
HTTP uses a client/server model, where an HTTP client (a browser, your Python program, curl, Requests, and so on) opens a connection and sends a message (“I want to see the /product page”) to an HTTP server (like Nginx, Apache, and others).
Then the server answers with a response (the HTML code, for example) and closes the connection. HTTP is called a stateless protocol, because each transaction (request/response) is independent. FTP, for example, is stateful.
Basically, when you type a website address in your browser, the HTTP request looks like this:
GET /product/ HTTP/1.1
Host: example.com
Accept: text/html,application/xhtml+xml,application/xml;q=0.9,image/web\
p,*/*;q=0.8
Accept-Encoding: gzip, deflate, sdch, br
Connection: keep-alive
User-Agent: Mozilla/5.0 (Macintosh; Intel Mac OS X 10_11_6) AppleWebKit\
/537.36 (KHTML, like Gecko) Chrome/56.0.2924.87 Safari/537.36
In the first line of this request, you can see multiples things:
- The GET verb or method being used, meaning we request data from the specific path,
/product/. There are other HTTP verbs, and you can see the full list here. - The version of the HTTP protocol. In this tutorial we will focus on HTTP 1.
- Multiple headers fields.
Here are the most important header fields:
- Host: The domain name of the server. If no port number is given, it is assumed to be 80*.*
- User-Agent: Contains information about the client originating the request, including the OS information. In this case, it is my web-browser (Chrome), on OSX. This header is important because it is either used for statistics (how many users visit my website on mobile vs. desktop) or to prevent any violations by bots. Because these headers are sent by the clients, it can be modified with a technique called “Header Spoofing”. This is exactly what we will do with our scrapers to make them look like a normal web browser.
- Accept: The content types that are acceptable as a response. There are lots of different content types and sub-types: text/plain, text/html, image/jpeg, application/json …
- Cookie : name1=value1;name2=value2… This header field contains a list of name-value pairs. These are called session cookies, and are what websites use to authenticate users and store data in your browser. For example, when you fill in a login form, the server will check if the credentials you entered are correct. If so, it will redirect you and inject a session cookie in your browser. Your browser will then send this cookie with every subsequent request to that server.
- Referrer: The Referrer header contains the URL from which the actual URL has been requested. This header is important because websites use this header to change their behavior based on where the user came from. For example, lots of news websites have a paying subscription and let you view only 10% of a post. But if the user came from a news aggregator like Reddit, they let you view the full content. Sites use the referrer to check this. Sometimes we will have to spoof this header to get to the content we want to extract.
And the list goes on. You can find the full header list here.
A server will respond with something like this:
HTTP/1.1 200 OK
Server: nginx/1.4.6 (Ubuntu) Content-Type: text/html; charset=utf-8 <!DOCTYPE html>
<html>
<head>
<meta charset="utf-8" /> ...[HTML CODE]
On the first line, we have a new piece of information, the HTTP code 200 OK. This means the request has succeeded. As for the request headers, there are lots of HTTP codes, split into four common classes: 2XX for successful requests, 3XX for redirects, 4XX for bad requests (the most famous being 404 Not found), and 5XX for server errors.
If you are sending an HTTP request with your web browser, it will parse the HTML code, fetch all the eventual assets (JavaScript, CSS, and image files) and render the result into the main window.
In the next section we will see the different ways to perform HTTP requests with Python and extract the data we want from the responses.
Manually opening a socket and sending the HTTP request
Socket
The most basic way to perform an HTTP request in Python is to open a socket and manually send the HTTP request:
import socket

HOST = 'www.google.com'  # Server hostname or IP address
PORT = 80        # Port

client_socket = socket.socket(socket.AF_INET, socket.SOCK_STREAM)
server_address = (HOST, PORT)
client_socket.connect(server_address)

request_header = b'GET / HTTP/1.0\r\nHost: www.google.com\r\n\r\n'
client_socket.sendall(request_header)

response = ''
while True:
    recv = client_socket.recv(1024)
    if not recv:
        break
    response += str(recv)

print(response)
client_socket.close()
Now that we have the HTTP response, the most basic way to extract data from it is to use regular expressions.
Regular Expressions
A regular expression (RE, or Regex) is a search pattern for strings. With regex, you can search for a particular character or word inside a bigger body of text.
For example, you could identify all the phone numbers on a web page. You can also replace items easily. For example, you can replace all the uppercase tags in poorly formatted HTML with lowercase ones. You can also validate some inputs.
You may be wondering, why it is important to know about regular expressions when doing web scraping? After all, there are all kinds of different Python modules to parse HTML, XPath, and CSS selectors.
In an ideal semantic world, data is easily machine-readable, and information is embedded inside relevant HTML elements with meaningful attributes.
But the real world is messy. You will often find huge amounts of text inside a p element. When you want to extract specific data inside this huge block of text like a price, date, or name, you will have to use regular expressions.
Note: Here is a great website to test your regex, and one awesome blog to learn more about them. This post will only cover a small fraction of what you can do with regular expressions.
Regular expressions can be useful when you have this kind of data:
<p>Price : 19.99$</p>
We could select this text node with an Xpath expression, and then use this kind of regex to extract the price. Remember that regex patterns are applied from left to right, and each source character is only used once.:
^Price\s:\s(\d+\.\d{2})\$
To extract the text inside an HTML tag, it is annoying to use a regex, but doable:
import re

html_content = '<p>Price : 19.99$</p>'

m = re.match('<p>(.+)<\/p>', html_content)
if m:
	print(m.group(1))
As you can see, manually sending the HTTP request with a socket and parsing the response with regular expressions can be done, but it’s complicated. There are higher-level APIs that can make this task a lot easier.
urllib3 & LXML
Disclaimer: It is easy to get lost in the urllib universe in Python. You have urllib and urllib2 that are parts of the standard library, but there’s also urllib3. urllib2 was split into multiple modules in Python 3, and urllib3 should not be a part of the standard library anytime soon. All of these confusing details will be the subject of its own blog post. In this section, I chose to only talk about urllib3 as it widely used in the Python world.
urllib3 is a high-level package that allows you to do pretty much whatever you want with an HTTP request. We can do what we did with socket above with way fewer lines of code:
import urllib3
http = urllib3.PoolManager()
r = http.request('GET', 'http://www.google.com')
print(r.data)
Much more concise than the socket version, isn’t it? Not only that, but the API is straightforward, and you can do many things easily like adding HTTP headers, using a proxy, POSTing forms, and so on.
For example, if we had to set some headers to use a proxy, we would only have to do this:
import urllib3
user_agent_header = urllib3.make_headers(user_agent="<USER AGENT>")
pool = urllib3.ProxyManager(f'<PROXY IP>', headers=user_agent_header)
r = pool.request('GET', 'https://www.google.com/')
See? Exactly the same number of lines.
However, there are some things that urllib3 does not handle very easily. If we want to add a cookie, we have to manually create the corresponding headers and add it to the request.
There are also things that urllib3 can do that requests can’t, like creation and management of pool and proxy pool, and control of retry strategy.
To put it simply, urllib3 falls between requests and socket in terms of abstraction, although it’s way closer to requests than socket.
To parse the response, we are going to use the lxml package and XPath expressions.
XPath
Xpath is a technology that uses path expressions to select nodes or node sets in an XML or HTML document. As with the Document Object Model, Xpath is a W3C standard since 1999. Even if Xpath is not a programming language in itself, it allows you to write expressions that can directly access a specific node or node-set without having to go through the entire XML or HTML tree.
Think of XPath as a sort of regular expression, but specifically for XML or HMTL.
To extract data from an HTML document with XPath we need 3 things:
- an HTML document
- some XPath expressions
- an XPath engine that will run those expressions
To begin, we will use the HTML that we got thanks to urllib3. We just want to extract all the links from the Google homepage, so we will use one simple XPath expression, //a, and use LXML to run it. LXML is a fast and easy to use XML and HTML processing library that supports XPATH.
Installation:
pip install lxml
Below is the code that comes just after the previous snippet:
from lxml import html

# We reuse the reponse from urllib3
data_string = r.data.decode('utf-8', errors='ignore')
# We instantiate a tree object from the HTML
tree = html.fromstring(data_string)
# We run the XPath against this HTML
# This returns an array of element
links = tree.xpath('//a')
for link in links:
    # For each element we can easily get back the URL
    print(link.get('href'))
And the output should look like this:
https://books.google.fr/bkshp?hl=fr&tab=wp
https://www.google.fr/shopping?hl=fr&source=og&tab=wf
https://www.blogger.com/?tab=wj
https://photos.google.com/?tab=wq&pageId=none
http://video.google.fr/?hl=fr&tab=wv
https://docs.google.com/document/?usp=docs_alc
...
https://www.google.fr/intl/fr/about/products?tab=wh
Keep in mind that this example is really, really simple, and doesn’t really show you how powerful XPath can be. (Note: this XPath expression should have been changed to //a/@href to avoid having to iterate through links to get their href).
If you want to learn more about XPath you can read this good introduction. The LXML documentation is also well written and is a good starting point.
XPath expresions, like regexp, are really powerful and one of the fastest ways to extract information from HTML. Though also like regexp, XPath can quickly become messy, hard to read, and hard to maintain.
requests & BeautifulSoup
![]()
Requests is the king of Python packages–with more than 11,000,000 downloads, it is the most widely used package for Python.
Installation:
pip install requests
Making a request with Requests (no comment) is really easy:
import requests

r = requests.get('https://www.scrapingbee.com')
print(r.text)
With Requests it is easy to do things like perform POST requests, handle cookies, and query parameters.
Authentication to Hacker News
Let’s say we want to create a tool to automatically submit our blog post to Hacker News or any other forums like Buffer. We would need to authenticate to those websites before posting our link. That’s what we are going to do with Requests and BeautifulSoup!
Here is the Hacker News login form and the associated DOM:

There are three <input> tags on this form. The first one has a type hidden with the name “goto”, and the two others are the username and password.
If you submit the form inside your Chrome browser, you will see that there is a lot going on: a redirect and a cookie is being set. This cookie will be sent by Chrome on each subsequent request in order for the server to know that you are authenticated.
Doing this with Requests is easy–it will handle redirects automatically for us, and handling cookies can be done with the Session object.
The next thing we will need is BeautifulSoup, which is a Python library that will help us parse the HTML returned by the server to find out if we are logged in or not.
Installation:
pip install beautifulsoup4
So all we have to do is to POST these three inputs with our credentials to the /login endpoint and check for the presence of an element that is only displayed once logged in:
import requests
from bs4 import BeautifulSoup

BASE_URL = 'https://news.ycombinator.com'
USERNAME = ""
PASSWORD = ""

s = requests.Session()

data = {"gogo": "news", "acct": USERNAME, "pw": PASSWORD}
r = s.post(f'{BASE_URL}/login', data=data)

soup = BeautifulSoup(r.text, 'html.parser')
if soup.find(id='logout') is not None:
	print('Successfuly logged in')
else:
	print('Authentication Error')
In order to learn more about BeautifulSoup, we could try to extract every link on the homepage.
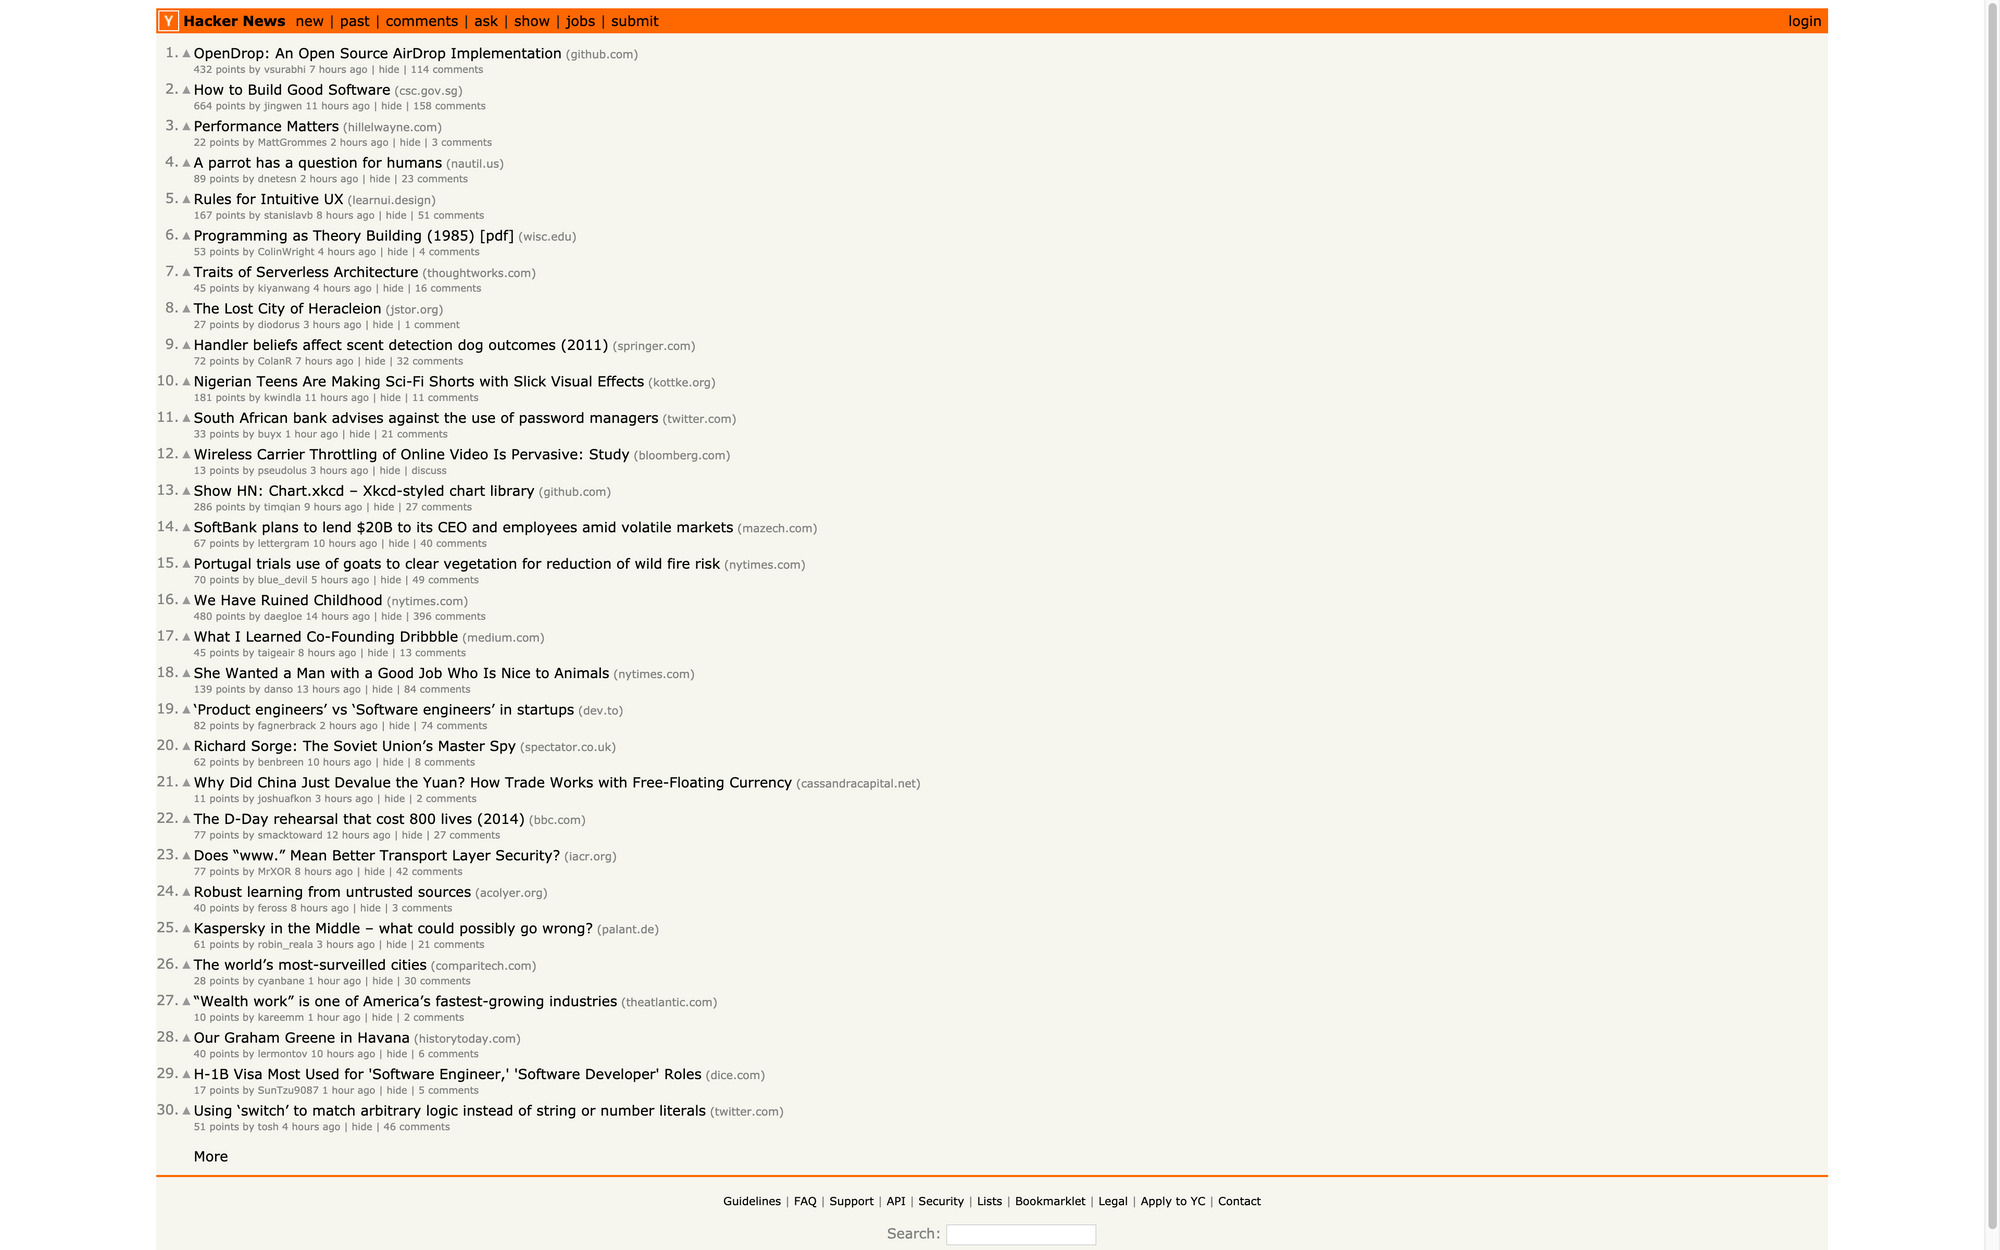
By the way, Hacker News offers a powerful API, so we’re doing this as an example. You should really use the API instead of scraping it!
The first thing we need to do is to inspect the Hacker News home page to understand the structure and the different CSS classes that we will have to select:
We can see that all posts are inside a <tr class="athing"> , so the first thing we will need to do is to select all these tags. This can be easily done with:
links = soup.findAll('tr', class_='athing')
Then for each link, we will extract its id, title, url and rank:
import requests
from bs4 import BeautifulSoup

r = requests.get('https://news.ycombinator.com')
soup = BeautifulSoup(r.text, 'html.parser')
links = soup.findAll('tr', class_='athing')

formatted_links = []

for link in links:
	data = {
		'id': link['id'],
		'title': link.find_all('td')[2].a.text,
		"url": link.find_all('td')[2].a['href'],
		"rank": int(links[0].td.span.text.replace('.', ''))
	}
	formatted_links.append(data)

print(formatted_links)
As you saw, Requests and BeautifulSoup are great libraries to extract data and automate different things like filling out forms. If you want to do large-scale web scraping projects, you could still use Requests, but you would need to handle lots of things yourself.
When you need to scrape a lots of webpages, there are many things you have to take care of:
- finding a way of parallelizing your code to make it faster
- handling errors
- storing results
- filtering results
- throttling your requests so you don’t overload the server
Fortunately for us, tools exist that can handle all of those things for us.
Scrapy

Scrapy is a powerful Python web scraping framework. It provides many features to download web pages asynchronously, process, and save it. It handles multithreading, crawling (the process of going from link to link to find every URL in a website), sitemap crawling, and much more.
Scrapy has also an interactive mode called the Scrapy Shell. With Scrapy Shell, you can test your things in your scraping code really quickly like XPath expression or CSS selectors.
The downside of Scrapy is that the learning curve is steep–there is a lot to learn.
To follow up on our example about Hacker News, we are going to write a Scrapy Spider that scrapes the first 15 pages of results and saves everything in a CSV file.
You can easily install Scrapy with pip:
pip install Scrapy
Then you can use the scrapy cli to generate the boilerplate code for our project:
scrapy startproject hacker_news_scraper
Inside hacker_news_scraper/spider we will create a new Python file with our Spider’s code:
from bs4 import BeautifulSoup
import scrapy

class HnSpider(scrapy.Spider):
    name = "hacker-news"
    allowed_domains = ["news.ycombinator.com"]
    start_urls = [f'https://news.ycombinator.com/news?p={i}' for i in range(1,16)]

    def parse(self, response):
        soup = BeautifulSoup(response.text, 'html.parser')
        links = soup.findAll('tr', class_='athing')

        for link in links:
        	yield {
        		'id': link['id'],
        		'title': link.find_all('td')[2].a.text,
        		"url": link.find_all('td')[2].a['href'],
        		"rank": int(link.td.span.text.replace('.', ''))
        	}
There is a lot of convention in Scrapy. Here we define an Array of starting URLs. The attribute name will be used to call our Spider with the Scrapy command line.
The parse method will be called on each URL in the start_urls array
We then need to tune Scrapy a little bit in order for our Spider to behave nicely against the target website.
# Enable and configure the AutoThrottle extension (disabled by default)
# See https://doc.scrapy.org/en/latest/topics/autothrottle.html
AUTOTHROTTLE_ENABLED = True
# The initial download delay
AUTOTHROTTLE_START_DELAY = 5
You should always turn this on. It will make sure the target website will not slow down because of your spiders by analyzing the response time and adapting the number of concurrent threads.
You can run this code with the Scrapy CLI and with different output format (CSV, JSON, XML, and so on):
scrapy crawl hacker-news -o links.json
And that’s it! You will now have all your links in a nicely formatted JSON file.
Selenium & Chrome —headless
Scrapy is really nice for large-scale web scraping tasks. But it is not enough if you need to scrape Single Page Applications written with JavaScript frameworks because it won’t be able to render the JavaScript code.
It can be challenging to scrape these SPAs because there are often lots of AJAX calls and websockets connections involved. If performance is an issue, you should always try to reproduce the JavaScript code, meaning manually inspecting all the network calls with your browser inspector and replicating the AJAX calls containing the interesting data.
In some cases, there are just too many asynchronous HTTP calls involved to get the data you want, and it can be easier to just render the page in a headless browser.
Another great use case would be to take a screenshot of a page. This is what we are going to do with the Hacker News homepage (again !)
You can install the Selenium package with pip:
pip install selenium
You will also need Chromedriver:
brew install chromedriver
Then we just have to import the Webdriver from the Selenium package, configure Chrome with headless=True, and set a window size (otherwise it is really small):
from selenium import webdriver
from selenium.webdriver.chrome.options import Options

options = Options()
options.headless = True
options.add_argument("--window-size=1920,1200")
driver = webdriver.Chrome(options=options, executable_path=r'/usr/local/bin/chromedriver')
driver.get("https://news.ycombinator.com/")
driver.save_screenshot('hn_homepage.png')
driver.quit()
You should then get a nice screenshot of the homepage:
You can do many more things with the Selenium API and Chrome like:
- Executing JavaScript
- Filling out forms
- Clicking on elements
- Extracting elements with CSS selectors or XPath expressions
Selenium and Chrome in headless mode is really the ultimate combination to scrape anything you want. You can automate anything that you could do with your regular Chrome browser.
The big drawback is that Chrome needs lots of memory / CPU power. With some fine-tuning you can reduce the memory footprint to 300-400mb per Chrome instance, but you still need 1 CPU core per instance.
If you want to run several Chrome instances concurrently, you will need powerful servers (the cost of which goes up quickly) and constant monitoring of resources.
Conclusion
Here is a quick recap table of every technology we discussed in this article. Do not hesitate to let me know in the comments if you know of some other resources that should be included here.
| Name | socket | urllib3 | requests | Scrapy | selenium |
|---|---|---|---|---|---|
| Ease of use | - - - | + + | + + + | + + | + |
| Flexibility | + + + | + + + | + + | + + + | + + + |
| Speed of execution | + + + | + + | + + | + + + | + |
| Common use case | -Writing low-level programming interface | -High level application that needs fine control over HTTP (pip, aws client, requests, streming) | -Calling an API | ||
| -Simple application (in terms of HTTP needs) | -Crawling a important list of website | ||||
| - Filter, extract and load on scrapped data | -JS rendering |
-Scraping SPA
-Automated testing
-Programmatic screenshot |
| Learn more | - Official documentation
- Great tutorial 👍 | - Official documentation
- PIP usage of urllib3, very interesting | - Official documentation
- Requests usage of urllib3 | - Official documentation - Scrapy overview | - Official documentation
- Scraping SPA |
I hope that this overview will help you choose your Python scraping tools and that you learned something reading this post.
Everything I talked about in this post are things I used to build my new indie hacker project: ScrapingBee, the simplest web scraping API around there 😊.
Every tool I talked about in this post will be the subject of a specific blog post in the future where I’ll go deep into the details.
Do not hesitate to let me know in the comments what else you’d like to know about scraping. I’ll talk about it in my next post.
Happy Scraping!
Recommended Reading
☞ How To Find String Length In Python
☞ Top 50 commonly asked Django Interview Questions and Answers
☞ Obtain Historical Weather Forecast data in CSV format using Python
Suggest:
☞ Python Tutorials for Beginners - Learn Python Online
☞ Learn Python in 12 Hours | Python Tutorial For Beginners
☞ Complete Python Tutorial for Beginners (2019)
☞ Python Tutorial for Beginners [Full Course] 2019
☞ Python Programming Tutorial | Full Python Course for Beginners 2019