Lazy load Angular components with Angular 9

No, you read correctly, lazy loading components!
Yes, the current Angular version only supports lazy loading of modules. But Ivy offers us new possibilities.
Lazy loading so far — Lazy loaded routes
Lazy loading is a great feature. In Angular, we get it almost for free by declaring a lazy route.

The code above would generate a separate chunk for the customers.module which gets loaded as soon as we hit the customer-list route.
It’s a pretty lovely way to shrink the size of your main bundle and boost the initial load of your application.
Still, wouldn’t it be cool if we get even more granular control over lazy loading? For example, by lazy loading single components?
Lazy loading of single components hasn’t been possible so far. But, things have changed with Ivy.
🌱 Ivy introduces “locality.”
Modules are a first-class concept and the main building block of every Angular app. They declare several components, directives, pipes, and services.
Today’s Angular applications can not exist without modules. One of the reasons for that is that the ViewEngine adds all the necessary metadata to modules.
Ivy, on the other hand, takes another approach. In Ivy, a Component can exist without a Module. Thanks to a concept called “Locality.”
“Locality” means that all the metadata is local to the component.
Let me explain this by having a closer look at an es2015 bundle generated with Ivy.
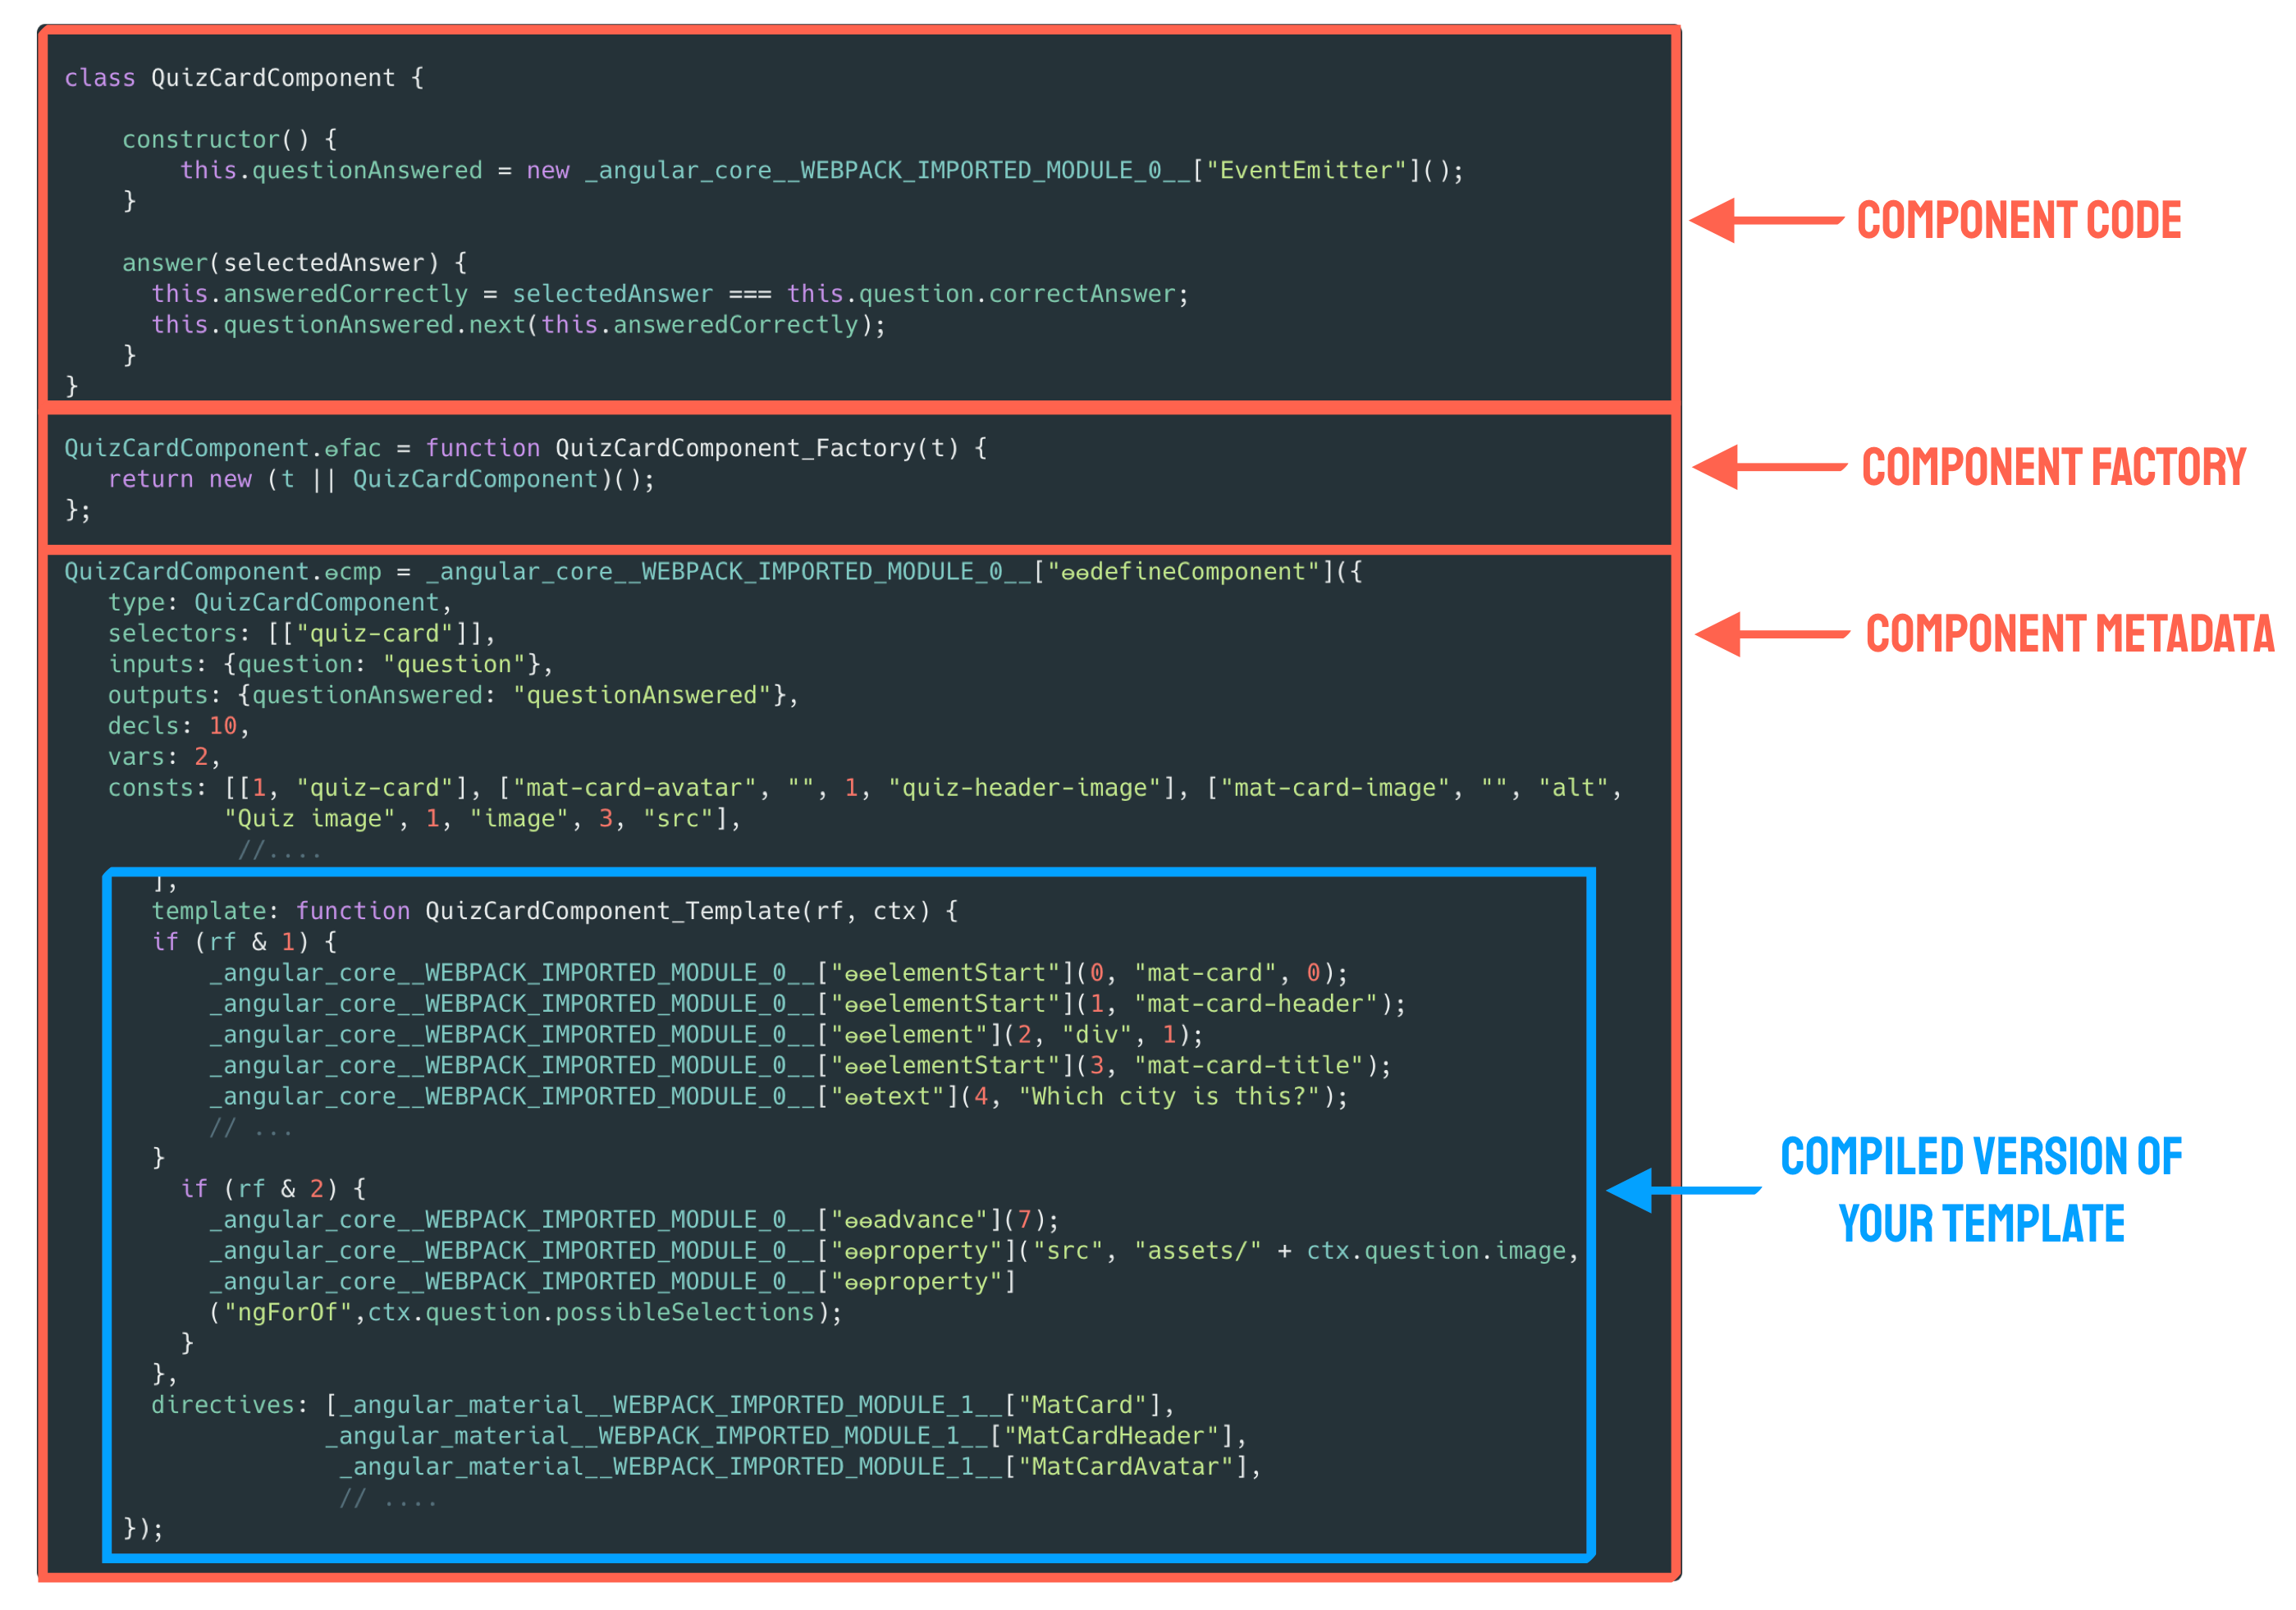
In the “Component Code” section, we can see that Ivy keeps our component code. Nothing special. But then Ivy also adds some metadata to it.
The first metadata it adds is a Factory that knows how to instantiate our component (“Component Factory”). In the ” Component Metadata” part, Ivy adds further attributes like type, selectors etc…, everything it needs at runtime.
One of the most exciting things Ivy adds is the template function. Which is worth some further explanations.
The template function is the compiled version of our HTML. It executes Ivy instructions to create our DOM. This differs from the way the ViewEngine worked.
The ViewEngine took our code and iterated through it. Angular was then executing code if we were using it.
With the Ivy approach, the component is in the driver seat and executes Angular. This change allows a component to live on its own and makes Angular core tree shakable.
A real-world example of lazy loading a component
Now that we know that lazy loading is possible, we will demonstrate it on a real-world use case. We are going to implement a Quiz application.
The app displays a city image with different possible solutions. Once a user chooses a solution, the clicked button immediately shows if the answer was correct or not by turning red or green.
After answering a question, the next question appears. Here’s a quick preview:

The concept of lazy loading a component 👨🎓
Let’s first illustrate the overall idea of lazy loading our QuizCard component.
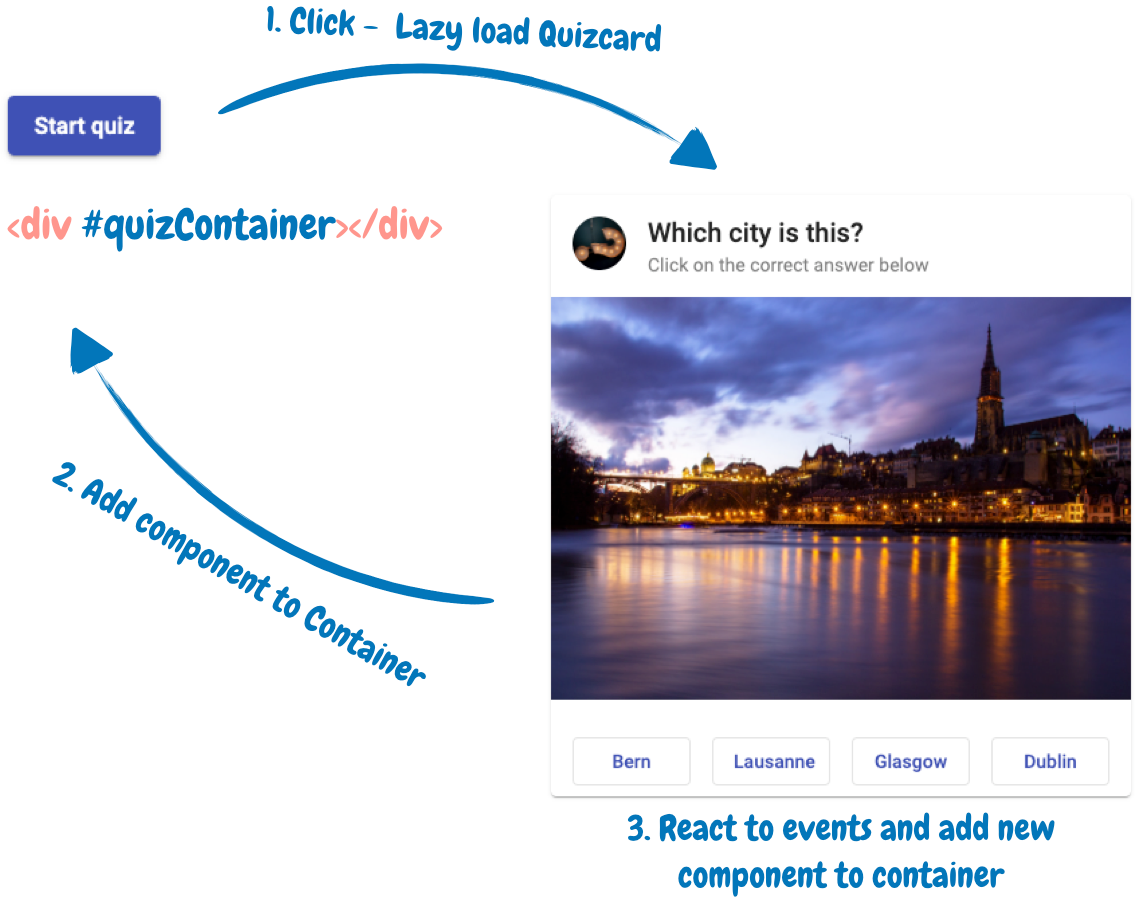
Once the user starts the quiz by clicking on the “Start Quiz” button, we start to lazy load our component. Once we get a hold of the component, we will add it to a Container.
We react to the questionAnwsered output events of our lazy-loaded component like we do with standard components. Once the questionAnwsered output event occurs, we add a new Quiz card.

Got it — let’s have a look at the code 🔍
To explain the process of lazy loading a component, we are going to start with a simplified version of our QuizCardComponent which simplistically displays the question properties.
We will then extend our component by adding Angular Material components. Last but not least, we react to output events of our lazy-loaded component.
So, for now, let’s lazy load a simplified version of the QuizCardComponent which has the following template:
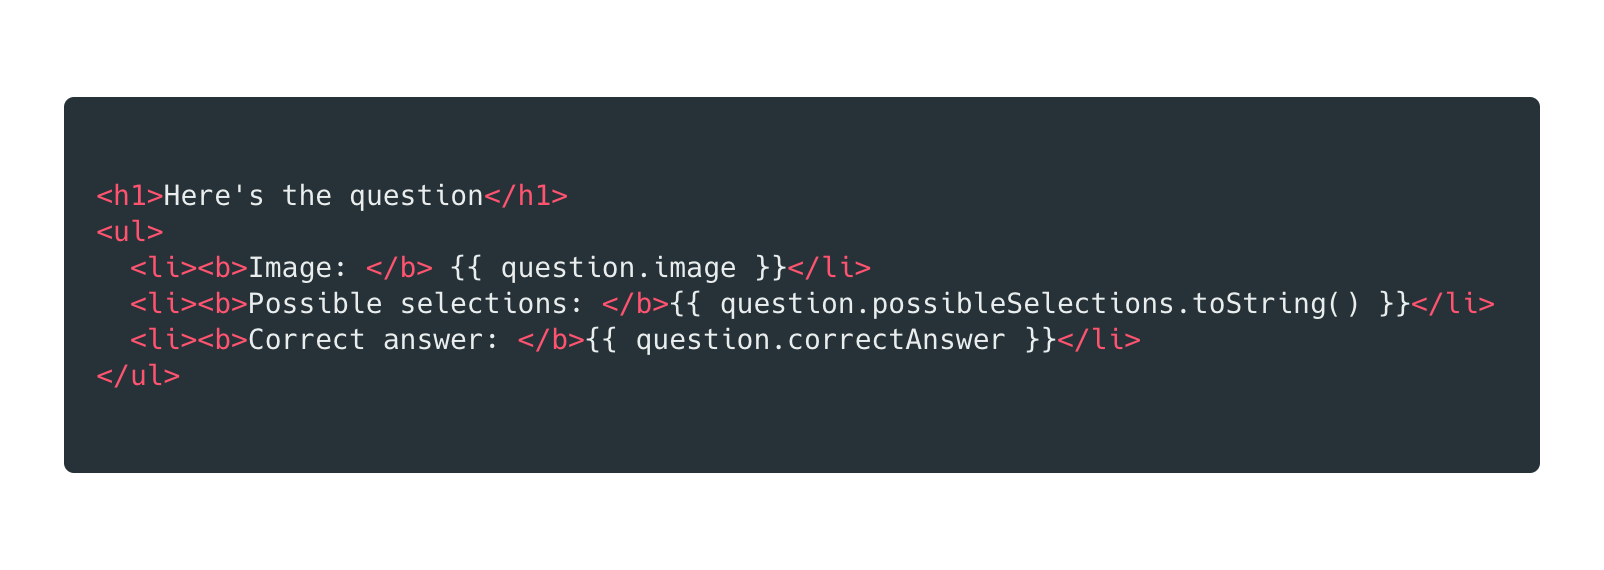
The first step is to create a container element. For this, we either use a real element like a div or we can use a ng-container , which does not introduce an extra level of HTML.
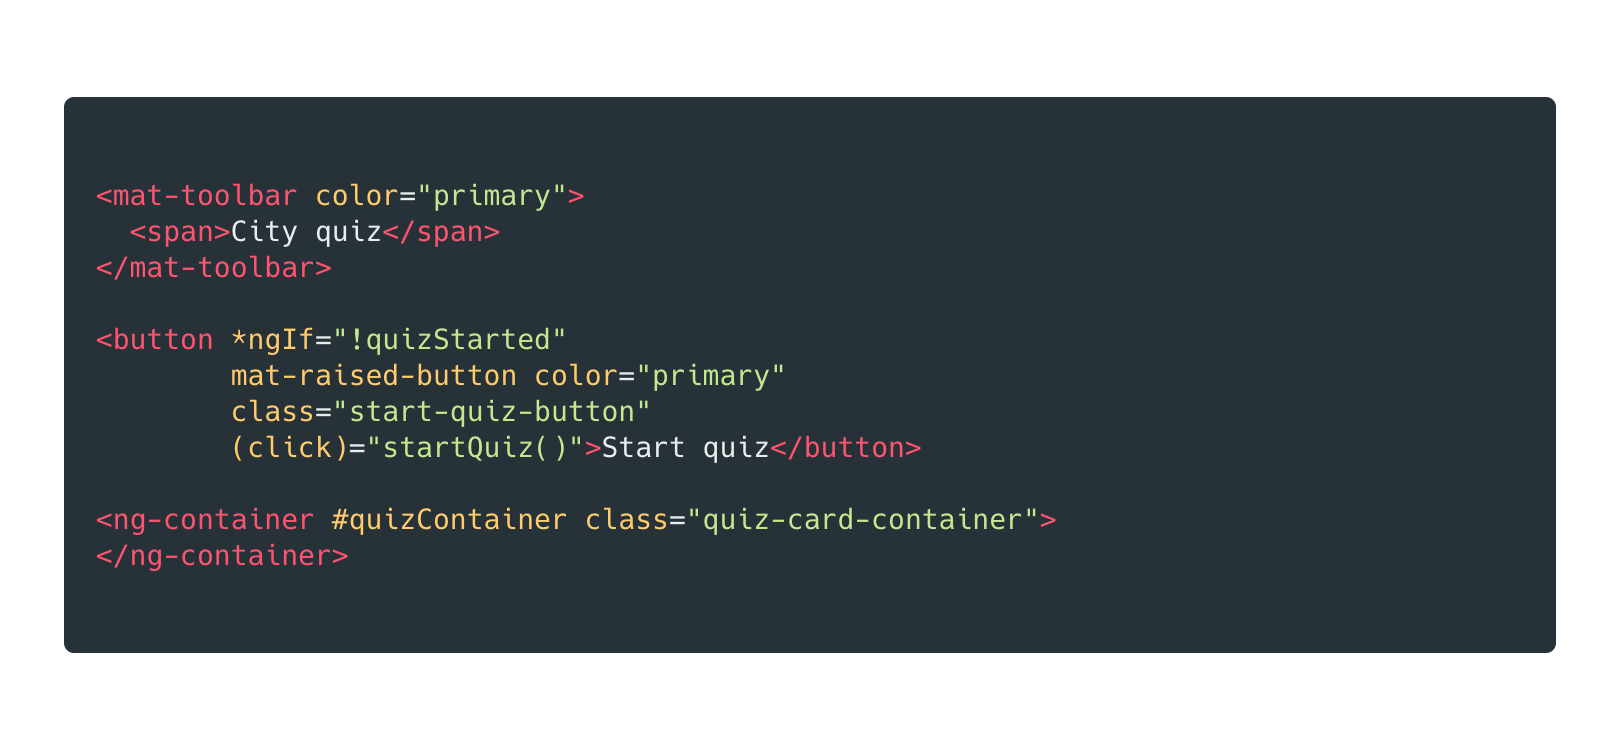
In our component, we then need to get a hold of the container. To do so, we use the @ViewChild annotation and tell it that we want to read the ViewContainerRef.
Note: In Angular 9 the static config in the @ViewChild annotation defaults to false.

Cool, we got the container where we want to add our lazy-loaded component. Next, we need a ComponentFactoryResolver and an Injector which we can both get over dependency injection.
A
_ComponentFactoryResolver_is a simple registry that maps Components to generated_ComponentFactory_classes which can be used to create instances of components.
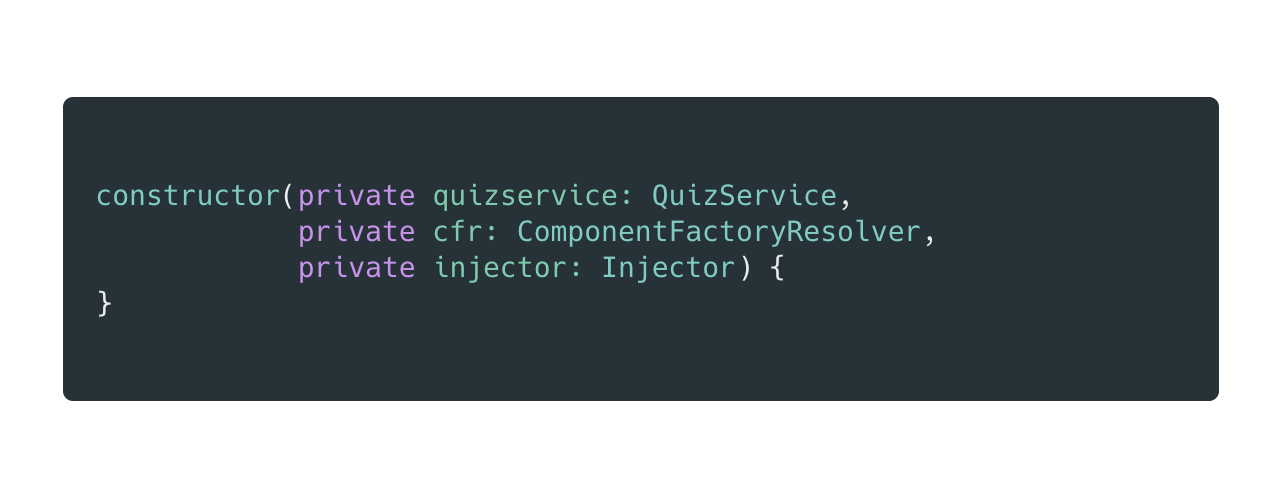
Ok, at this point, we have all the things which we need to achieve our goal. Let’s change our startQuiz method and lazy load our component.

We can use the ECMAScript import function to lazy load our QuizCardComponent. The import statement returns us a promise which we either handle using async/await or with a then handler. Once the promise resolves, we use destructuring to grep the component.
Don’t use
async/awaitwhen you compile toes2017. Zone js can not patch nativeasync/awaitstatements. Therefore you might run into trouble with Change Detection. If you compile your code toes2017you should use a.thenhandler with a callback function.
To be backward compatible we nowadays need a ComponentFactory. This line will not be required in the future since we can directly work with the component.
The ComponentFactory gives us a componentRef which we then, together with the Injector, pass to the createComponent method of our container.
The createComponent gives us back a ComponentRef which contains an instance of our component. We use this instance to pass @Input properties to our component.
In the future, all this might be done using Angular’s
renderComponentmethod. This method is currently still private/experimental. However, it’s very likely that this method will make it to Angular. Lars Gyrup Brink Nielsen gave a great workshop about this at InDepthConf.
That’s all that’s needed to lazy load a component.

Once the start button was clicked, we lazy load our component. If we open the network tab, we can see that the quiz-card-quiz-card-component.js chunk is lazy loaded. In the running application, the component is shown, and the Question is displayed.
Let’s add material 👷
Currently, we lazy-loaded our QuizCardComponent. Pretty cool. But our application isn’t yet useful.
Let’s change that by adding additional features and some Angular material components.
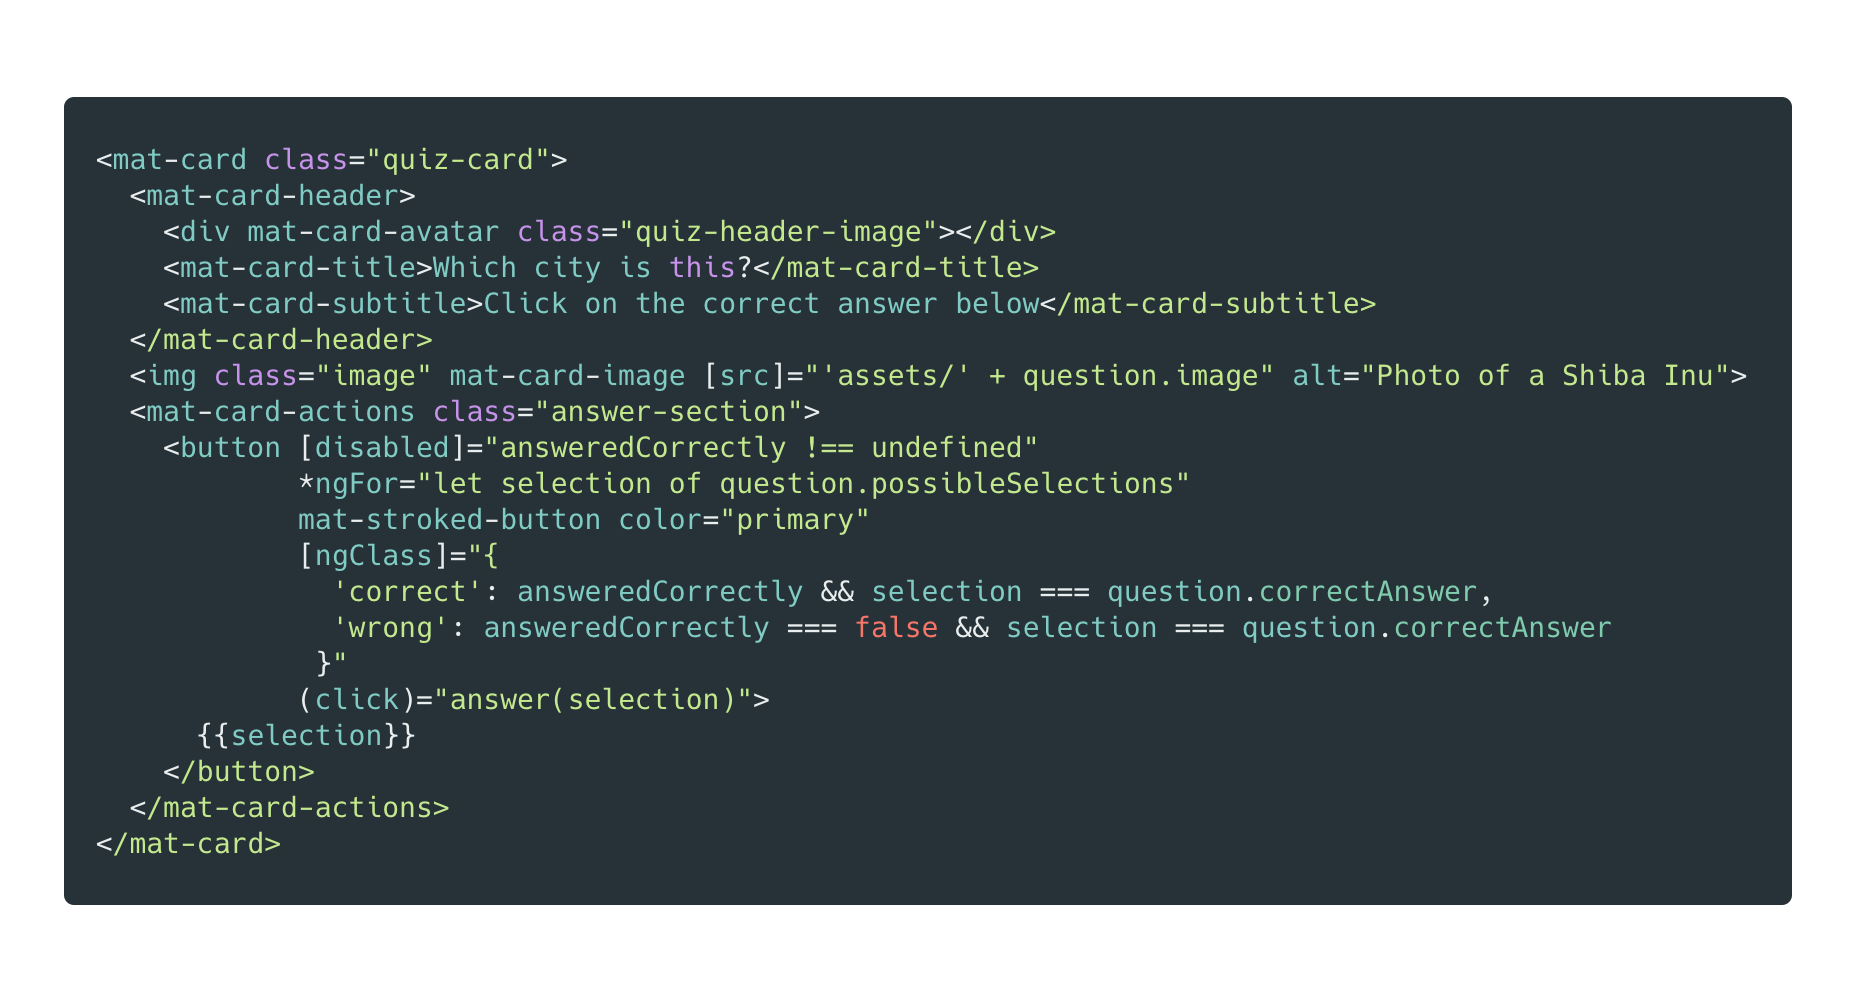
We included some beautiful Material components. But where do we add the Material Modules?
Yeah, we could add them to our AppModule. But, this would mean that those modules are eagerly loaded. So that’s not the best solution. Furthermore, our build fails with the following message:
ERROR in src/app/quiz-card/quiz-card.component.html:9:1 - error TS-998001: 'mat-card' is not a known element:
1. If 'mat-card' is an Angular component, then verify that it is part of this module.
2. If 'mat-card' is a Web Component then add 'CUSTOM_ELEMENTS_SCHEMA' to the '@NgModule.schemas' of this component to suppress this message.
What now? As you might guess, there’s a solution to this problem. And the answer is Modules!
But this time we use them slightly different. We add a small module to the same file as our QuizCardComponent.

Module inside quizcard.component.ts — Note: no export statement
This module specification only belongs to our lazy-loaded component. Therefore the only component this module will ever declare is the QuizCardComponent. In the imports section, we only add the Modules needed for our component.
To ensure that an eagerly loaded module can not import the module, we don’t export it.
Let’s rerun our application and see how it behaves when we click on the “Start Quiz” button.

Awesome! Our QuizCardComponent gets lazy-loaded and added to the ViewContainer. It also brings all the necessary dependencies.
Let’s use a tool called webpack-bundle-analyzer and analyze how the bundle looks.
_webpack-bundle-analyzer_is an npm module which allows you to visualize the size of webpack output files with an interactive zoomable treemap.
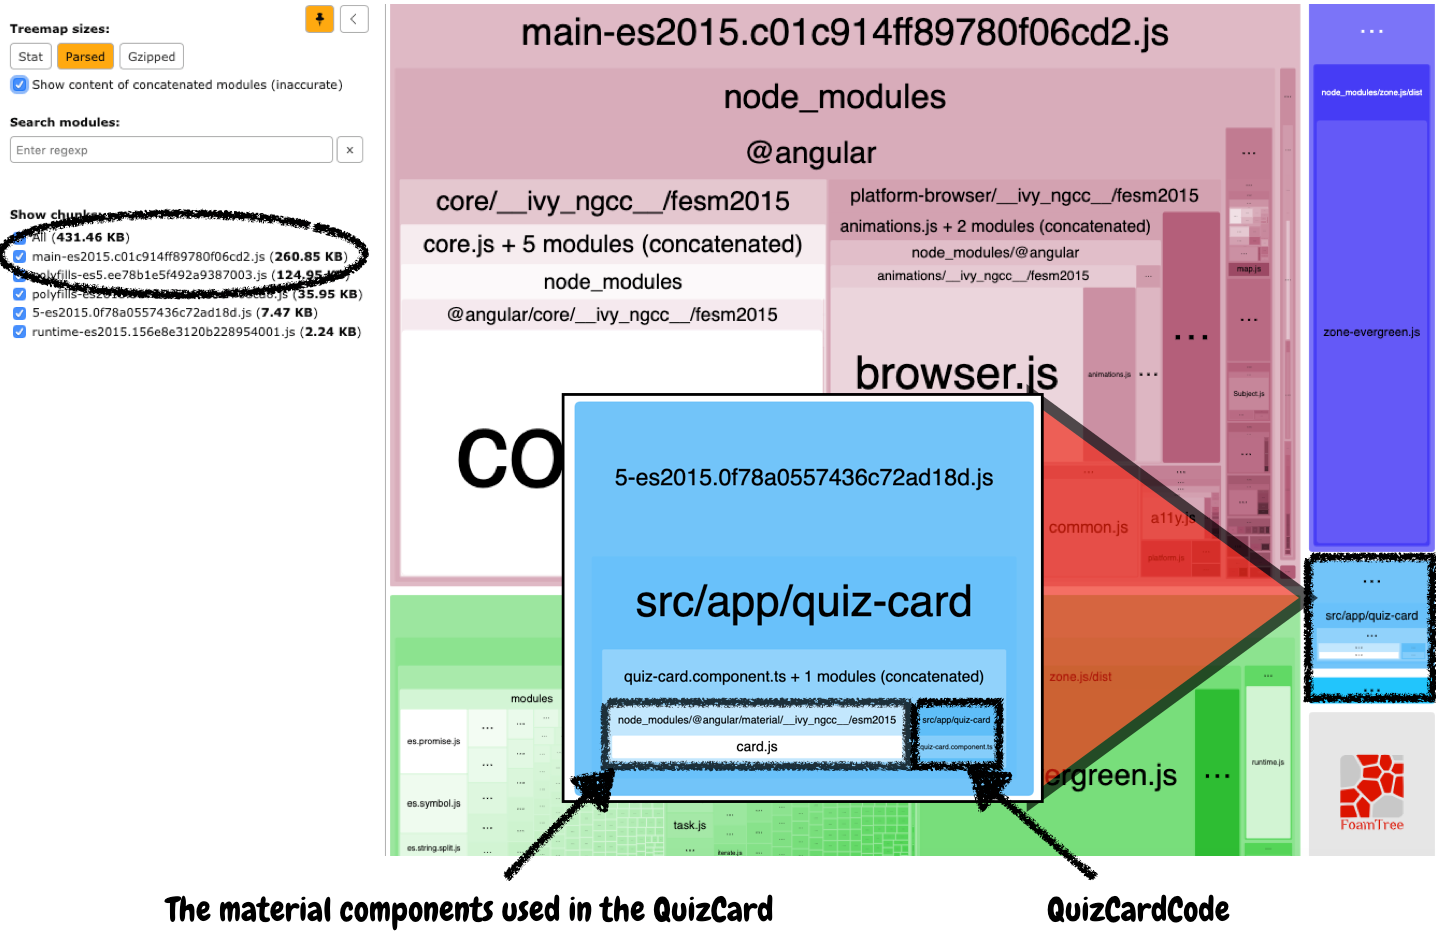
The size of our main bundle is around 260 KB. If we would eagerly load the, QuizCardComponent it would be around 270 KB. We saved around 10 KB by lazy loading only this component. Pretty cool!
Our QuizCardComponent got bundled in a separate chunk. If we take a closer look at the content of this chunk, we don’t only find our QuizCardComponent code, but we also see the Material modules used inside the QuizCadrComponent.
Even though the
_QuizCardComponent_used_MatButtonModule_and_MatCardModule_only the_MatCardModule_ends up in the quiz-card component chunk. Reason for that is because we also use the_MatButtonModule_in our_AppModule_to display the start quiz button. Therefore it ends up in another chunk.
At this point, we lazy-loaded our QuizCardComponent , which displays a lovely Material card with an image and some possible answers. But does it currently happen if you click on one of those possible answers?
Based on your answer, the button turns green or red. But besides that? Nothing! So now other question is shown. Let’s fix that.
Reacting on events of lazy-loaded components
No further question is shown because we didn’t yet react to the output event of our lazy-loaded component. We already know that our QuizCardComponent emits events by using an EventEmitter. If we look at the class definition of the EventEmitter we can see that the EventEmitter inherits from Subject.
export declare class EventEmitter<T extends any> extends Subject<T>
Means, the EventEmitter also has a subscribe method, which allows us to react to emitted events.

We subscribe to the questionAnswered stream and call the showNextQuestion method, which then executes our lazyLoadQuizCard logic.
_takeUntil(instance.destroy$)_is necessary to clean up the subscription once the component gets destroyed. If the_QuizCardComponent_‘s_ngOnDestroy_lifecycle hook gets called the_destroy$_Subject is called with_next_and_complete_
async showNewQuestion() {
  this.lazyLoadQuizCard();
}
Since the QuizCard has already been loaded, there’s no additional HTTP request made. We use the content of the previously loaded chunk, create a new component, and add it to our container.
Life cycle hooks
Almost every life cycle hook gets automatically called if we lazy load our QuizCardComponent. But there’s one hook missing, do you see which?

It’s the first of all hooks, ngOnChanges. Since we manually update the input properties of our component instance, we are also responsible for calling the ngOnChanges life cycle hook.
To call ngOnChanges on the instance, we manually need to construct the SimpleChanges object.

We manually call ngOnChanges on our component instance and pass a SimpleChange object to it. The SimpleChange indicates that it’s the first change, that the previous value was null and that the current value is our question.
Awesome! We lazy-loaded a component with third-party modules, reacted to output events, and called the correct life cycle hooks.
Interested in the source code?
All the sources used throughout this blog post are publicly available in the following repository.
https://github.com/kreuzerk/city-quiz
Conclusion
Lazy loading component enables great possibilities to optimize our application further when it comes to performance. We have more granular control what we want to lazy load compared to lazy loading features with the Angular router.
Unfortunately, we still need modules when using other modules in our component. Keep in mind, chances are high that this might change in the future.
Ivy uses locality, which enables components to live on their own. This change is the base for the future of Angular.
Suggest:
☞ Angular Tutorial - Learn Angular from Scratch
☞ JavaScript Programming Tutorial Full Course for Beginners
☞ Learn JavaScript - Become a Zero to Hero