Build Node.js RESTful APIs in 10 Minutes

I’m going to try to make this as simple as possible. I’ve spent a ton of time trying to find a simple, working, easy to follow example of a REST API performing CRUD operations, error handling, sorting, and filtering in Node.js and have failed to do so.
Environment Setup
OK, let’s get started! First, let me explain the tools we’ll be using:
Node.js— an open-source JavaScript runtime environment that allows you to run code outside of a browser. We will be developing our RESTful API in JavaScript on a Node.js serverMongoDB— the database we will be writing our data toPostman— the tool we will be using to test our APIVSCode— you can use any text editor you want but I will be using this because it’s my favorite
If you don’t have any of these tools set up, I have created an accompanying piece walking you through the steps: Node.js REST API Environment Setup
Introduction to REST API
You hear about REST API everywhere in today’s technology world, but what is it? For starters, API stands for Application Programming Interface.
What is the point of an API? It allows two pieces of software to talk to one another. There are many types of APIs — SOAP, XML-RPC, JSON-RPC — but today we’ll be talking about REST.
What is REST? It stands for Representational State Transfer. It is a software architecture style that is used for creating web services. REST has made it easy for computer systems to communicate with one another via the internet.
How does it work? Pretty similar to how you type “rest api” into Google and the search results are returned. At the highest level, a client makes a call (request) in the form of a URL to a server requesting some data. Below is an example of a google search for “rest API”:
www.google.com/search?q=rest+api
The server then responds with the data (response) over the HTTP protocol. This data appears in JSON notation and is converted into an aesthetically pleasing visual in your browser — your google search results.
In short, you send a request in the form of a URL and receive a response in the form of data.
How is this data normally received? JSON (Javascript Object Notation) describes your data in key-value pairs. JSON makes reading the data easy both machines and humans.
Let’s dive into the requests a little more.
Requests
First, it’s important to understand that requests are made of up four parts.
- Endpoint — The URL you are requesting for. Typically made up of a root and a path. E.g. https://www.google.com/search?q=rest+api, where the root is https://www.google.com and the path is /search?q=rest+api. More on this below.
- **Method—**The type of request you send to the server, or “HTTP verb”. This is how we’re able to execute our CRUD (Create, Read, Update or Delete) operations. The five types are
GET,POST,PUT,PATCHandDELETE. - **Headers—**Additional information that can be sent to the client or server that is used to assist your data in some way. For example, it can be used to authenticate a user so the data can be viewed. Or it can tell you how the data should be received (application/JSON).
- Data (body) — The information we want to receive from our request as a JSON.
More on endpoints: We will be dealing with these strings a lot, so it’s important that we understand them. Here are the kinds of things you may see in an endpoint:
- Colon (
:) — Used to indicate a variable in the string. In API docs you will see endpoints with:username(or something similar). Just know that when you test it out, you should replace thatusernamewith an actual username. Example of a fake medium endpoint:
medium.com/users/:username/articles
to
medium.com/users/ryangleason82/articles
- Question mark (
?) — Begins the query parameters.Query parameters are sets of key-value pairs that can be used to modify your requests. Here’s an example of a Medium endpoint in which I want to see my articles and whether they’ve been published or not:
medium.com/users/:username/articles?query=value
medium.com/users/ryangleason82/articles?published=true
- Ampersand (
**&**) — Used to separate query parameters when you want to use multiple. For example, we can see articles by me that are published andposted today.
medium.com/users/:username/articles?query=value&query2=value2
medium.com/users/ryangleason82/articles?published=true&date=today
Enough of the conceptual stuff, let’s dive into the coding! I’ll first show you the basics of creating a REST API. It will be made up of four parts:
- Server — Used to establish all of the connections we need, as well as defining important information such as endpoints, ports, and routing.
- Model — What does our data look like?
- Routes — Where do our endpoints go?
- Controller — What do our endpoints do?
Setting Up Our Server
var express = require("express"),
  app = express(),
  port = process.env.PORT || 3000,
  mongoose = require("mongoose"),
  bodyParser = require("body-parser"),
  Entry = require("./api/models/leaderboardModel");
app.use(bodyParser.json());
app.use(bodyParser.urlencoded({ extended: true }));

mongoose.connect(
  "mongodb+srv://ryangleason:[email protected]/RESTTutorial?retryWrites=true&w=majority",
  { useUnifiedTopology: true, useNewUrlParser: true, useFindAndModify: false }
);

var routes = require("./api/routes/leaderboardRoutes");
routes(app);

app.listen(port);

console.log("API server started on " + port);
server.js
Let me explain what’s happening here:
Express— The web application framework forNode.js. This starts a server and listens for connections on port 3000.Mongoose—Assists us in object modeling for MongoDB. It helps to manage relationships between data, validates schema, and is overall useful in communicating from Node.js to MongoDB.bodyParser—Is needed to interpret requests. Works by extracting the body portion of an incoming request and exposes it asreq.bodyand as a JSON.Entry—This is the name of our schema. We need to include this in our server.js because the schema must be “registered” for each model we use.mongoose.connect(uri string, {options})— Establish a connection to our MongoDB Atlas database. We set these options to eliminate deprecation warnings.routes(app):— Defines how an application’s endpoints will respond to client requests. This will point to the routes we define ourselves.
Now we’re going to create our model, routes, and controller. This is what my project directory structure looks like:
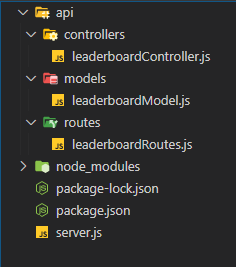
Create the Model
var mongoose = require("mongoose");
var Schema = mongoose.Schema;

var EntrySchema = new Schema({
  player: {
    type: String,
    required: "Please enter a name"
  },
  score: {
    type: Number,
    required: "Please enter a score"
  },
  registered: {
    type: String,
    default: "No"
  }
});

module.exports = mongoose.model("Entry", EntrySchema, "Leaderboard");
leaderboardModel.j
I’ve created a basic model, only containing three fields. It’s important to understand that we’re using a Mongoose schema. Each schema maps to a MongoDB collection and defines the structure of the documents within that collection. Then you will see at the end we are exporting our schema, called Entry, and exposing it to the rest of our application.
Each Entry will represent a different record in our leaderboard where an Entry is the player name, score and whether they’re registered.
Define our Routes
module.exports = app => {
  var leaderboard = require("../controllers/leaderboardController");

  app
    .route("/entries")
    .get(leaderboard.read_entries)
    .post(leaderboard.create_entry);

  app
    .route("/entries/:entryId")
    .get(leaderboard.read_entry)
    .put(leaderboard.update_entry)
    .delete(leaderboard.delete_entry);
};
leaderboardRoutes.js
The routes will define what happens when a user hits one of our endpoints. It’s also how we determine which CRUD operation is used to interact with the data in our database.
POST—Create an entryGET— Read an entryPUT— Update an entryDELETE— Delete an entry
Build the Controller
var mongoose = require("mongoose"),
  Entry = mongoose.model("Entry");

exports.read_entries = async (req, res) => {
  ret = await Entry.find();
  res.json(ret);
};

exports.create_entry = async (req, res) => {
  const new_entry = new Entry(req.body);
  ret = await new_entry.save();
  res.json(ret);
};

exports.read_entry = async (req, res) => {
  ret = await Entry.findById(req.params.entryId);
  res.send(ret);
};

exports.update_entry = async (req, res) => {
  ret = await Entry.findByIdAndUpdate({ _id: req.params.entryId }, req.body, {
    new: true
  });
  res.json(ret);
};

exports.delete_entry = async (req, res) => {
  await Entry.deleteOne({ _id: req.params.entryId });
  res.json({ message: "Entry deleted" });
};
leaderboardController.js
Here we have the logic. So WHAT is happening when our routes are hit. This is the bare minimum you need for a fully functioning API. Each one of these methods corresponds with a route — you’ll notice all of the names are the same as the routes.
Each of these methods takes in two parameters: the request and the response (req, res). We then use the Mongoose method that coincides with the operation we are trying to implement. For example, for a GET request, we want to find all the documents and return them as a response JSON object. To do so, we use the find() method.
The same goes for POST. We want to create a record so we use the Mongoose method, save(), to write that record to the database.
Checkpoint: To ensure that we are correctly writing to the database, let’s perform a POST request in Postman.
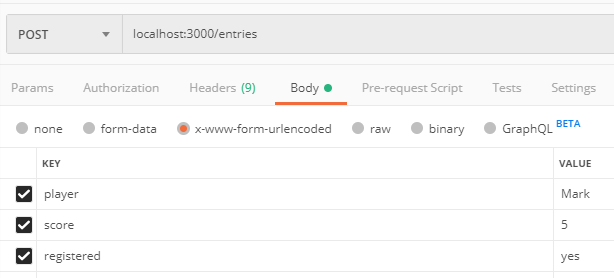
This is what my POST request will look like sent to localhost:3000/entries. Here’s the response you should get on hitting the Send button:
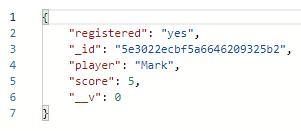
A GET request to localhost:3000/entries will receive all of the documents in our database as a response.
A GET request to localhost:3000/entries/:entryId (example from above: localhost:3000/entries/5e3022ecbf5a6646209325b2) will return just a single record.
A PUT request sent to localhost:3000/entries/:entryIdwill update the entry with whatever you put in the body.
A DELETE request sent to localhost:3000/entries/:entryIdwill delete the specified entry.
I think you get the idea. What’s missing from this? Proper error handling. Since we made the player and score fields required, the response will be an error if one of those two fields isn’t entered. We need a way to handle this gracefully.
Error Handling
For error handling with REST API’s, we are going to use try-catch statements. We are going to “try” to make the request and if that fails we will “catch” the error. This is a way to gracefully handle errors. Below are the types of errors you may find when creating an API request:
100 level (informational)— The server acknowledges a request.200 level (Successful)— The server completed the request.300 level (Redirect)— The client needs to do more to complete the request.400 level (Client Error)—The client sent an invalid request.500 level (Server Error)— The server failed to complete the request due to server error.
var mongoose = require("mongoose"),
  Entry = mongoose.model("Entry");

exports.read_entries = async (req, res) => {
  try {
    const ret = await Entry.find();
    res.json(ret);
  } catch (error) {
    res.send({ message: "Bad request: " + error });
  }
};

exports.create_entry = async (req, res) => {
  try {
    const new_entry = new Entry(req.body);
    ret = await new_entry.save();
    res.json(ret);
  } catch (error) {
    res.send({ message: "Bad request: " + error });
  }
};

exports.read_entry = async (req, res) => {
  try {
    const ret = await Entry.findById(req.params.entryId);
    res.send(ret);
  } catch (error) {
    res.send({ message: "Bad request: " + error });
  }
};

exports.update_entry = async (req, res) => {
  try {
    const ret = await Entry.findByIdAndUpdate(
      { _id: req.params.entryId },
      req.body,
      { new: true }
    );
    res.json(ret);
  } catch (error) {
    res.send({ message: "Bad request: " + error });
  }
};

exports.delete_entry = async (req, res) => {
  try {
    const ret = await Entry.deleteOne({ _id: req.params.entryId });
    res.json({ message: "Deleted entry" });
  } catch (error) {
    res.send({ message: "Bad Request: " + error });
  }
};
leaderboardControllerError.js
Checkpoint: Let’ssend in a bad request so we can see if our error handling works. I’ll post before and after error handling so you can see the difference.
In the request, I’m just going to remove the player field. This will trigger an error since it’s a required field:
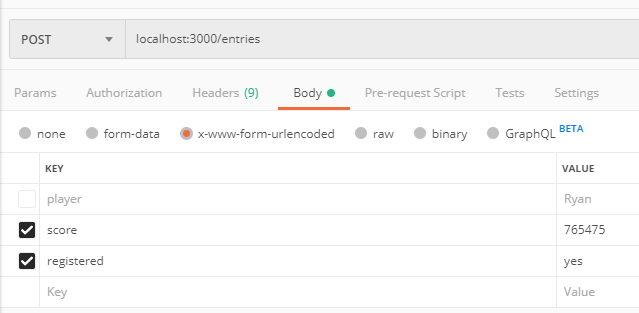
Before error handling:

In Postman, before adding error handling, the server will just keep trying to send the request. It has nothing to catch the error with, so it will eventually time out and you won’t know what’s wrong with your request.
In your console you’ll just see this messy output:

But when we add error handling we just get this simple response:

Much better!
Sorting
As this is a leaderboard, we want to sort in descending order by score. We take the sort parameter out of the URL string, check if it’s true, and then execute a simple sort.
We only have to update our read_entries method:
var mongoose = require("mongoose"),
  Entry = mongoose.model("Entry");

exports.read_entries = async (req, res) => {
  try {
    const ret = await Entry.find();
    if (req.query.sort === "true")
      res.json(ret.sort((a, b) => b.score - a.score));
    else res.json(ret);
  } catch (error) {
    res.send({ message: "Bad Request: " + error });
  }
};
leaderboardControllerSort.js
We take the sort variable out of our URL query string. The way we access this is req.query.sort.
Checkpoint: Before our sort, our output should look something like this when performing a GET request:
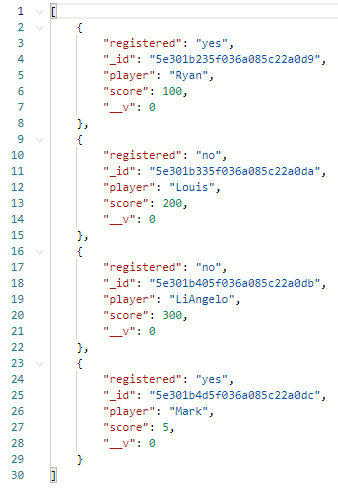
After adding sort=true to our endpoint:

It should look like this:

It’s been sorted in descending order!
Filtering
We now want to display only the registered entries. How do we do that? By adding a filter. Again, for simplicity’s sake, we are going to only modify the read_entries method.
var mongoose = require("mongoose"),
  Entry = mongoose.model("Entry");

exports.read_entries = async (req, res) => {
  try {
    var ret = await Entry.find();
    if (req.query.sort === "true") {
      ret = ret.sort((a, b) => b.score - a.score);
    }
    if (req.query.registered === "yes") {
      ret = ret.filter(a => a.registered === "yes");
    }
    res.json(ret);
  } catch (error) {
    res.send({ message: "Bad GET Request: " + error });
  }
};
filterController.js
We take the registered variable down from the URL and if it’s equal to “yes”, then we filter out all entries that aren’t registered.
Checkpoint: Before adding the filter, the results of the GET request will look like this:

After adding registered=yes to the endpoint:

The response should look like this:
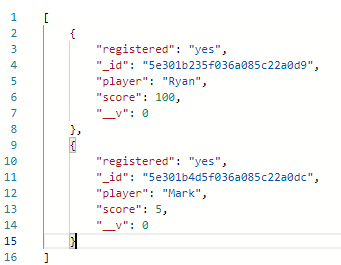
That’s it! You’ve successfully filtered your data from the back end.
Review
In this tutorial, you have learned how to successfully:
- Create a REST server
- Perform CRUD operations
- Gracefully handle errors
- Sort your data using query parameters
- Filter your data using query parameters
I hope this was helpful! If you have any questions, comments or concerns please don’t hesitate to reach out.
Suggest:
☞ JavaScript Programming Tutorial Full Course for Beginners
☞ Learn JavaScript - Become a Zero to Hero
☞ E-Commerce JavaScript Tutorial - Shopping Cart from Scratch