Best practice for Django project working directory structure

Django is a robust, open-source, Python-based framework for building web applications. Its popularity has increased during the last couple of years, and it is already mature and widely-used with a large community behind it.
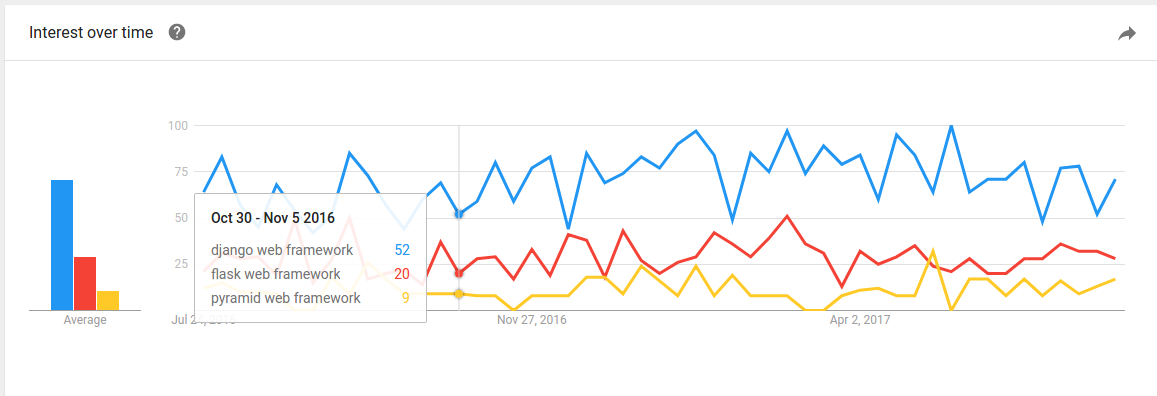
Among other Python-based frameworks for creating web applications (like Flask and Pyramid), Django is by far the most popular. It supports both Python version 2.7 and Python 3.6. But at the time of this article, Python 2.7 is still the more accessible version in terms of community, third party packages, and online documentation. Django is secure when used properly, and provides high dimensions of flexibility. It is the way to go when developing server-side applications using Python.
As an experienced Python and Django developer, I will share with you some best practices for a Django setup that I’ve learned and collected over the years. Whether you have a few Django projects under your belt, or you’re just about to start your first one from scratch, the best practices described here might help you create better applications down the road.
I wrote this article from a very practical mindset so that you can add some tools to your development toolbox immediately. You can even create an advanced custom Django boilerplate for your next projects.
For the purpose of this article, I assume you’re using a Linux Ubuntu machine. Throughout the article, some code lines start with a <div class="section-inner sectionLayout--insetColumn" sign. These are used to emphasize that this line should be inserted into the terminal. Make sure to copy the line **without** the <div class=“section-inner sectionLayout–insetColumn” sign.
Virtual Environment
While developing Python-based applications, using third party packages is an ongoing thing. These packages are updated often, so keeping them organized is essential. When developing more and more projects on the same local machine, it’s challenging to keep track of the current version of each package. It’s impossible to use different versions of the same package for different projects. Moreover, updating a package on one project might break functionality on another, and vice versa.
That’s where Python Virtual Environment comes handy. To install virtual environment use:
$ apt-get update
$ apt-get install python-pip python-dev build-essential
$ export LC_ALL="en_US.UTF-8" # might be necessary in case you get an error from the next line
$ pip install --upgrade pip
$ pip install --upgrade virtualenv
$ mkdir ~/.virtualenvs
$ pip install virtualenvwrapper
$ export WORKON_HOME=~/.virtualenvs
$ nano ~/.bashrc
Add this line to the end of the file:
. /usr/local/bin/virtualenvwrapper.sh
Then execute:
$ . .bashrc
After installing, create a new virtual environment for your project by typing:
$ mkvirtualenv project_name
While you’re in the context of your virtual environment, you’ll notice that a prefix is added to the terminal, like:
(project_name) ofir@playground:~$
In order to deactivate (exit) the virtual environment and get back to the main Python context of your local machine, use:
$ deactivate
In order to activate (start) the virtual environment context, use:
$ workon project_name
To list the virtual environments existing in your local machine, use:
$ lsvirtualenv
Holding your project dependencies (packages) in a virtual environment on your machine allows you to keep them in an isolated environment. You only use them for a single (or multiple) projects. When creating a new virtual environment, you’re starting a fresh environment with no packages installed in it. Then you can use, for example:
(project_name) $ pip install Django
for installing Django in your virtual environment, or:
(project_name) $ pip install Django==1.11
for installing version 1.11 of Django accessible only from within the environment.
Neither your main Python interpreter nor the other virtual environments on your machine will be able to access the new Django package you’ve just installed.
In order to use the runserver command using your virtual environment, while in the context of the virtual environment, use:
(project_name) $ cd /path/to/django/project
(project_name) $ ./manage.py runserver
Likewise, when entering the Python interpreter from within the virtual environment, type:
(project_name) $ python
It will have access to packages you’ve already installed inside the environment.
Requirements
Requirements are the list of Python packages (dependencies) your project is using while it runs, including the version for each package. Here’s an example for a requirements.txt file:
dicttoxml==1.7.4
Django==1.11.2
h5py==2.7.0
matplotlib==2.0.2
numpy==1.13.0
Pillow==4.1.1
psycopg2==2.7.1
pyparsing==2.2.0
python-dateutil==2.6.0
pytz==2017.2
six==1.10.0
xmltodict==0.11.0
Keeping your requirements.txt file up to date is essential for collaborating properly with other developers. It’s also important for keeping your production environment properly configured. This file, when included in your code repository, enables you to update all the packages installed in your virtual environment by executing a single line in the terminal. Then you can get new developers up and running in no time.
In order to generate a new requirements.txt or to update an existing one, use from within your virtual environment:
(project_name) $ pip freeze > requirements.txt
For your convenience, make sure to execute this command in a folder that is being tracked by your Git repository. This allows other instances of the code to have access to the requirements.txt file as well.
If a new developer joins the team, or if you want to configure a new environment using the same packages listed in the requirements.txt file, execute in the virtual environment context:
(project_name) $ cd /path/to/requirements/file
(project_name) $ pip install -r requirements.txt
All requirements listed in the file will immediately be installed in your virtual environment. Older versions will be updated and newer versions will be downgraded to fit the exact list of requirements.txt. Be careful though — there might be differences between environments that you still want to respect.
I highly recommend integrating these commands to your work flow. Update the requirements.txt file before pushing code to the repository and install requirements.txt file after pulling code from the repository.

Better settings.py configuration
Django comes out-of-the-box with a very basic yet useful settings.py file. This defines the main and most useful configurations for your project. The settings.py file is very straightforward. But sometimes, as a developer working on a team, or when setting up a production environment, you need more than one basic settings.py file.
Multiple settings files allow you to easily define tailor-made configurations for each environment separately like:
ALLOWED_HOSTS # for production environment
DEBUG
DATABASES # for different developers on the same team
Let me introduce you to an extended approach for configuring your settings.py file. It allows you to maintain different versions and use the one you want at any given time and in any environment.
First, navigate to your settings.py file path:
(project_name) $ cd /path/to/settings/file
Then create a new module called settings (module is a folder containing an __init__.py file):
(project_name) $ mkdir settings
Now, rename your settings.py file to base.py and place it inside the new module you created:
(project_name) $ mv settings.py settings/base.py
For this example, I assume that you want to configure one settings file for your development environment and one for your production environment. Different developers on the same team can use the exact same approach for defining different settings files.
For your development environment create:
(project_name) $ nano settings/development.py
Then type:
from .base import *
DEBUG = True
and save the file by hitting Ctrl + O, Enter and then Ctrl + X.
For your production environment create:
(project_name) $ nano settings/production.py
and type:
from .base import *
DEBUG = False
ALLOWED_HOSTS = [‘app.project_name.com’, ]
Now, whenever you want to add or update the settings of a specific environment, you can easily do it in its own settings file.
You might be wondering — how does Django know which settings file to load on each environment? That’s what the __init__.py file is used for. When Django looks for the settings.py it used to load when running the server, for example, it now finds a settings module rather than a settings.py file. But as long as it’s a module containing an __init__.py file, as far as Django is concerned, it’s the exact same thing. Django will load the __init__.py file and execute whatever is written in it.
Therefore, we need to define which settings file we want to load inside the __init__.py file by executing:
(project_name) $ settings/__init__.py
and then, for a production environment, for example, by typing:
from .production import *
This way, Django will load all the base.py and production.py settings every time it starts. Magic?
Now, the only configuration left is to keep the __init__.py in your .gitignore file so it will not be included in pushes and pulls. Once you set up a new environment, don’t forget to create a new __init__.py file inside the settings module. Then import the settings file required exactly like we did before.
In this article we’ve covered three best practices for better setting up your Django project:
- Working inside a virtual environment
- Keeping the
requirements.txtfile up to date and using it continuously in your work flow - Setting up a better project settings array
Have you followed these best practices in your last project? Do you have any insights to share? Comments are highly appreciated.
Did you find this useful? If so, please give me some claps so more people see the article.
This is part 1 in the series about best practices for Django development. Follow me to get an immediate update once the next parts are available.
Find more great tips for technological entrepreneurs at CodingStartups.
**Recommended Courses: **
Machine Learning with Open CV and Python
☞ https://goo.gl/qaNrjc
Introduction to Data Extraction/Web Scraping in Python
☞ https://goo.gl/kUTd1B
Master the Python Interview | Real Banks&Startups questions
☞ http://on.edupioneer.net/HJAutIZef
Encoding and Unicode Demystified in Python
☞ https://goo.gl/6PHqXL
Suggest:
☞ Try Django Tutorial - Build a Web Application with Python Framework
☞ Complete Python Tutorial for Beginners (2019)
☞ Learn Python in 12 Hours | Python Tutorial For Beginners
☞ Python Tutorials for Beginners - Learn Python Online
☞ Python Programming Tutorial | Full Python Course for Beginners 2019