Plex Media Server on Raspberry pi 3 using Raspbian Lite (Stretch)

Note: The guide might be a bit lengthy as I have added explanations to some of the steps as well. I did this tutorial while learning myself and I thought it would be useful for people to know what some of the commands mean.
You will need…
- Raspberry Pi 3 (with its power adaptor)
- Larger than 8GB micro SD card for the pi
- External HDD with its own power source
- Internet connection (This tutorial is for a WiFi setup on the pi)
- A laptop or computer that has a memory card reader (or an external memory card reader)
Topics being covered…
- Setting up Raspbian (a Raspberry Pi OS) on the SD card
- Setting up WiFi headlessly for the pi
- Enabling SSH headlessly
- Using SSH to connect to the pi
- Static IP address
- Setting up Plex on the pi
- Connect external HDD
- Managing metadata of Plex on HDD (optional)
- Adding Plex libraries
- Setting up samba share for the external HDD (optional)
- Setting up NFS share for the external HDD (optional)
- Updating your Plex server
Setting up Rasbian on the SD card
Before connecting the raspberry pi to any power source, we must install an operating system on the pi — Raspbian. For this you will need a computer or laptop that has a memory card reader or you will need to connect an external memory card reader.
At the time of this tutorial, raspbian version is Stretch.
Note: For this tutorial, I used the Lite version of Raspbian as most of the setup is via the terminal but you can also download the full version which comes with a GUI and then use a terminal for the instructions.
Flash SD card
- Insert SD card into reader
- Format SD card using Fat32 format (this step is optional)
- Launch etcher on your computer
- Select the Raspbian image you just downloaded
- Etcher should automatically find your SD card
- And flash your SD card
Need more HELP?
If you need further assistance in installing Raspbian on the pi, you can use the NOOBS installer. More information is available here — https://www.raspberrypi.org/documentation/installation/installing-images/README.md
Setting up WiFi headlessly for the pi
To avoid connecting the pi with peripherals (monitor, keyboard, mouse), I decided to set up the WiFi headlessly. So essentially, we will need to add a config file to the boot partition of the SD card that was just flashed with the Raspbian image using your computer.
Note: If you are directly connecting the pi via an ethernet cable, you can skip this section.
Find your network
First, we need to find the details (ESSID and Encryption) of your WiFi network. This will be very similar to the name of your WiFi.
- Enter the following in the terminal of the computer you are using (once again, assuming you are using a Linux based machine):
sudo iwlist wlan0 scanning | egrep 'Cell |Encryption|ESSID'
Note: This is a modified version of
_sudo iwlist wlan0 scan_which has a lot of additional information. We only need the ESSID.
2. Note down the ESSID and make sure you have your WiFi password handy.
Adding network config to your pi
When adding the WiFi password, we need to create an encrypted form so that a spy can’t simply find your password in plain text,
- Enter the following in the terminal to get the encrypted PSK:
wpa_passphrase "MyWiFiESSID" "MyWiFiPassword" >> wpa_supplicant.conf
Two things are happening here:
_wpa_passphrase "MyWiFiESSID" "MyWiFiPassword"_will create a network profile with your password replaced by a token so that it is not saved as plain text.
_>> wpa_supplicant.conf_will add the network profile to your configuration file.
2. Now we need to remove the plain text password that also gets copied into the config file. In the terminal:
sudo nano wpa_supplicant.conf
3. Your WiFi profile will look like this:
ctrl_interface=DIR=/var/run/wpa_supplicant GROUP=netdev
network={
  ssid="MyWiFiESSID"
  #psk="MyWiFiPassword"
  psk=131e1e221f6e06e3911a2d11ff2fac9182665c004de85300f9cac208a6a80531
}
4. Remove #psk="MyWiFiPassword" and add the line ctrl_interface=DIR=/var/run/wpa_supplicant GROUP=netdev, if it’s missing.
5. Save it.
6. Copy wpa_supplicant.conf to the boot partition of your flashed SD card.
More info can be found here — https://howchoo.com/g/ndy1zte2yjn/how-to-set-up-wifi-on-your-raspberry-pi-without-ethernet and https://www.raspberrypi.org/documentation/configuration/wireless/wireless-cli.md
Enabling SSH headlessly
Now that the WiFi configuration is set up, we still need a way to access the pi over the network to avoid connecting the peripherals — so we need to enable SSH before we actually start up the raspberry pi.
Create a file called ssh with no extension and put it in the boot partition of the SD card — same place as the wpa_supplicant.conf file.
More info can be found here — https://www.raspberrypi.org/documentation/remote-access/ssh/README.md
Using SSH to connect to the pi
Now you are ready to start up the pi so connect the power source — that should start it up. It took a couple of restarts for it to connect to the WiFi and have the SSH running.
A really cool thing with the new Raspbian is that you don’t need to fix the IP address anymore (like we needed to before) — all you need to use is raspberrypi.local as the hostname.
Open up your terminal,
ssh [email protected]
I used a Linux machine to connect to my pi, but for Windows users, you will need to install an additional tool — Putty, in order to SSH into another computer.
OR
Enter, if you know the IP address of the pi.
ssh pi@<ip address>
The first time you connect, it will ask you if you trust this fingerprint. Select ‘Yes’.
You will need to enter your pi’s password, which should be raspberry unless you changed it.
If you connect successfully, your terminal’s prompt will change to pi@raspberrypi
Note: For more information on setting up SSH — https://www.raspberrypi.org/documentation/remote-access/ssh/README.md
If you have problems using
_raspberrypi.local_you will need to find the pi’s address. There are many ways to do this and some of the methods can be found here — https://www.raspberrypi.org/documentation/remote-access/ip-address.md
Static IP address
When setting up a pi as a Plex server, I personally like to set a static IP so I can easily access it from any device without having to look for its IP every time. So first check your pi’s IP address,
ifconfig
Then we need to edit the dhcpcd.conf file
sudo nano /etc/dhcpcd.conf
And enter the following, making sure you have added your IP address,
interface eth0

static ip_address=192.168.0.100/24
static routers=192.168.0.1
static domain_name_servers=192.168.0.1

interface wlan0

static ip_address=192.168.0.100/24
static routers=192.168.0.1
static domain_name_servers=192.168.0.1
sudo reboot to make sure you restart with the new static IP address :)
Setting up Plex on the pi
Finally, we are all set with the pi setup and we can start installing and configuring the Plex Media Server.
First, let’s make sure the pi is up to date…
sudo apt-get update && sudo apt-get upgrade -y
sudo apt-get update && sudo apt-get dist-upgrade
Now we install HTTPS download transport for APT so that we can access metadata and packages over HTTPS
sudo apt-get install apt-transport-https -y --force-yes
Next, we need a key to authenticate the Plex download
wget -O - https://dev2day.de/pms/dev2day-pms.gpg.key | sudo apt-key add -
Let’s add the Plex repository to our sources list
echo "deb https://dev2day.de/pms/ stretch main" | sudo tee /etc/apt/sources.list.d/pms.list
Update again
sudo apt-get update
Install Plex Media Server
sudo apt-get install -t stretch plexmediaserver-installer -y
Now we restart the pi, to make sure Plex is running
sudo reboot
To access Plex from your computer, open your favourite browser and enter the following
<static ip address>:32400/web
Here, <static ip address> is your pi’s IP address.
If you see the Plex dashboard come up, then everything is installed properly and Plex is running on your pi. You probably won’t see any media files since no libraries have been added yet.
Connect External HDD
The raspberry pi’s SD card does not have much memory to hold your media files so it’s always best to connect a larger external HDD (which has its own power source) to manage all your media files.
- Connect the HDD to your pi
- Make sure that the HDD is connected and note down the HDD’s path. If your drive already has a label simply run
sudo blkid
This will give you a list of all the drives connect to your pi and their locations. In most cases this should be /dev/sda1
If you are not sure about your HDD’s label and need to look at disk sizes as well, then use
sudo fdisk -l
3. Now we need to create the directory where we wish to mount the HDD
sudo mkdir /mnt/library
4. Give the correct permissions to the directory
sudo chmod 775 /mnt/library
5. Now we need to mount the drive to that location.
In order to do this, we need to know what format our drive is in. You can use sudo blkid to check this.
If your drive is NTFS…
There is an additional step for this. We need to install a library that supports NTFS formatted drives.
sudo apt-get install ntfs-3g
sudo mount -t ntfs-3g /dev/sda1 /mnt/library
If your drive is exFat…
sudo apt-get install exfat-fuse exfat-utils
sudo mount -t exfat /dev/sda1 /mnt/library
Important: Do not use exFat for your HDD if you will be keeping the Plexmetadata on this drive as (at the time of writing this tutorial), exFat did not support symlinks which are needed for the metadata folder. I learnt this the hard way :)
Otherwise…
sudo mount /dev/sda1 /mnt/library
6. We need to make sure that every time the pi restarts, the external HDD is always mounted to the same location. This is important because you will be add your media libraries to Plex and we need to make sure that path does not change.
Edit the fstab file
sudo nano /etc/fstab
And enter the following line at the bottom of the list (although it is spread over two lines it’s supposed to be a single line in the file), you can get the PARTUUID or UUID by using sudo blkid
PARTUUID=iuwhdf-iuwfe8hj-sd78g8-wer3 /mnt/library exfat defaults 0 0
This will auto mount the drive on a restart.
So, as always, let’s reboot and check :)
sudo reboot
Browse to /mnt/library and check if your HDD’s directories show up there.
Managing Plex metadata on the HDD (optional)
Plex metadata tends to get very large and so I felt more comfortable putting it on the external HDD rather than having it on the pi’s SD card, where it is located by default.
The Plex data is located at the following location on the pi:
/var/lib/plexmediaserver/Library/Application Support/Plex Media Server/
First we make a backup of this folder,
sudo cp -r /var/lib/plexmediaserver/Library/Application\ Support/Plex\ Media\ Server /var/lib/plexmediaserver/Library/Application\ Support/server.backup
Now we create a directory on the mounted HDD to move the Plex data to
mkdir /mnt/library/plex-data
Let’s copy over the data from the current location to the new location we just created,
sudo cp -r /var/lib/plexmediaserver/Library/Application\ Support/Plex\ Media\ Server /mnt/library/plex-data
Make sure that the data has copied over at the new location by doing
ls /mnt/library/plex-data
There should be a folder called Plex Media Server if all has gone well :)
Now we need to symlink the original location to the new location on the HDD.
sudo ln -s /mnt/library/plex-data/Plex\ Media\ Server /var/lib/plexmediaserver/Library/Application\ Support/Plex\ Media\ Server
Make sure the symlink is created,
ls /var/lib/plexmediaserver/Library/Application\ Support
Note: More information here on things you can do to manage the Plex Server data directory-https://support.plex.tv/hc/en-us/articles/202529153-Why-is-my-Plex-Media-Server-directory-so-large-
Adding Plex Libraries
This is the easy bit. Go to your Plex Server — on your browser…
<static ip address>:32400/web
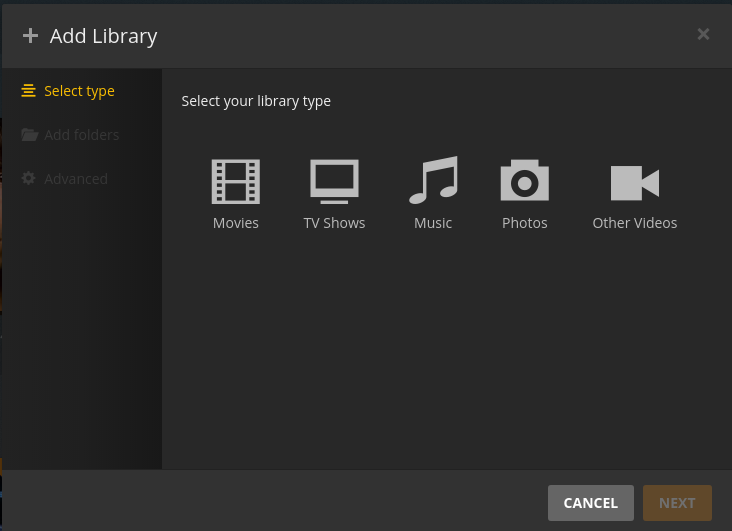
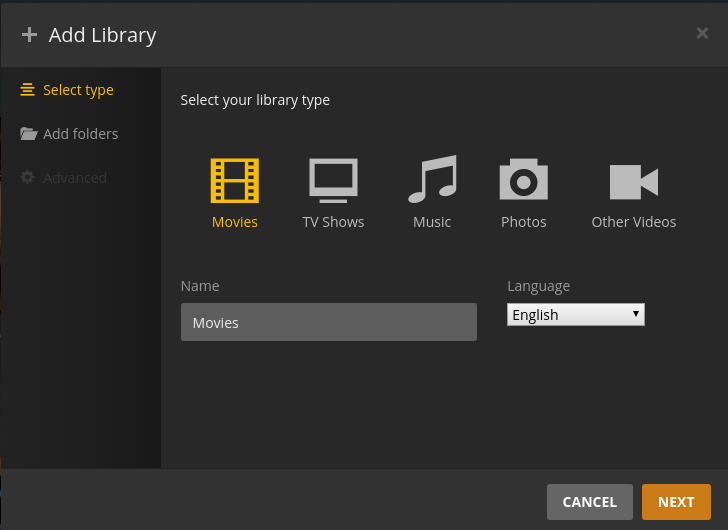
Since this is a fresh install of Plex, you will be asked to add a library. Select the type of library you want to create. For this tutorial, let’s select Movies.

Enter a name for your library,

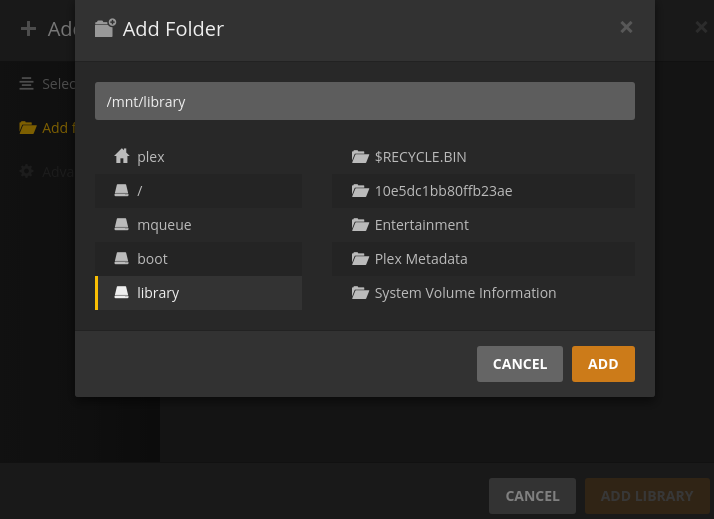
And then click Browser for Media Folder. Here comes the interesting bit where we will now point to the mounted HDD that you created a few steps above… /mnt/library

Select your Movies folder and click Add. Do have a look at the Advanced setting as well before Adding the Library — they are self-explanatory.
Once you have added the library, Plex will download the metadata. Depending on the size of your media libraries, it might take some time. Now you can stream your media to any device that has a Plex player or you can browse to the server as well.
Setting up the external HDD as a samba share (Multiple OS) (optional)
In my case, I have a Windows desktop that I wanted to use to add media files to the external HDD connected to the pi — but disconnecting the HDD from the pi and connecting to the Windows machine is not an ideal solution :) So we set the HDD up as a samba share with read/write permissions so that any computer can access the HDD on your home network to copy and edit files.
sudo apt-get install samba samba-common-bin -y
Back up the samba config file,
sudo cp /etc/samba/smb.conf /etc/samba/smb.conf.bak
Then we edit it,
sudo nano /etc/samba/smb.conf
Find the following lines,
# Windows Internet Name Serving Support Section:
# WINS Support - Tells the NMBD component of Samba to enable its WINS Server
#   wins support = no
Uncomment the following line by removing the # and setting it to yes,
# Windows Internet Name Serving Support Section:
# WINS Support - Tells the NMBD component of Samba to enable its WINS Server
   wins support = yes
Scroll down to the section that says Share Definitions and add the following profile.
[PLEXMEDIA] #Name of the share
comment = Plex media share
path = /mnt/library/
create mask = 0775
directory mask = 0775
read only = no
browseable = yes
public = yes
force user = pi
guest ok = no
Ctrl+O (to write out) and Ctrl + X (to exit)
Next, we set a samba password, although the above configuration allows anyone on your home network to access the directory,
sudo smbpasswd -a pi
And then, restart to check if you can access the share from your Windows machine…
sudo reboot
Setting up the HDD as an NFS share (Limited support on Windows but good for Mac and Linux) (optional)
I also wanted to explore the setup for my Ubuntu machine so I tried the NFS as well and I thought I would add it here for whoever else it might be useful.
Install NFS packages
sudo apt-get install nfs-common nfs-server -y
Open the NFS config file
sudo nano /etc/exports
And append the following line,
/mnt/library/ *(rw,all_squash,nohide,insecure,async,no_subtree_check)
Make sure there is no space between * and ( . This allows all IP addresses to connect to the NFS share but you can remove the * and use a specific IP address or even all the IP addresses in your home network.
For example, if you want to connect only one device to your pi’s share and that device’s IP address is 192.168.0.23,
/mnt/library/ 192.168.0.23(rw,all_squash,nohide,insecure,async,no_subtree_check)
Or to all the addresses in your home network,
/mnt/library/ 192.168.0.0/24(rw,all_squash,nohide,insecure,async,no_subtree_check)
Close the exports file and run the following commands for the NFS share to be started up,
sudo exportfs -ra
sudo update-rc.d rpcbind enable && sudo update-rc.d nfs-common enable
sudo service rpcbind restart
sudo service nfs-kernel-server restart
Now the NFS share should be ready to go. To check if it’s up and running, go to your computer and check for the mount,
sudo showmount -e <raspberrypi-ip-address>
Create a directory on your computer where you will mount the NFS share, let’s call it /mnt/plex
sudo mkdir -p /mnt/plex
Now, we simple have to mount the NFS share onto this newly created directory,
sudo mount <raspberrypi-ip-address>:/mnt/library /mnt/plex
And that’s it. You should be able to browse to /mnt/plex on your computer and edit files on the externall HDD of the pi.
Updating your Plex server
In order to update your server, simply ssh into the pi,
ssh pi@<static ip address>
Then update & upgrade,
sudo apt-get update
sudo apt-get upgrade
Mnemonic: I always get confused as to whether it’s update first or upgrade, so here’s a mnemonic to remember the order. Look at the third letter of each word (basically both start with ‘up’ so we can remove those): ‘d’ and ‘g’. d comes before g in the alphabet, so
_update_comes first and then_upgrade_.
Then, as always,
sudo reboot
Or take the following course:
☞ Raspberry Pi 3 Day Project: Retro Gaming Suite
☞ Scratch Programming for Raspberry Pi
☞ Raspberry Pi Projects : Build a Media Centre Computer
☞ Raspberry Pi Course™ 2018: Including Raspberry Pi Projects
☞ Build Your Own Super Computer with Raspberry Pis
Suggest:
☞ Intro to HTML & CSS - Tutorial
☞ Raspberry Pi 3 Model B+ Benchmarks
☞ Full Stack React & Firebase Tutorial - Build a social media app
☞ Learn Vue 2 in 65 Minutes -The Vue Tutorial for 2018