Creating a Rogue Wi-Fi Access Point using a Raspberry Pi

WiFi became part of our everyday vocabulary, yet, it’s inner workings are still a mistery to many. According with a survey by Symantec, 87% of U.S. consumers have used the readily available public WiFi to connect to the internet (cafes, airports, hotels, etc). Also, 60% of the consumers think their information is safe when using public internet.
Do you connect to public WiFi ? What precautions to you take? If the WiFi network (public or at home) is password-protected, do you consider it safe?
Getting to know the basics
To connect to a WiFi network, you essentialy need two things: the Network Name (SSID) and a passphrase (if it’s protected — usually with WPA2 encryption).

Why some WiFi networks have such a wide coverage? How can the same Network Name (SSID) be available in a big space such as an airport or a shopping mall? The answer is WiFi Access Points.
Extending a network range is achieved by adding more WiFi Access Points that are connected to the same network and are using the same SSID & Passphrase.
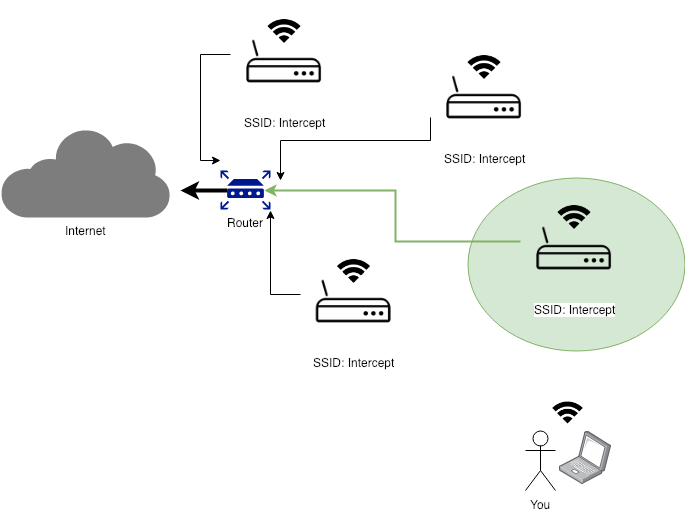
To which WiFi Access Point my device is connected to?
While the “formula” varies a bit from vendor to vendor, the rule of thumb generally is that your device connects to the Access Point with better signal/quality. Of course, plenty of other factors such as frequency, channels and protocol weight in.
In OSX, you can use the Airport or the Wireless Diagnostic utilities to scan for all the WiFi Access Points within your range.

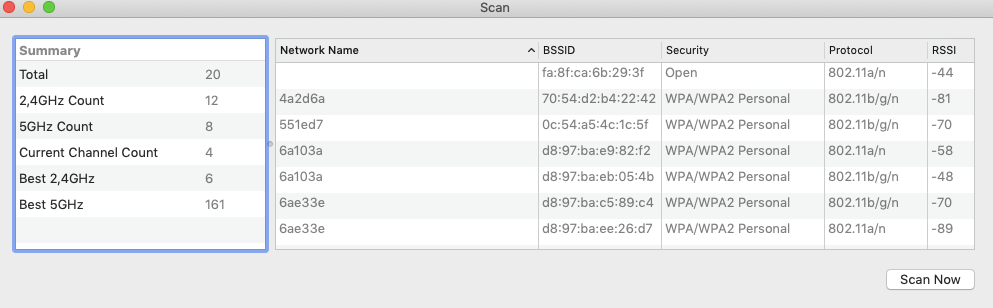
You might have noticed from the screenshots above that, despite some Access Points are serving the same SSID, they each have a unique identifier called BSSID.
Adding a “rogue” Wi-Fi Access Point
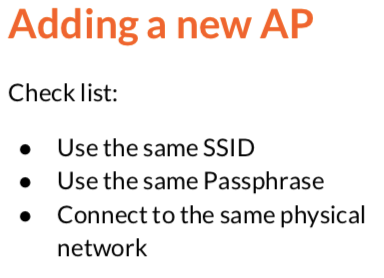
Adding a new Wi-Fi Access Point to an existing network is quite straightforward. As you saw from the images above, you simply need to use the same SSID & Passphrase and connect to the same physical network. But, if we think about Wi-Fi public networks (e.g. cafes, airports, hotels, etc) where you are only interested in getting access to Internet, a simple question comes up:
What if….
… we don’t connect the AP to the same physical network?
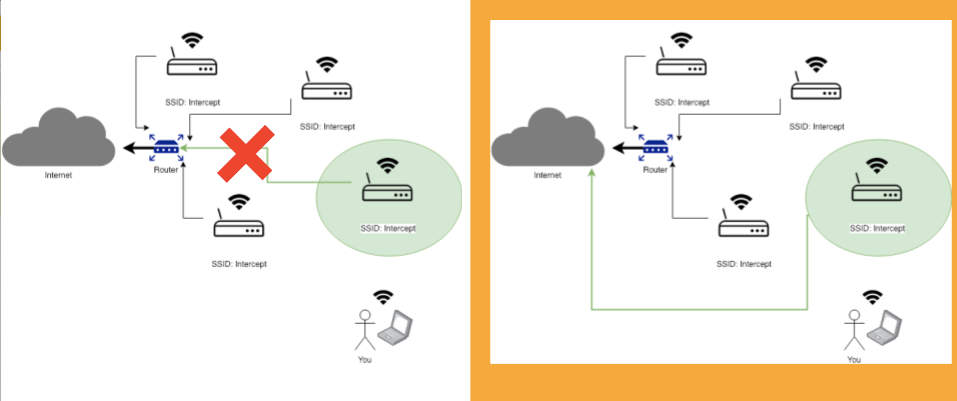
Of course, the devices connected to the rogue Access Point will not be able to interact with other devices or resources within the same physical network we are “impersonating”. However, that is completely irrelevant and goes unnoticed if the devices connected are only interested in accessing the internet.
In practice, how easy is to create a rogue Wi-Fi Access Point?
Meet RogueOne: a Raspberry PI Wi-Fi Rogue Access Point
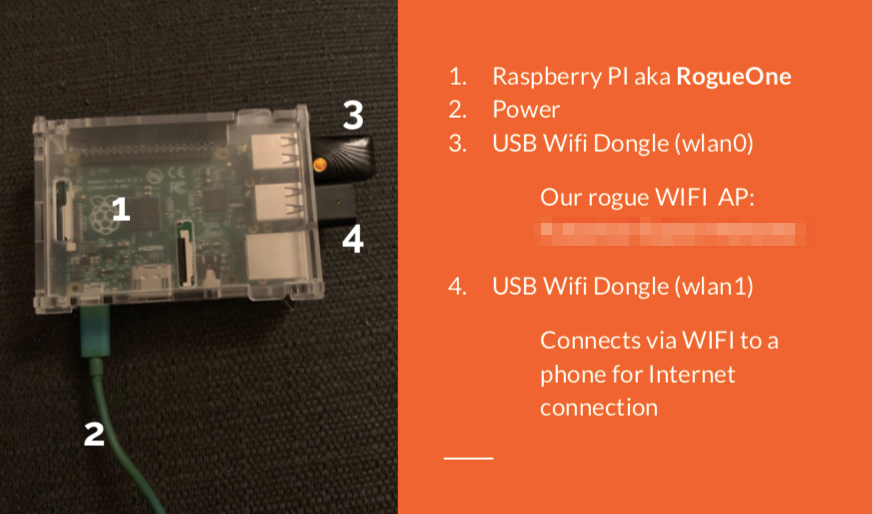
Pre-requisites:
Raspberry with latest Raspbian (Debian Stretch)
2 x USB Wi-Fi dongles
If you are unable to get your Wi-Fi USB Dongle working, you probably need to install additional drivers.
# Wi-Fi Additional Drivers Install (if needed)
# MrEngman
sudo wget http://www.fars-robotics.net/install-wifi -O /usr/bin/install-wifi
sudo chmod +x /usr/bin/install-wifi
sudo install-wifi
Some vendors provide the additional drivers, but if they don’t, you can give a try to the install-wifi script above.
Getting RogueOne up and running
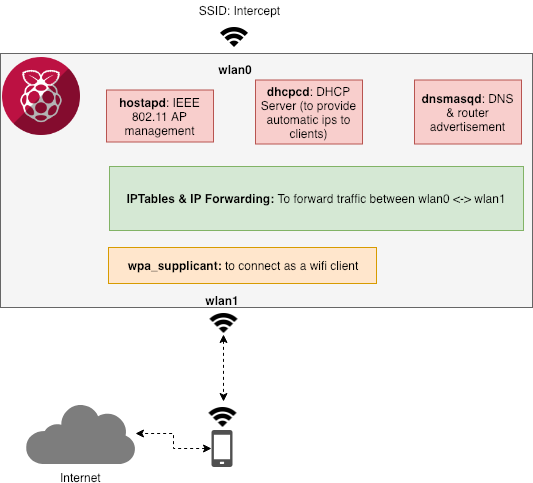
To create our rogue Wi-Fi access point, we will need to configure three services (hostapd, dhcpcd and dnsmasqd) in addition to the connection as wifi client to the phone Wi-Fi hotspot.
# Install required component packages
sudo apt-get update
sudo apt-get install hostapd dnsmasq bridge-utils iptables -qy
sudo systemctl stop dnsmasq
sudo systemctl stop hostapd
sudo systemctl stop dhcpcd
# WPA Supplicant: Connect to your Phone (Internet)
sudo cat << 'EOF' > /etc/wpa_supplicant/wpa_supplicant.conf
ctrl_interface=DIR=/var/run/wpa_supplicant GROUP=netdev
update_config=1
country=FI
network={
 ssid="MyPhoneHotspot"
 psk="randompassword"
}

EOF
The dhcpdcd component will be responsible to dynamically distribute network information (e.g. ip address, net mask, etc) to the clients connecting to our Wi-Fi Access Point.
Please note the section related to the interface **wlan0 **—we configure a static ip and disable wpa_supplicant on this network interface.
sudo cat << 'EOF' > /etc/dhcpcd.conf
hostname
clientid
persistent
option rapid_commit
option domain_name_servers, domain_name, domain_search, host_name
option classless_static_routes
option ntp_servers
option interface_mtu
require dhcp_server_identifier
slaac private
interface wlan0
 static ip_address=10.3.0.1/24
        nohook wpa_supplicant
denyinterfaces eth0
EOF
sudo service dhcpcd restart
The dnsmasq component will provide DNS information and advertise the network routes to the clients connecting to our Wi-Fi Access Point.
Please note that this is where we are defining the dhcp range our clients will be using. Obviously, this needs to match the same subnet information we defined in dhcpcd.
sudo cat << 'EOF' > /etc/dnsmasq.conf
interface=wlan0
 dhcp-range=10.3.0.2,10.3.0.50,255.255.255.0,24h
server=8.8.8.8
listen-address=127.0.0.1
listen-address=10.3.0.1
#no-dhcp-interface=
no-hosts
addn-hosts=/etc/spoof.hosts
EOF
sudo touch /etc/spoof.hosts
sudo service dnsmasq restart
The hostapd component will enable the network interface wlan0 to act as a Wi-Fi Access Point. Please note that the network SSID and Passphrase we want to use are also defined in the configuration file. You can adjust this as needed.
Note: This configuration will work with the protocol 802.11b/g/n. If you want to configure the protocol 802.11a/c please confirm your Wi-Fi USB dongle supports it and change the configuration accordingly.
sudo cat << 'EOF' > /etc/hostapd/hostapd.conf
country_code=FI
ieee80211d=1
ieee80211h=1
interface=wlan0
driver=nl80211
# Use the 2.4GHz band
hw_mode=g
# Use channel 6
channel=6
# Enable 802.11n
ieee80211n=1
# Enable WMM
wmm_enabled=1
# Enable 40MHz channels with 20ns guard interval
ht_capab=[HT40][SHORT-GI-20][DSSS_CCK-40]
macaddr_acl=0
# Use WPA authentication
auth_algs=1
# Require clients to know the network name
ignore_broadcast_ssid=0
# Use WPA2
wpa=2
# Use a pre-shared key
wpa_key_mgmt=WPA-PSK
# Use AES, instead of TKIP
rsn_pairwise=CCMP
ssid=Intercept
wpa_passphrase=oneveryuniquepassword
ctrl_interface=/var/run/hostapd
ctrl_interface_group=0
EOF
sudo echo "DAEMON_CONF=\"/etc/hostapd/hostapd.conf\"" >> /etc/default/hostapd
sudo service hostapd restart
To allow the traffic to be forwarded between the two network interfaces (wlan0 and wlan1), we need to enable IP Forwarding and define an iptables rule.
sudo echo “net.ipv4.ip_forward=1” >> /etc/sysctl.conf
sudo iptables -t nat -A  POSTROUTING -o wlan0 -j MASQUERADE
sudo sh -c "iptables-save > /etc/iptables.ipv4.nat"
# Make it persistent
sudo cat << 'EOF' > /etc/rc.local
#!/bin/sh -e
# Print the IP address
_IP=$(hostname -I) || true
if [ "$_IP" ]; then
  printf "My IP address is %s\n" "$_IP"
fi
iptables-restore < /etc/iptables.ipv4.nat
exit 0
EOF
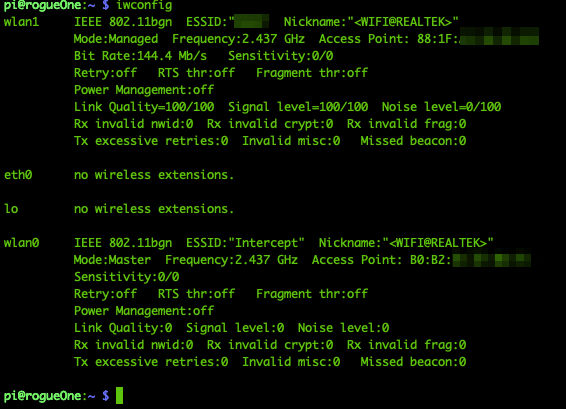
You can now reboot your Raspberry Pi and take all the changes into effect. After the reboot and your becomes available, you can verify with iwconfig the status of the two Wi-Fi interfaces. The first device wlan0 should be set to Access Point ESSID: Intercept and the second device wlan1 should be connected to your phone WiFi hotspot.
Go ahead and connect one device (e.g. your tablet) to the Intercept Wi-Fi network.
You should be able to get internet connectivity straight away. Also, via your Raspberry Pi you can verify that the device is indeed connected using the hostapd_cli tool.

By having clients connected to the internet via your Raspberry Pi, you are now able to see the traffic flow using tools such as tcpdump.

With full control over the Raspberry Pi and with Wi-Fi clients connected to it, we have a powerful tool that can be used to different types of Man-in-the-Middle attacks.
Conclusion
I hope you found this article useful and informative. Please share your feedback and thoughts.
Learn more
☞ A Rookie’s Guide to Raspberry Pi
☞ Hardware projects using Raspberry Pi
☞ Home Automation using Raspberry Pi
☞ Physical Computing with Scratch using Raspberry Pi
Suggest:
☞ Top 4 Programming Languages to Learn in 2019 to Get a Job
☞ Top 4 Programming Languages to Learn In 2019
☞ What To Learn To Become a Python Backend Developer
☞ Raspberry Pi 3 Model B+ Benchmarks