Using Vue.js components in PHP applications

A practical guide to bundling Vue.js components with webpack for use in PHP applications.
It’s often thought that Vue.js is only used in large single-page applications, written entirely in JavaScript. However, that’s not the only way it can be used. You can render your pages with PHP and only implement interactive components in Vue.js, much like you would use jQuery a few years ago.
Such hybrid solution is often simpler and more efficient. It works well especially on mobile devices, where downloading and running large JavaScript applications can be slow. It’s also a great way to improve an existing PHP application or gradually migrate it to Vue.js.
Bundling the scripts using webpack
To use Vue.js we need to set up the whole build process to transform the .vue files, style sheets and all dependencies into something the browser can digest.
The default template for a new Vue.js project comes with a bunch of build scripts and configuration files which make webpack seem like some black magic voodoo, especially if you’re new to these technologies like me.
But in fact it’s not that hard to understand the whole bundling process and set it up manually from ground up. I will try to explain it step by step, so that you can have a better understanding of how it works.
Before we start, keep in mind that there is no single “right” way to configure webpack. It all depends on what you want to achieve. To simplify things I’m going to make a few assumptions:
- Everything is bundled into one .js and one .css file. This is a good start and you can add code splitting when your bundle grows.
- Our bundle is built from .js files, .vue components, style sheets and images.
- The style sheets can be written using Less or another style processor, but that’s optional.
- The majority of the application is written in PHP, so we need a way to inject the bundled .js and .css files into pages generated by PHP.
- We will pass data from PHP to the script in order to create and configure our components.
- We want to take advantage of the webpack development server for on the fly compilation and hot reloading.
Project structure
Before we start configuring webpack, we need to understand the structure of folders in our project. In my example it looks like this:
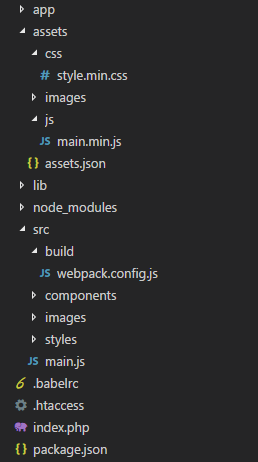
The sources of our bundle are located in the src/ folder. The main file which includes all other files is called main.js. We will place Vue.js components in the src/components/ subfolder, style sheets in src/styles/ and images in src/images/.
Note that only images which are directly used by our bundle need to be placed here. That includes, for example, background images used by the style sheets. Images which are only used by the PHP application should be located somewhere else, so they are not mixed together.
The webpack configuration file is placed in src/build/ so it doesn’t clutter the root folder of our application.
The generated bundle is placed in the assets/ folder. It contains the minimized script and style sheet and all images which are copied from src/images/. You can change the location of the bundle, but you have to modify the example configuration accordingly.
Other files and folders, for example app/ and lib/, are part of the PHP application. Their names may be different, but it’s not really important, because webpack will not touch them.
Remember that when you deploy the application to a production server, do not include the src/ and node_modules/ folders. Everything that you need to deploy will be placed in the assets/ folder.
Adding dependencies
You need to create a package.json file in the root folder of the application. The npm init command can do this for you. I’m assuming that you already have basic understanding of Node.js and npm.
Add the following modules to package.json:
 "dependencies": {
    "vue": "^2.3.3"
  },
  "devDependencies": {
    "assets-webpack-plugin": "^3.5.1",
    "babel-core": "^6.0.0",
    "babel-loader": "^6.0.0",
    "babel-preset-env": "^1.6.0",
    "css-loader": "^0.25.0",
    "extract-text-webpack-plugin": "^2.1.2",
    "file-loader": "^0.9.0",
    "less": "^2.7.2",
    "less-loader": "^4.0.4",
    "vue-loader": "^12.1.0",
    "vue-template-compiler": "^2.3.3",
    "webpack": "^2.6.1",
    "webpack-dev-server": "^2.5.0"
  }
Then run npm update to download all modules and update them to the latest version if necessary.
Note that I’m using Less in this example, but you can use another style processor like Sass, or just plain CSS. Just install the appropriate modules instead.
Configuring webpack
Let’s start with a really simple webpack.config.js file:
const path = require( 'path' );
const webpack = require( 'webpack' );
module.exports = function( env = {} ) {
  if ( env.production )
    process.env.NODE_ENV = 'production';
  return {
    entry: './src/main.js',
    output: {
      path: path.resolve( __dirname, '../../assets' ),
      filename: env.production ? 'js/main.min.js' : 'js/main.js'
    },
    plugins: env.production ? [
      new webpack.DefinePlugin( {
        'process.env': {
          NODE_ENV: '"production"'
        }
      } ),
      new webpack.optimize.UglifyJsPlugin( {
        compress: {
          warnings: false
        }
      } ),
    ] : [
    ],
    devtool: env.production ? false
      : '#cheap-module-eval-source-map'
  };
};
Instead of splitting the production and development configuration into separate files, we can use one configuration file which exports a function. It will generate the right configuration depending on the environment.
We tell webpack to take the src/main.js file as input and create an output file called main.min.js in production mode and main.js in development mode.
As the configuration file itself is located in the src/build/ folder, we need to resolve the path of the assets/ folder using a relative path.
In production mode, we use the UglifyJsPlugin to minimize the generated script. We disable warnings that can be generated by code inserted by webpack.
The devtool option specifies that source maps will only be generated for development and will be disabled in production. You can change that if you need production source maps.
Enabling production environment
In production mode we set the NODE_ENV variable to "production". This enables some optimizations in vue-loader that we will add later.
We also pass this variable to the DefinePlugin to remove unnecessary debugging code from Vue.js.
Our scripts can also use debugging code like this:
if ( process.env.NODE_ENV != 'production' )
  console.log( 'some debugging information' );
When building the production bundle, the DefinePlugin will replace process.env.NODE_ENV with "production", the condition will evaluate to false and the debugging code will be removed completely during minification.
Running webpack
To run webpack in development mode, you can use the following command:
webpack-dev-server --config src/build/webpack.config.js
To build the production bundle, run this command:
webpack --config src/build/webpack.config.js --env.production
The --env.production flag is passed as an argument to our function in the configuration file. You can pass additional parameters if you need.
You can place those commands in the scripts section of the package.json file. Then you will be able to run them quickly using the npm run command.
Configuring webpack loaders
Loaders are additional modules which tell webpack what to do with files of a particular type. Let’s start with the loader for .vue files:
module: {
  rules: [
    {
      test: /\.vue$/,
      loader: 'vue-loader',
      options: {
        loaders: {
          css: makeStyleLoader(),
          less: makeStyleLoader( 'less' )
        }
      }
    }
  ]
}
This tells webpack to process .vue files using vue-loader. It will automatically convert HTML templates to JavaScript and handle embedded style sheets.
We need to configure internal loaders that will tell vue-loader how to process these style sheets. This configuration makes it possible to use both CSS and Less style sheets in .vue files. You can use another style processor or remove it if you only need CSS. I will talk about the makeStyleLoader() function later.
Another rule will tell webpack to process .js files using Babel:
{
  test: /\.js$/,
  loader: 'babel-loader',
  exclude: /node_modules/
}
That will let us use the ES6 syntax in our .js files. Note that vue-loader also uses babel-loader under the hood, so we can use ES6 in .vue files as well.
We will create a simple .babelrc file to tell Babel to use babel-env-preset and leave module processing to webpack:
{
  "presets": [
    [ "env", { "modules": false } ]
  ]
}
You may need to tweak this configuration, but that’s a subject for another article.
To be able to import .css and .less files from .js files, we will add another set of rules:
{
  test: /\.css$/,
  use: makeStyleLoader()
},
{
  test: /\.less$/,
  use: makeStyleLoader( 'less' )
}
Finally, let’s add a rule for images:
{
  test: /\.(png|jpg)$/,
  loader: 'file-loader',
  options: {
    name: 'images/[name].[ext]'
  }
}
This way images will be copied to the assets/images/ folder when the production bundle is created. Their original names will be preserved.
To reference images from your style sheets you can just use the relative path, for example:
#my-logo {
  background-image: url('../images/my-logo.png');
}
You can also reference images from <img> tags in your Vue.js components.
To ensure that correct paths are produced in the generated CSS files we will have to adjust the publicPath option, but I will return to this in a while.
Resolving paths
The resolve section tells webpack how to resolve paths when importing files.
Let’s look at this example:
resolve: {
  extensions: [ '.js', '.vue', '.json' ],
  alias: {
    '@': path.resolve( __dirname, '..' )
  }
}
The extensions array contains file extensions which can be omitted.
The alias option is very powerful, but one particularly useful trick is defining @ as the alias of the src/ folder. This way you don’t have to use relative paths with lots of ../.
For example, to import a Vue.js component, you can simply write:
import PageComponent from '@/components/PageComponent'
You can also import style sheets into JavaScript:
import '@/styles/global.less'
Within a Less style sheet, you can import other CSS or Less files using this syntax:
@import "~@/styles/variables.less";
The ~ tells less-loader to resolve the path using webpack rules, instead of treating it as a relative path.
The tilde can also be used to import files from another module, for example:
@import "~bootstrap/less/bootstrap.less";
Also the previous example for referencing an image can be written this way:
#my-logo {
  background-image: url('~@/images/my-logo.png');
}
Development configuration
Building the whole bundle every time you make a simple change would take a long time, so during development you should use the webpack development server which will make it much faster by only recompiling the files that you modify.
But you’re already using Apache or IIS to host you PHP application, so how can these two servers work together?
First, let’s define the publicPath where our assets will be served:
output: {
  // ... path and file name ...
  publicPath: 'http://localhost:8080/'
}
The URL of our script will be http://localhost:8080/js/main.js. Note that the webpack development server uses port 8080 by default.
Also let’s add the devServer configuration section:
devServer: {
  contentBase: false,
  hot: true,
  headers: {
    'Access-Control-Allow-Origin': '*'
  }
}
Disabling contentBase tells the webpack development server to only serve the files that are part of our bundle. Everything else will be served by Apache or IIS.
A nice feature of the webpack development sever is hot module replacement. It allows you to see your changes immediately without refreshing the page. To make it work, we must first enable the hot option.
We also set the Access-Control-Allow-Origin header to *. This is necessary because our PHP application is running on a different port than the webpack development server. Without it, the browser would block the AJAX requests which fetch the updated scripts.
Finally, we have to add the HotModuleReplacementPlugin when running webpack in development mode:
plugins: env.production ? [
  // ... production plugins ...
] : [
  new webpack.HotModuleReplacementPlugin()
]
Now, whenever you modify a source file, it’s not only recompiled on the fly by webpack, but also injected into your web page. Awesome! Try doing this with jQuery… 😉.
Production configuration
Let’s tweak our bundle configuration for production builds.
I already mentioned the UglifyJsPlugin which will minimize the generated JavaScript file.
We also need to extract all the styles to a separate CSS file. We only do that in production mode. During development, styles are injected by the script directly into the page header. This way hot reloading can also work for style sheets.
First we need to load the extract-text-webpack-plugin because it’s not included in webpack:
const ExtractTextPlugin = require( 'extract-text-webpack-plugin' );
We add this plugin to the list of production plugins and specify the name of the generated CSS file:
new ExtractTextPlugin( {
  filename: 'css/style.min.css'
} )
Now we have to use this plugin with the style loaders. This is handled by the makeStyleLoader() function that I mentioned earlier:
function makeStyleLoader( type ) {
  const cssLoader = {
    loader: 'css-loader',
    options: {
      minimize: env.production
    }
  };
  const loaders = [ cssLoader ];
  if ( type )
    loaders.push( type + '-loader' );
  if ( env.production ) {
    return ExtractTextPlugin.extract( {
      use: loaders,
      fallback: 'vue-style-loader'
    } );
  } else {
    return [ 'vue-style-loader' ].concat( loaders );
  }
}
Note that this function should be placed inside the main function exported from the webpack configuration file, so that it can access the env argument.
The minimize option for the css-loader is enabled in production mode, so the extracted CSS file will be minimized.
The function chains an additional style loader when the type argument is specified. This way we can handle Less or another style processor.
In production mode, we pass these loaders to the text extraction plugin.
In development mode we use the vue-style-loader which injects the styles into the page header and handles hot reloading.
Using the script in the PHP application
In development mode we can simply add the following tag at the end of the body of the page which is generated by PHP to load the script:
<script src="http://localhost:8080/js/main.js"></script>
The webpack development server will also serve any images which are included in our components or style sheets. In the earlier example, the image was specified using a relative path, for example '../images/my-logo.png'. This path is automatically translated using the specified publicPath, so it will become this:
#my-logo {
  background-image: url('http:/localhost:8080/images/my-logo.png');
}
The translation will also happen if you use an <img> tag in a Vue.js template.
Loading the production bundle
When we deploy our PHP application to production, we will load the bundled styles and script from the assets/ folder, for example:
<link href="http://example.com/assets/css/style.min.css"
      rel="stylesheet">
<script src="http://example.com/assets/js/main.min.js"></script>
We also have to change the publicPath in production mode. Otherwise the image paths in the style sheet would refer to the development server.
Using an absolute URL is not a good option, because we don’t always know the URL of the server on which our code will be installed. Instead, we will use a relative path:
publicPath: env.production ? '../' : 'http://localhost:8080/'
This way the translated path will be the same as the original one, for example '../images/my-logo.png'. This will work because our style sheet is placed in assets/css/ and images are in assets/images/.
However, such relative paths in <img> tags will not work, because the browser will try to resolve them based on the URL of the current page.
Fortunately, the public path can be changed at run-time using the special __webpack_public_path__ variable. We can set it at the beginning of our script, for example:
if ( process.env.NODE_ENV == 'production' )
  __webpack_public_path__ = 'http://example.com/assets/';
We only do it in production mode, because in development the public path is already correctly set to http://localhost:8080/.
But it still doesn’t solve the problem, we cannot hard-code the public path in the script if we don’t know it. We can auto-detect it, for example based on window.location, or use the PHP code to pass the base URL as a parameter to the script. I will show you how to pass parameters from PHP in a moment.
Cache busting
There is one more thing that we have to consider when deploying our application for production. The browser will store the bundled files in the local cache so that it doesn’t have to reload them every time from the server. But even if we publish a new version to the server, the browser may still use the cached old version.
A simple solution to this problem is called “cache busting”: we include the version of the file in the URL, for example main.min.js?v=1.
We don’t have to update the version manually, because webpack can handle this for us with a few simple changes. It will use hashes based on file content to ensure that the URL changes whenever the file is updated.
We can include the hash in the output script file name:
filename: env.production ? 'js/main.min.js?[chunkhash]'
 : 'js/main.js'
We can also pass the hash to the extracted CSS file name:
new ExtractTextPlugin( {
  filename: 'css/style.min.css?[contenthash]'
} ),
Also file-loader supports this option:
{
  test: /\.(png|jpg)$/,
  loader: 'file-loader',
  options: {
    name: 'images/[name].[ext]?[hash]'
  }
}
It’s also possible to include the hash in the file name, instead of using a query string, for example js/main-[chunkhash].min.js. Both solutions have their advantages and disadvantages, so choose whatever works best for you.
But how do we know these hashes when we include the style sheet and script files in the page?
We can use the assets-webpack-plugin to extract them for us:
const AssetsPlugin = require( 'assets-webpack-plugin' );
Let’s add it to our webpack configuration in production mode and configure it like this:
new AssetsPlugin( {
  filename: 'assets.json',
  path: path.resolve( __dirname, '../../assets' ),
  fullPath: false
} )
The plugin will create a file called assets.json which looks like this:
{
  "main": {
    "js": "js/main.min.js?6973f571ac0276126690",
    "css": "css/style.min.css?ea9c3ce9b0e3a48ab3837671690b9e39"
  }
}
Now we just have to load this file in the PHP code and voilà! We can generate correct URLs which include these hashes.
Passing data to the script
If we want to embed Vue.js components into a PHP application, we need to control what components are created and where they are placed. We also may need to pass additional parameters to configure them.
One solution is to pass all information using custom HTML attributes:
<input name="date" data-component="DatePicker" data-format="...">
The script would have to scan the document, look for these attributes and create appropriate components.
Another approach is to create components explicitly like this:
<input id="date-field" name="date">
<script>
  MyLibrary.createDatePicker( '#date-field', { format: "..." } );
</script>
This is simpler so I will show you how this can be done.
First, our main.js script needs to export some functions, for example:
import Vue from 'vue'
import DatePicker from './components/DatePicker.vue'
export function createDatePicker( selector, options ) {
  new Vue( {
    el: selector,
    render( h ) {
      return h( DatePicker, { props: { format: options.format } } );
    }
  } );
}
We must tell webpack that we want the exported functions to be available in a global variable. To do that, add the library option to the output section and pass the name of the global variable:
output: {
  // ... paths and file name ...
  library: 'MyLibrary'
}
It will let you use your Vue.js components wherever you need, just like you would use jQuery components.
I’m not showing you the final configuration file, because my intention was to explain how to configure webpack, not to provide yet another boilerplate file that you can copy and paste into your application. Your use case may be different than mine, so read the webpack documentation, it’s really well written, and do your own research.
Also, I’m not an expert in Vue.js and webpack by any means. I’m just learning these technologies and I wanted to share with you what I learned so far. But I hope this is a good starting point and you will learn something as well.
Recommended Courses:
☞ Vue.js 2 Essentials: Build Your First Vue App
☞ Learn by Doing: Vue JS 2.0 the Right Way
☞ Vue JS 2 - The Complete Guide (incl. Vue Router & Vuex)
☞ Vue JS: From Beginner to Professional
Suggest:
☞ PHP Tutorial for Absolute Beginners - Learn PHP from Scratch -
☞ Web Development Tutorial - JavaScript, HTML, CSS
☞ E-Commerce JavaScript Tutorial - Shopping Cart from Scratch