Firebase Angular app with auth and a real-time database

For a long time, I was looking for a good Portfolio web app that can help me to easily track my Cryptocurrency profits/losses, until I’ve decided to develop such on my own with the help of Firebase and Angular! Yes, it’s that easy, let me explain you why.
Firebase gives the perfect tooling for applications with user authentication and Realtime database storage needs. It provides rich documentation with a variety of dev examples to help anyone gain better understanding on how to create stellar apps.
I have covered the Angular application bootstrapping, using Ignite UI CLI, in another blog post.
This article aims to:
- Go through the Firebase installation and setup.
- Set up Firebase Authentication.
- Implement Realtime database storing and synchronization.
- Add Observable data services.
- Visualize the data in an Angular application.
Configure a Firebase account
I want to go through the steps that we’ve took to set up the Portfolio Firebase account. Projects are created from the Firebase console by choosing Add a new project. Once the Create project form is submitted you will see the following Project Overview.
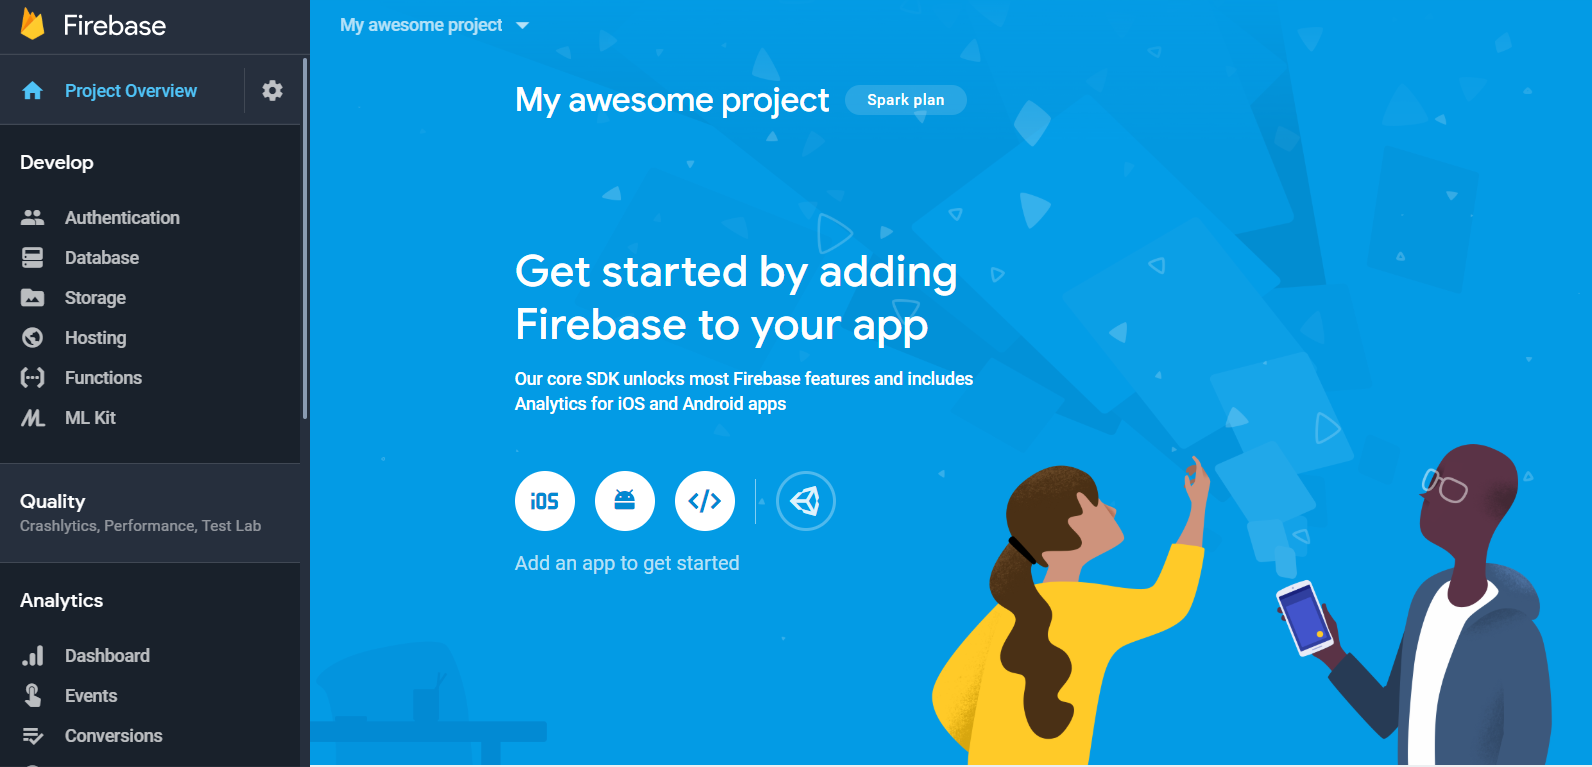
Under Project Overview section you can find all development tools that are used for Authentication and Data storing, here is also located the configuration which is used in the Portfolio Web App. This configuration is generated by pressing Add Firebase to your web app, and it is later added in application’s app.module.ts file:
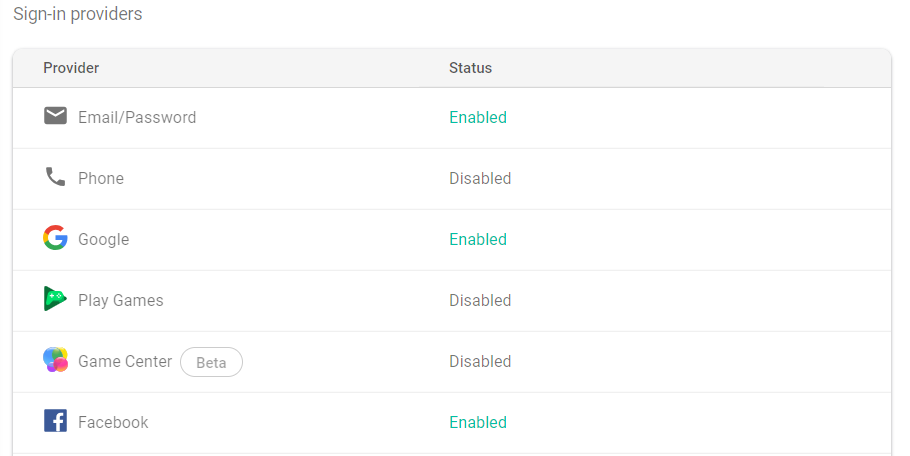
Let’s get back to the sidebar on the left and select Authentication. From here we have access to the Sign-in methods that we need in the app. Navigate to the Sign-in tab, there you can see the providers that are enabled and used in the Portfolio application - Google, Facebook and Email/Password provider. Sign-in providers let users authenticate with Firebase using their Facebook and Google accounts by integrating their logins into the app. As for the Email/password provider, it represents a simple authentication mechanism by using only email and password. Firebase Auth provides build in validation rules verifying the user entries, so we don’t need to configure something additional here.
The “trickiest” part here was the Facebook provider configuration, because we needed to have Facebook application in order to authenticate the login. We’ve created a FB app from Facebook Developers which provided us with the App ID and App Secret requested from Firebase.
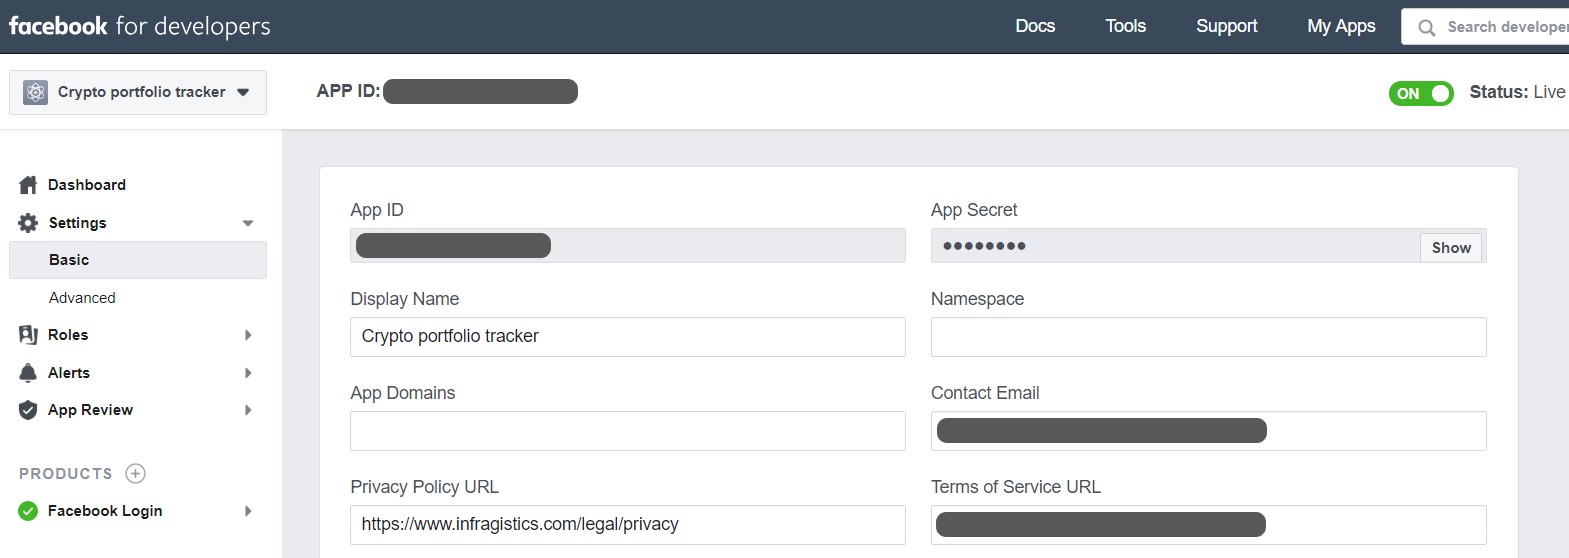
Both API ID and Secret should be filled when enabling the Facebook provider, as for the Auth redirect URI (from the provider window) it should be pasted under Facebook/Facebook Login/Products section/Valid Auth Redirect URIs.
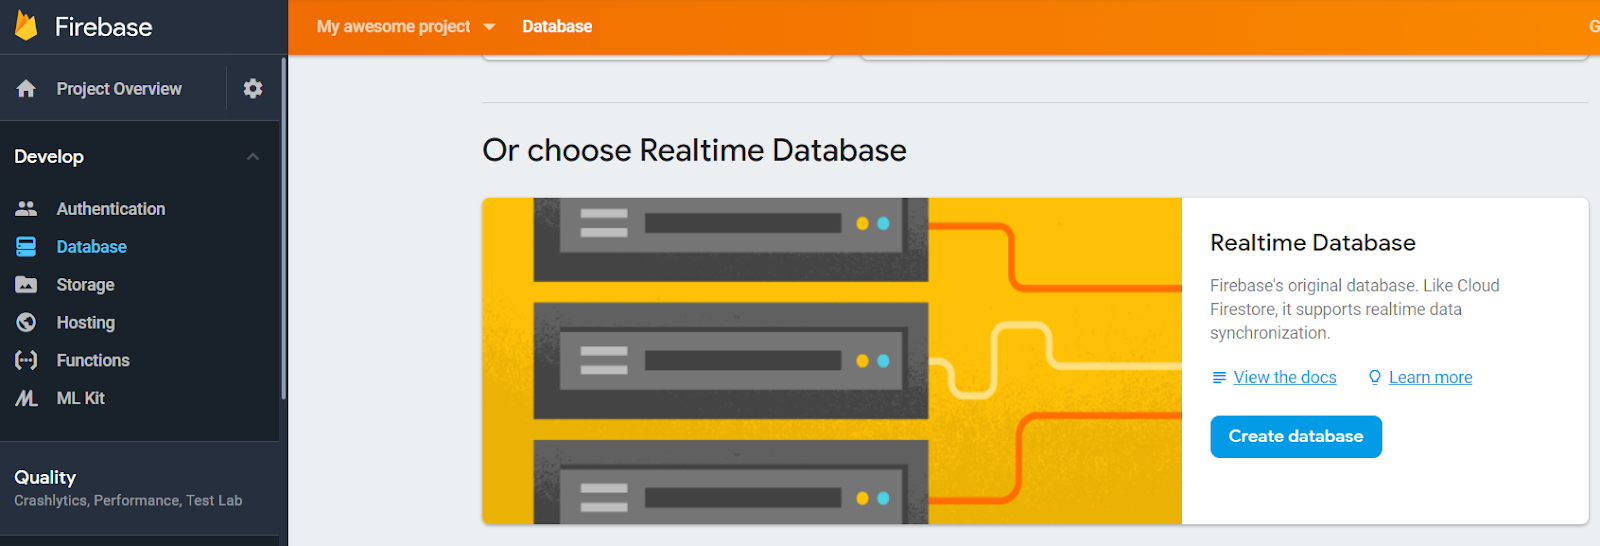
Let’s continue with the Firebase console. From the Database view page, we’ve created a Realtime Database.
In this view we can find information of the application data items and write/read security rules. Below are the rules used by the Portfolio application:
{
  "rules": {
    "items": {
      "$uid": {
        ".read": "$uid === auth.uid",
        ".write": "$uid === auth.uid"
      }
    }
  }
}
This Security Rule configuration will allow only authenticated users to be able to read and write in our database. If you want to learn how to define more advanced rules, I strongly recommend checking out the Official Security & Rules section.
Okay, where are we, now that we went through the Portfolio Firebase account creation, let’s see how the Firebase development project was created. If we didn’t have a project created already, I would have recommended to start with installing the firebase CLI, that provides a variety of tools for managing and deploying Firebase projects. BUT we’ve bootstrapped the Portfolio Angular Project with Ignite UI CLI, so we just needed to install AngularFire and Firebase from npm. We need both packages in order to communicate with Firebase, AngularFire is the official library for Firebase and Angular development.
npm install firebase @angular/fire --save
All AngularFire modules that are used in the application are added in the app.module.ts file:
- FirestoreModule is needed for the database features like working with collections, queries and services for data streaming and manipulation.
- FireAuthModule needed for authentication features like monitoring authentication state, Log-in providers and security.
- FireDatabaseModule allows us to work with Realtime databases, it’s very efficient for mobile and web apps that require synced states across clients in Realtime.
The only common module that is not used in the Portfolio app is AngularFireStorageModule, you can use this module to quickly and easily store and serve user-generated content like photos and videos as well as monitor uploads and metadata associated with files.
Now that we know how the app was configured initially, we can take a look at the other Firebase features that are used.
Authentication
We useAngularFireAuth serviceto monitor the app authentication state. AngularFireAuth.auth returns an initialized firebase.auth.Auth instance, allowing us to log users in and out. The app demonstrates Sign-in capabilities using three providers: Facebook, Google and Email.
Firebase user instance is kept for every provider linked to the user, and when a user is registered or signs in, that user becomes the current user of the Auth instance. The instance persists user’s state, so that refreshing the page or restarting the application doesn’t lose user’s information.
We use signInWithRedirect method for both Facebook and Google providers, in order to sign in by redirecting to the sign-in page. Password-based account creation is used for the Email sign-in provider, createUserWithEmailAndPasswordand signInWithEmailAndPasswordare the methods responsible for the user account creation and sign-in.
I recommend the official Firebase docs for more detailed information on authentication and user lifecycle.
Realtime Database actions
Firebase offers two cloud-based, client-accessible database solutions, and we are using Firebase’s original database - Realtime. Check out the differences between Realtime and Cloud firestore on the official documentation page.
AngularFireDatabaseand AngularFireListservices are used in the Portfolio app to retrieve, save and remove data easily.
AngularFireDatabasecan be injected through the constructor of a component or @Injectable()service. In our case we use the second approach:
Data is retrieved through the AngularFireDatabaseservice, which fills Observable list of BlockItems. AngularFireprovides methods like snapshotChanges() that returns Observable of data as synchronized array, it is very handy if you want to limit event actions, like added, changed, removed and moved. By default, it listens to all four, however you may only be interested in one of these events and you can specify which of them you’d like to use. In our application we are subscribed to all of them.
Adding of new item, updating of existing one or removing it from the list is achieved by using push(), update() and remove() methods.
Each data operation method returns a promise, although we don’t need to use the completion promise to indicate success, because the realtime database keeps the list in sync.
Observables
CoinItem service
Cryptocompare API service manages async data and emits multiple values at a time with Observables. We use [HttpClient get(](https://angular.io/guide/http))method to request the data from the resource and subscribe to it, in order to transform it to Observable Array of CoinItemobjects, which will be used later by our igxGrid, igxList and igxCard components.
Rx.js allows us to cache the result of the HTTP Request. We retrieve this data initially, cache it and use the cached version during application’s lifetime. The combination of publishReply(1, 300000) and refCount() does the following.
publishReply(1, 300000) tells Rx to cache the latest emitted value and to stay valid for 5 minutes. After that time, it will invalidate the cache.
refCount() tells Rx to keep the Observable alive as long as there are any Subscribers.
Now after we subscribe to the Coins list, the result will be cached, and we won’t need to make another HTTP Request.
BlockItem service
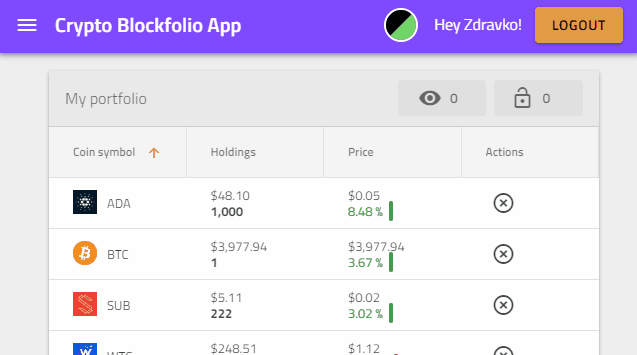
Portfolio Crypto Coins data is ensured by getItemsList() method that returns Observable BlockItem arrayto which the igxGrid component is subscribed to. Only authenticated users can use this service because the AngularFireList that we manipulate is associated with unique user ids.
Visualize the data
For the visualization, we use UI Components from the Ignite UI for Angular library. These components are responsible for data handling, while providing access to custom templates and real-time updates, with intuitive API, by using minimal code.
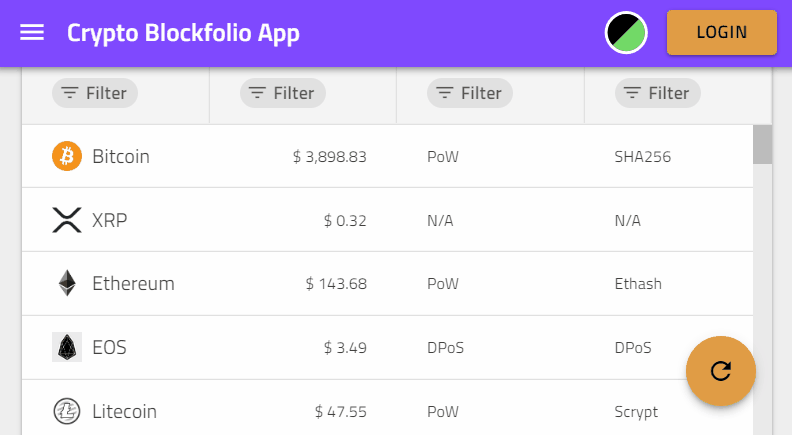
igxGrid
Grids [data] property binding is used to pass the returned BlockItem array. Each <igx-column> represent a field of the object and it is used to define features like editing and sorting. The columns are templatable and with the help of Angular pipes we can declare display-value transformations in them easily. We use decimal pipe to change the minimum number of integer digits before the decimal point.
The component provides a straightforward event handlers and API for CRUD operations. Handlers like updateRow and deleteRow are implementing additional logic like AngularFireList manipulation and coin item restore logic with the igxSnackbar.
igxCard
Cards are used to provide general information of Crypto coins using CSS Flexbox layout. These Card components can be filtered with igxFilter directive, which can be used to filter different data sources. igxFilter can be applied as a pipe or as a directive.
igxFinancialChart
The Chart offers multiple ways in which the data can be visualized and interpreted, once it is returned by the service. There are several display modes for price and volume, and in our case we use chartType=”candle”.
The financial chart component analyzes and selects data columns automatically:
Date/Timecolumn to use forx-axisOpen,High,Low,Close,Volumecolumns or the first 5 numeric columns fory-axis
Theming
IgniteUI for Angular bases its component designs on the Material Design Principles and with just a few lines of code, we can easily change the colors, sizes, typography, and overall look and feel of our components.
Now that we’ve provided all base definitions needed for the igx-theme, and have configured the igx-dark-theme mixin, we need to only apply .light-theme and .dark-theme CSS classes somewhere at DOM element root level and toggle it on button click.
Result
Wrapping up
Everything is possible with the right tooling, we have created a Portfolio Web application using the full power of Angular Framework, Firebase Authentication services and Cloud Database store/synchronization.
GitHub repository and the actual portfolio application.
Feel free to share in the comments below any questions that you have, suggestions what can be approved or changed in the app, or any problems that you’ve encountered while configuring your Firebase account or application.
✅30s ad
☞ Angular (Full App) with Angular Material, Angularfire & NgRx
☞ Angular 7 with Angular Material and Firebase Cloud Firestore
☞ Angular 5 - A 3-Step Process to Master Angular for Beginners
☞ Angular 6 (Angular 2+) & React 16 - The Complete App Guide
☞ Learn Angular 2 from Beginner to Advanced
Suggest:
☞ Angular Tutorial - Learn Angular from Scratch
☞ Learn Angular 8 from Scratch for Beginners - Crash Course
☞ React Firebase Tutorial | AUTH - CRUD - Image Upload
☞ Firebase - Ultimate Beginner's Guide
☞ Angular and Nodejs Integration Tutorial
☞ Angular 5 vs Angular 6 | What's New in Angular 6 | Features & Updates