Video Chat with Vue, WebRTC, SocketIO, Node & RedisApp

In almost one click we all are able to communicate with anyone in any part of the world but, why don’t we try to build our own app to make it even more real? Let’s do it!
The main features of our app will be:
- Several available rooms and the possibility to jump across them
- User status (online/absent/unavailable)
- Be able to open a private chat with anyone else in the same room (just one private chat at the same time) and get notified whether that user is already talking with someone else or has closed the chat
- Be able to start a video conference within the same private chat
To build it we’ll use the following tech:
- Vue.js as a frontend framework. Vue is becoming more popular lately, so it’s a good chance to catch up with it. We’ll also use Vuex to store the user and chat information
- The backend will be implemented in NodeJS with Express
- Socket.io and WebRTC for the real-time engine and communications
- Redis as a database in memory
- Docker & Docker Compose
Talking about that tech (and Sockets and WebRTC specially) we could go as far as we wanted, diving deeper in more complex aspects, but that’s not the purpose. We want to build something simple to understand the basic points of each part but fully working though, so let’s get started.
App skeleton
First of all, let’s install and use [@vue/cli](https://cli.vuejs.org/) to easily create the main skeleton:
npm install -g @vue/cli
vue create video-chat
After that, you’ll be prompted to pick a preset. In our case we manually select Babel, Router, Vuex, CSS Pre-processor and Linter support
To speed up the process we’ll use [vue-materia](https://vuematerial.io/getting-started)l as a style framework (it’s still on beta version even though they claim the API will not change)
npm install vue-material --save
Regarding HTTP and WebSocket communications, we’ll use [vue-resource](https://github.com/pagekit/vue-resource) and [vue-socket.io](https://github.com/MetinSeylan/Vue-Socket.io) as custom implementations for Vue.js
npm install vue-resource vue-socket.io --save
Once all installed, we can configure them in our main.js file:
import VueSocketIO from 'vue-socket.io'
import VueResource from 'vue-resource'
import store from './store'
import { url } from './utils/config'

// Socket config
Vue.use(new VueSocketIO({
  debug: true,
  connection: `${url}/video-chat`,
  vuex: {
    store, // Attach the store
    actionPrefix: 'SOCKET_',
    mutationPrefix: 'SOCKET_'
  },
}))

// Vue resource for http
Vue.use(VueResource)

// Vue instance
new Vue({
  router,
  store, // Attach the store
  render: h => h(App)
}).$mount('#app')
main.js
With actionPrefix and mutationPrefix in the vuex configuration we could trigger server side vuex actions and mutations respectively. In our example we will not use them as we’ll dispatch the actions in the client after listening the socket server events
Regarding the store attached to the VueSocketIO and Vue instances, we can configure them in the store.js file with the following state:
import Vue from 'vue'
import Vuex from 'vuex'
import { STATUS_OPTIONS } from './utils/config'

Vue.use(Vuex)
export default new Vuex.Store({
  state: {
    room: undefined, // Current room
    username: undefined, // Username
    status: STATUS_OPTIONS.available, // User status
    rooms: [] // Available rooms in the whole chat
  },
  mutations: {
    // Mutation per action (joinRoom, changeRoom, setRooms, leaveChat, changeStatus)
  },
  actions: {
    // Here we define all the actions that will get triggered when:
    // joinRoom, changeRoom, setRooms, leaveChat, changeStatus
  }
})
store.js
Every time the user triggers an action, we’ll dispatch it to the store generating a mutation execution and ending up with a new state.
Normally, the state management pattern is quite similar regardless the framework you choose. Check out the Vuex implementation in that case for more details
As we can see, the socket configuration is expecting a connection url, so before keeping going with the login page, let’s build the main basics of our server
Server
First of all, we need to install all the main packages to set up our server basics
npm install express http body-parser path cors socket.io --save
Secondly, within a /server folder in the project root we create the index.js and app.js files as our main server entry points:
const http = require('http');
const app = require('./app')
const config = require('./config')
const server = http.createServer(app);

app.io.attach(server) // Atach server to the socket
app.io.origins([config.ORIGINS]) // Origin socket configuration

server.listen(config.PORT, () => {
    console.log(`Server Listening on port ${config.PORT}`)
});
index.js
We define all the server configuration in the config.js file. That will help us in the future to configure several instances of our application easily
const express = require('express');
const app = express();
const io = app.io = require('socket.io')();
const cors = require('cors');
const bodyParser = require('body-parser');
const path = require('path');
const users = require('./routes/user');
const rooms = require('./routes/room');
const chat = require('./chat_namespace');

app.use(cors())
app.use(bodyParser.json());
// Middleware
app.use((req, res, next) => {
    console.log('Time: ', Date.now());
    next();
});
// Routing
app.use('/auth', users)
app.use('/rooms', rooms)

app.use(express.static(path.join(__dirname, '../dist'))); // Static routing
chat.createNameSpace(io) // Chat socket namespace

module.exports = app
app.js
With the previous configuration we’ve mainly achieved:
- Create and configure both http and express servers
- Define the REST APIs for the login and the rooms (for both APIs will store the information in memory for simplicity)
- Create the static server that will serve all the static files of our frontend
- Create the websocket namespace and configure its server events
The namespaceis essentially the endpoint or path of our WS connection. By default is always / and it’s the one socket.io clients connect to by default. In our case we’ve set it up to /video-chat
That’s the reason the socket client connects to
${url}/video-chat
Regarding the events, for now we’ve just defined the basic one to join a room. Under the /chat_namespace folder, we create the index.js file:
const config = require('./../config')

// Socket namespace
let namespace;
const users = {
    general: [],
    sports: [],
    games: []
};

const onConnection = (socket) => {
    // Listening for joining a room (joinRoom event)
    socket.on('joinRoom', ({ username, room }) => {
        socket.join(room, () => {
            // push user for the suitable room
            users[room].push({ username: username, privateChat: false })
            // Notify all the users in the same room
            namespace.in(room).emit('newUser', users[room]);
        });
    });
}

exports.createNameSpace = (io) => {
    namespace = io
        .of(config.CHAT_NAMESPACE)
        .on('connection', onConnection)
}
index.js
In the connection callback we are listening for the joinRoom event. Once it gets triggered, we join the room, we add the user into that room and we emit back all the user within that room through the newUser event. So our front will emit joinRoom event and it will listen for the newUser one
You can check out all the available server events in the socket.io emit cheatsheet
At this point we’d be ready to start building our frontend
Frontend
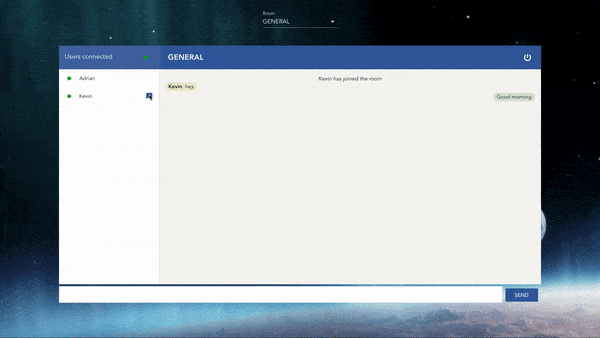
We’ll have two main pages: the login and the main chat page.
We won’t use any authentication mechanism, so for the first one we just need the user and the room to join. The user will work as a primary key in the system, so the username has to be unique. Besides the main rooms, the idea is to use the username as the room value for private conversations
If we wanted to allow more than one private chat at the same time, we could create for instance like a unique constrain name with the two usernames involved in the private conversation
Within a new /views folder we create the file Home.vue as follows:
<template>
  <div class="options">
    <h2>VIDEO CHAT</h2>
    <div>
      <form novalidate class="md-layout" @submit.prevent="submitForm">
        <md-field>
          <label>Username</label>
          <md-input v-model="username" type="string" id="username">
          </md-input>
        </md-field>
        <md-field>
          <label for="movie">Room</label>
          <md-select v-model="room" name="room" id="room">
            <md-option
              v-for="room in rooms"
              :key="room.id"
              :value="room.name">{{room.name}}
            </md-option>
          </md-select>
        </md-field>
        <div v-if="error" class="options-error">
          <p>{{error}}</p>
        </div>
        <div class="options__submit">
          <md-button type="submit" class="md-raised md-primary" :disabled="!(username && room)">JOIN
          </md-button>
        </div>
      </form>
    </div>
  </div>
</template>
Home.vue
Now we just need to fetch the rooms and submit the user information:
<script>
import { url, STORE_ACTIONS } from "./../utils/config";
export default {
  name: "home",
  data: // Function returning an object with username, room, rooms, error,
  async created() {
    try {
      const data = await this.$http.get(`http://${url}/rooms`)
      this.rooms = data.body;
      this.$store.dispatch(STORE_ACTIONS.setRooms, this.rooms) // Save rooms
    } catch (error) {
      console.log(error);
    }
  },
  methods: {
    async submitForm() {
      if(!(this.username && this.room)) return
      try {
        let response = await this.$http.post(`http://${url}/auth/login`, {
          room: this.room,
          username: this.username
        })
        if (response.body.code === 400 || response.body.code === 401 || response.body.code === 500) {
          this.error = response.body.message
          return
        }
        this.$store.dispatch(STORE_ACTIONS.joinRoom, data) // Save room
        this.$router.push("/chat") // Navigate to main room
      } catch (error) {
        console.log(error)
      }
    }
  }
};
</script>
home.vue
Within the created lifecycle method we fetch the rooms and save them in our store. Same when submitting the form, as soon as the user sends the right information, we save the room and navigate to the main chat page.
We change the state dispatching events to the store along with the appropriate payload
this.$store.dispatch(<name>, payload)
For the main chat page, and to get some help with the structure, we’ll mainly use the material appcomponent with the following parts:

-
Change room select
-
Header (room name and logout button)
-
Users list area (with their status)
-
Messages area
-
Text area to send messages
For the private chat, we’ll use the material dialog component.
Even though we use material components, we’ll still need some tuning :)
For that, I’ve used style encapsulation in all the child components but the two parent pages (login and chat). For those, I use a global scope due to their self-reliance character and for simplicity when overwriting some material styles. You can checkout here an explanation of scoped CSS in Vue.js
At this point we can distinguish the following events:
- joinRoom: to join a main room (just explained above)
- publicMessage: when the user sends a message. The server emits back a newMessage event with the message to all the users within the same room
- leaveRoom: when the user changes the room. The server leaves the room and sends back the new users list for the room left. After that, the client will join the new room following the joinRoom event
- leaveChat: when the user logs out. The server emits the new users list through the leaveChat event and leaves the socket room
- changeStatus: when the user changes the status. The server updates it and send back the new values using the same newUser event than before
- joinPrivateRoom: when the user (A) open a private chat with someone else (B). The server joins the room and emits back a privateChat event to notify the other user (B). If the final user (B) is already talking, the server notifies the user (A) and force him to leave the private room with the leavePrivateRoom event
- leavePrivateRoom: when the user closes a private chat. The server emits back the same event to notify the other user
- privateMessage: when the user sends a private message. The server emits back the message with the privateMessage event to both users
Now, under the same /views folder we create the Chat.vue filewith the major components for our main chat page:
<template>
  <div class="page-container">
    <div class="md-layout-item">
      <!-- Change room select -->
      <md-field>
        <label for="room">Room</label>
        <md-select v-model="room" @md-selected="onChangeRoom" name="room" id="room">
          <md-option v-for="room in this.$store.state.rooms" :key="room.id" :value="room.name">{{room.name}}</md-option>
        </md-select>
      </md-field>
    </div>

    <md-app md-waterfall md-mode="fixed">
      <!-- Room title and logout -->
      <md-app-toolbar class="md-primary">
        <span class="md-title page-container__room">{{room}}</span>
        <md-button class="md-icon-button page-container-logout" @click.native="logout()">
          <md-icon>power_settings_new</md-icon>
        </md-button>
      </md-app-toolbar>

      <!-- Connected users list -->
      <md-app-drawer md-permanent="full">
        <!-- Display the users and emit an event when the user open a private chat -->
        <UserList
          :users="users"
          :openPrivateChat="openPrivateChat.chat"
          @open-chat="openChat($event)"
        ></UserList>
      </md-app-drawer>

      <!-- Chat area with all the messages -->
      <md-app-content>
        <!-- As an input it display the messages received from the server -->
        <ChatArea :messages="messages"></ChatArea>
      </md-app-content>
    </md-app>

    <!-- Text area to write on. It emits an event each time the user sends a message -->
    <MessageArea
      @send-message="sendMessage($event)">
    </MessageArea>

    <!-- Private chat. The showDialog input controls whether we open a private chat or not -->
    <!-- The openPrivateChat is an object defined in the Vue chat component that contains
         information to handle the private chat -->
    <ChatDialog
      :showDialog="openPrivateChat"
      @close-chat="closePrivateChat()">
    </ChatDialog>
  </div>
</template>
Chat.vue
That’s our parent component and it will be the responsible to listen to all the sockets events emitted by the server. For that, we just need to create a socket object within our Vue component and create a listener method per server event:
<script>
export default {
  name: "chat",
  components: { UserList, ChatArea, MessageArea, ChatDialog },
  // server events listeners
  sockets: {
    // newMessage server event
    newMessage: function({ message, username }) {
      if(message.replace(/\s/g, "").length === 0) return // No empty messages
      const isMe = this.$store.state.username === username;
      const msg = isMe ? ` ${message}` : {username, message};
      this.messages.push({ msg, isMe });
    },
    // Rest of listeners:
    // newUser, privateChat, privateMessage, leavePrivateRoom, leaveChat
  },
  beforeCreate: function() {
    this.$socket.emit(WS_EVENTS.joinRoom, this.$store.state); // Join the room
  },
  data: // chat data,
  methods: {
    sendMessage(msg) {
      // Send a new public message
      this.$socket.emit(WS_EVENTS.publicMessage, {
        ...this.$store.state,
        message: msg
      });
    },
    // Rest of methods:
    // onChangeRoom, openChat, closePrivateChat, logout
  }
};
</script>
Chat.vue
In that example we emit the publicMessage event when the user sends a public message and we listen to the newMessage server event to get the message back.
Bear in mind that all the users will run the same client code, so we need to build a generic way to handle all the logic in any case
Going through all the details for each component would take too long, so we’ll explain the main functionality. They just basically get input data after the socket listeners get triggered and emit events to the parent under user actions:
Text area to send messages. It emits an event to the parent every time the user sends a public message, what emits a publicMessage socket event to the server It displays all the public messages within a room using a directive to format the message based on the user:
<template>
  <div class="message">
    <div v-for="msg in messages" :key="msg.msg" class="message__container">
      <p
        v-if="!msg.join"
        class="message__text"
        :class="{ own: msg.isMe, other: !msg.isMe}"
        v-message="msg.msg"></p>
      <p v-if="msg.join" class="message__joined">{{msg.msg}}</p>
    </div>
  </div>
</template>

<script>
export default {
  props: // messages: Array, maxMessageLength: Number
  directives: {
    message: {
      bind: function(el, binding, vnode) {
        let chunks
        const maxLength = vnode.context.maxMessageLength
        if(typeof binding.value === 'object') {
          chunks = Math.ceil(binding.value.message.length / maxLength)
          el.innerHTML = `<span style="font-weight:bold">${binding.value.username}</span>:
            ${vnode.context.getChunkText(binding.value.message, maxLength, chunks)}`
        } else {
          chunks = Math.ceil(binding.value.length / maxLength)
          el.innerHTML = vnode.context.getChunkText(binding.value, maxLength, chunks)
        }
      }
    }
  },
  methods: {
    // Calculate the chunck text to fit within the chat area
    getChunkText(message, maxLength, index){}
  }
};
</script>
ChatArea.vue
It displays the current user status and the list of users with their status. When the user wants to open a private chat, it emits an event to the parent to open the private chat modal and emits the joinPrivateRoom socket event. When the user changes the status, it updates the state and emits the changeStatus socket event. Private chat. For each message it emits a privateMessage socket event. When closing the conversation it emits an event to the parent what emits the leavePrivateRoom socket event. It also contains the component with all the video functionality
After that, it’s time to add the new listeners to our previous server file index.js within the /chat_namespace folder:
const onConnection = (socket) => {
    socket.on('joinRoom', events.joinRoom(socket, namespace)) // Join a room
    socket.on('publicMessage', events.publicMessage(namespace)) // New public messages
    socket.on('leaveRoom', events.leaveRoom(socket, namespace)) // Leave room
    socket.on('leaveChat', events.leaveChat(socket, namespace)) // Leave the chat
    socket.on('joinPrivateRoom', events.joinPrivateRoom(socket, namespace)) // Join private chat
    socket.on('leavePrivateRoom', events.leavePrivateRoom(socket, namespace)) // Leave private chat
    socket.on('privateMessage', events.privateMessage(namespace)) // Private message
    socket.on('changeStatus', events.changeStatus(socket, namespace)) // // Set status
}

exports.createNameSpace = (io) => {
    namespace = io
        .of(config.CHAT_NAMESPACE)
        .on('connection', onConnection)
}
index.js
As we are getting more events, we‘ve changed slightly that file and created a new events.js file under the same/chat_namespace folder with all the callback functions:
const joinRoom = (socket, namespace) => ({ username, room }) => {}  // Defined above

const publicMessage = (namespace) => ({ room, message, username }) => {
    namespace.sockets.in(room).emit('newMessage', { message, username });
}
const privateMessage = (namespace) => ({ privateMessage, to, from, room }) => {
    namespace.to(room).emit('privateMessage', { to, privateMessage, from, room })
}
const leaveRoom = (socket, namespace) => ({ room, username }) => {
    socket.leave(room, () => {
        let usersRoom = users[room]
        usersRoom = usersRoom.filter((user) => (user.username !== username)) // delete user from the array
        namespace.sockets.in(room).emit('newUser', usersRoom); // To all the users in the same room
    })
}
const joinPrivateRoom = (socket, namespace) => ({ username, room, to }) => {
    socket.join(to, () => {
        if (room !== null) {
            let usersRoom = users[room];
            let userToTalk = usersRoom.find(user => user.username === to)

            if (userToTalk.privateChat) { // If he is already talking
                namespace.to(to).emit('leavePrivateRoom', { to, room, from: username,
                    privateMessage: `${to} is already talking`,
                })
                socket.leave(to, () => {
                    console.log(`user ${username} forced to left the room ${to}`);
                })
                return;
            }
            // If the user is not talking we update the flag and notify the other user
            userToTalk.privateChat = true
            namespace.sockets.in(room).emit('privateChat', { username, to });
        }
    });
}
const leavePrivateRoom = (socket, namespace) => ({ room, from, to }) => {
    let usersRoom = users[room];
    let userToTalk = usersRoom.find(user => user.username === to)
    // Update the flag and notify the other user
    userToTalk.privateChat = false
    namespace.to(to).emit('leavePrivateRoom', { to, from, privateMessage: `${to} has closed the chat`})
    socket.leave(to, () => {
        console.log(`user ${from} left the private chat with ${to}`);
    })
}
// module.exports = { ... }
events.js
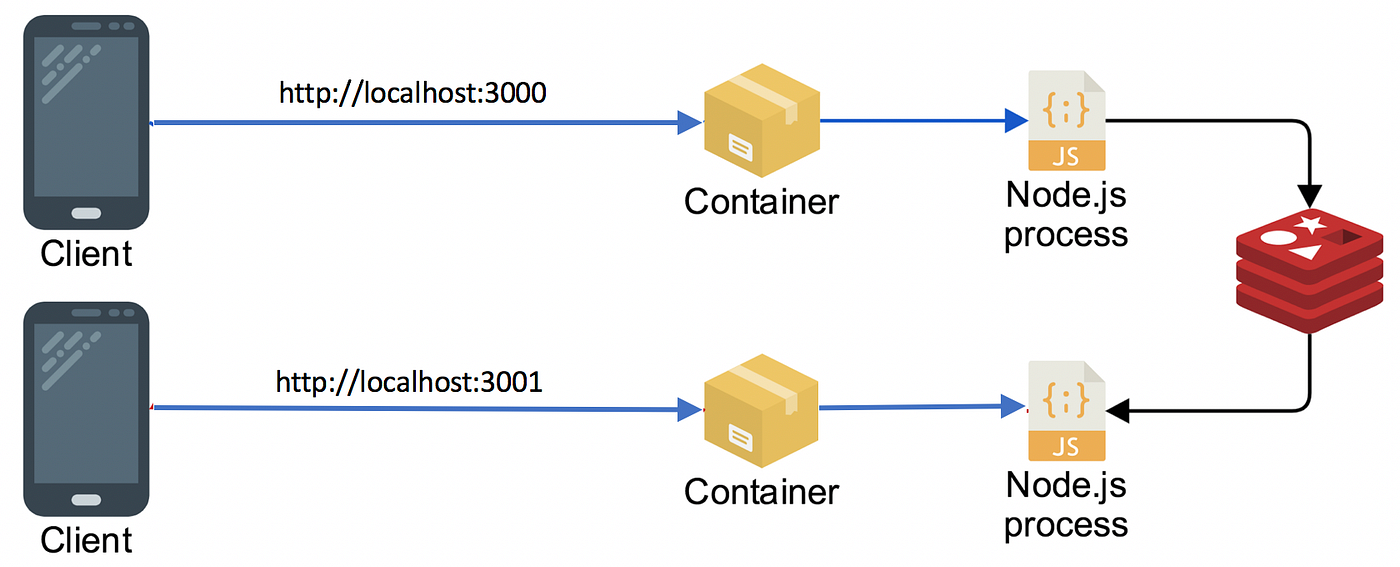
During the whole process we’ve stored all the information in memory. That approach would work for simple cases, but as soon as we needed to scale, it just would not work properly because each server instance would have its own copy of the users. And not only that, the users might be connected to different instances, so there would not be a way to communicate both socket connections.

Adding Redis
Implementing the Redis adaptor in our server solves the problem.
npm install socket.io-redis redis --save
In the server entry point index.js we add the following lines:
const redis = require('socket.io-redis');

// We configure the adapter through configuration, so we can get
// the values from environment variables when deploying
app.io.adapter(redis({
    host: config.REDIS_HOST,
    port: config.REDIS_PORT
}));
index.js
Besides, we’ll use Redis as a database to store all the users connected. For that we create an index.js file within a new /redis folder in our server:
const redis = require('redis')
const bluebird = require('bluebird')
const config = require('./../config/')

bluebird.promisifyAll(redis); // Using promises

function ChatRedis() {
    this.client = redis.createClient({ host: config.REDIS_HOST });
}
ChatRedis.prototype.addUser = function (room, socketId, userObject) {
    this.client.hsetAsync(room, socketId, JSON.stringify(userObject)).then(
        () => console.debug('addUser ', userObject.username + ' added to the room ' + room),
        err => console.log('addUser', err)
    );
}
ChatRedis.prototype.getUser = function(room, socketId){
    return this.client.hgetAsync(room, socketId).then(
        res => JSON.parse(res),
        err => {
            console.log('getUser ', err)
            return null
        }
    )
}
// getUsers, delUser, setUser implementations

module.exports = new ChatRedis()
index.js
In our case we’ve implemented the hash pattern to store the data as an example, but there are more data-types and abstractions that we could’ve used based on the search requirements. Besides, there are also some node.js
redis clients that provide extra functionality with a layer of abstraction
After that we would just need to update all the references to the users in memory and change them to use our redis implementation.
WebRTC
WebRTC is a free and open project that provides web and mobile applications with Real-Time Communications (RTC) capabilities via simple APIs.
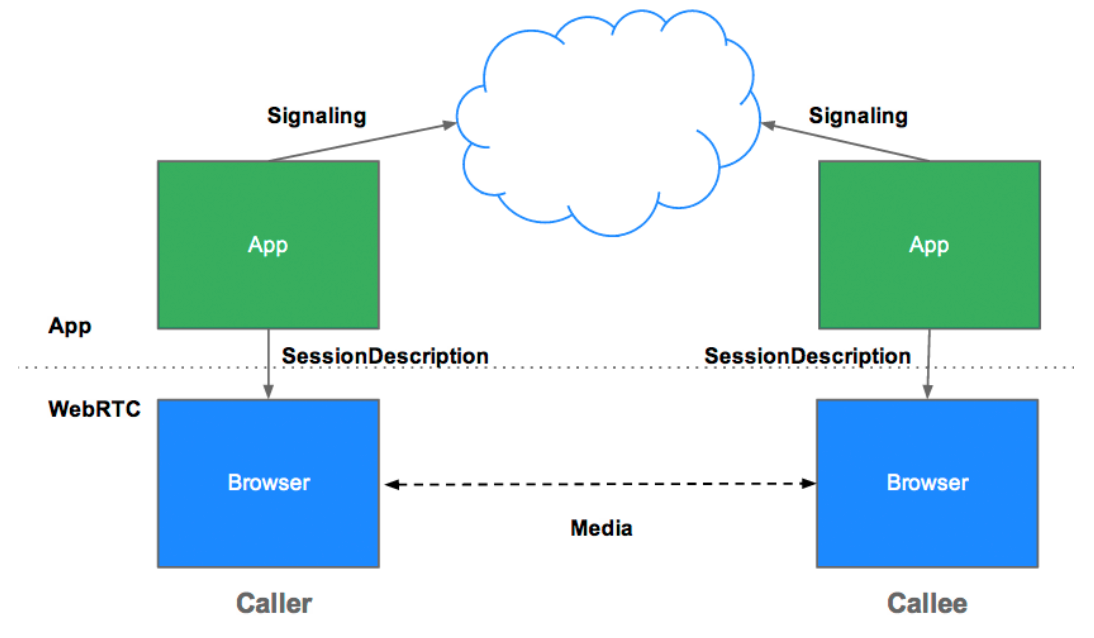
WebRTC enables peer to peer communications even tough it still needs a server for the signaling process. Signaling is the process of coordinating communication between the two clients to exchange certain metadata needed to establish the communication (session control and error messages, media metadata, etc). However, WebRTC does not specify any method and protocol for that, so it’s up to the application to implement the appropriate mechanism.
In our case we’ll use the private room as the signaling mechanism between the two users
To secure a WebRTC app in production is mandatory to use TLS (Transport Layer Security) for the signaling mechanism
For that, we’ll add a new server listener to our server configuration:
const privateMessagePCSignaling = (namespace) => ({ desc, to, from, room }) => {
    // Private signaling message to the user
    // desc is the local session description of the user emitting the event
    namespace.to(room).emit('privateMessagePCSignaling', { desc, to, from })
}

module.exports = {
    // Other events
    privateMessagePCSignaling
}
events.js
const onConnection = (socket) => {
    // Rest of listeners
    // Private message for Signaling PeerConnection
    socket.on('privateMessagePCSignaling', events.privateMessagePCSignaling(namespace))
}

exports.createNameSpace = (io) => {
    namespace = io
        .of(config.CHAT_NAMESPACE)
        .on('connection', onConnection)
}
index.js
The mechanism to establish the communication between A (caller) and B (callee) would be the following:
- A creates a RTCPeerConnection object with the ICE servers configuration
- A creates an offer (SDP session description) with the RTCPeerConnection createOffer method
- A calls **setLocalDescription(offer)**methodwith the offer
- A uses the signaling mechanism (privateMessagePCSignaling) to send the offer to B
Follow
- B gets the offer and calls setRemoteDescription() with A’s offer (so B RTCPeerConnection knows about A’s setup)
- B creates an answer with the RTCPeerConnection createAnswer method
- B calls **setLocalDescription(answer)**methodwith the answer
- B uses the signaling mechanism (privateMessagePCSignaling) to send back the answer to A
- A sets B’s answer as the remote session description using the setRemoteDescription() method
Besides that process, both users will have to set up the following:
- Get access to the camera, get the stream and attach it to the local video tag
- Set the RTCPeerConnection onaddstream listener to get the remote track mediaand attach it to the remote video tag
- Set the RTCPeerConnection onicecandidate listener to send any ice candidates to the other peer
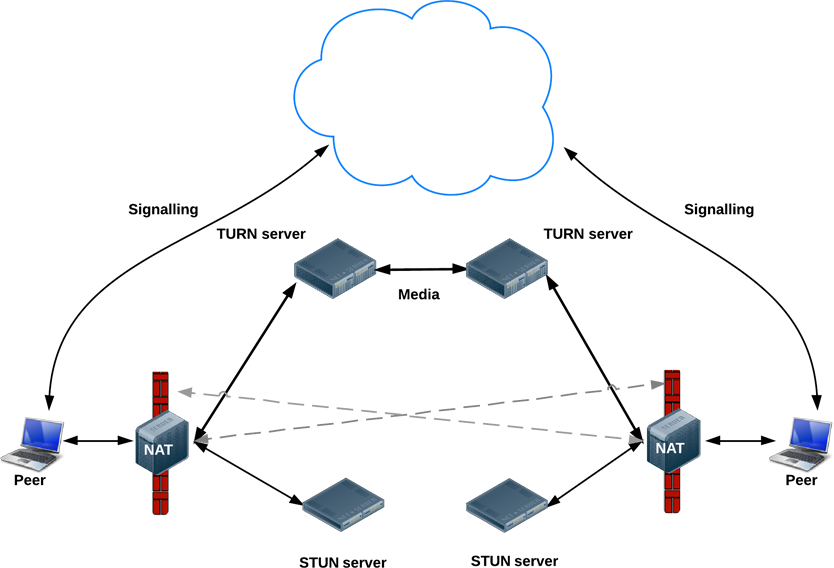
Once the session is established, WebRTC attemps to connect clients directly (peer to peer without any server) for media and data streaming. However, in the real world most devices live behind one or more layers of NAT, so WebRTC uses ICE framework to overcome those complexities
That’s the reason we need the ICE server configuration when creating the RTCPeerConnection object. You can test out here the connectivity of any STUN/TURN server to check whether they are alive and properly responding to connections
The VideoArea.vue component will contain all that logic:
<template>
  <div class="video">
    <div class="video__partner">
      <!-- Loading component whilst we wait for the remote video track -->
      <rotate-square5 v-if="!remoteStream" class="video__spinner"></rotate-square5>
      <!-- Remote video -->
      <video id="remoteVideo" class="video__spinner" autoplay></video>
    </div>
    <!-- Local video -->
    <video id="localVideo" class="video__myself" autoplay></video>
  </div>
</template>

<script>
export default {
  props: // room (String), to(String), videoAnswer(Object)
  data: // Media & Offer config, STUN ICE servers, RTC objec, streams & video
  async created() {
    await this.getUserMedia() // Get camera access

    this.createPeerConnection(); // Create RTCPeerConnection object
    this.addLocalStream(); // Add local video stream
    this.onIceCandidates(); // Add event listeners
    this.onAddStream();

    !this.videoAnswer.video ? // Handle logic
      this.callFriend() : // Caller
      this.handleAnser() // Callee
    }
  },
  methods: {
    // CALLER
    callFriend() {
      this.createOffer(); // Create offer
    },
    // CALLEE
    async handleAnser() {
      await this.setRemoteDescription(this.videoAnswer.remoteDesc); // Set remote description
      this.createAnswer(); // Create the answer
    },
    async getUserMedia() {
      if ("mediaDevices" in navigator) {
        try {
          const stream = await navigator.mediaDevices.getUserMedia(this.constraints);
          this.myVideo.srcObject = stream;
          this.localStream = stream;
        } catch (error) {
          log(`getUserMedia error: ${error}`);
        }
      }
    },
    createPeerConnection() {
      this.pc = new RTCPeerConnection(this.configuration) // RTCPeerConnection object
    },
    async createOffer() {
      try {
        const offer = await this.pc.createOffer(this.offerOptions) // Create offer
        await this.pc.setLocalDescription(offer) // Add local description
        this.sendSignalingMessage(this.pc.localDescription, true) // Send signaling message
      } catch (error) {
        log(`Error creating the offer from ${this.username}. Error: ${error}`);
      }
    },
    async createAnswer() {
      try {
        const answer = await this.pc.createAnswer() // Create answer
        await this.pc.setLocalDescription(answer) // Add local description
        this.sendSignalingMessage(this.pc.localDescription, false) // Send signaling message
      } catch (error) {
        log(`Error creating the answer from ${this.username}. Error: ${error}`);
      }
    },
    sendSignalingMessage(desc, offer) { // Send the offer to the other peer
      this.$socket.emit("privateMessagePCSignaling", {
        desc,
        to: this.to,
        from: this.$store.state.username,
        room: this.room
      });
    },
    setRemoteDescription(remoteDesc) {
      this.pc.setRemoteDescription(remoteDesc);
    },
    addLocalStream(){
      this.pc.addStream(this.localStream)
    },
    addCandidate(candidate) {
      this.pc.addIceCandidate(candidate);
    },
    onIceCandidates() { // send any ice candidates to the other peer
      this.pc.onicecandidate = ({ candidate }) => {
        this.$socket.emit("privateMessagePCSignaling", {
          candidate,
          to: this.to,
          from: this.$store.state.username,
          room: this.room
        })
      }
    },
    onAddStream() { // Attach remote video track
      this.pc.onaddstream = (event) => {
        if(!this.remoteVideo.srcObject && event.stream){
          this.remoteStream = event.stream
          this.remoteVideo.srcObject = this.remoteStream ;
        }
      }
    }
  }
};
</script>
VideoChat.vue
The caller uses the privateMessagePCSignaling socket event to send the local description with the offer to the other user, so we need a socket listener in our client to handle the message on the callee side (and the other way around when the callee sends back the answer to the caller)
The ChatDialog component mentioned above was the responsible for the private chat, so we’ll add the logic there to listen for our signaling mechanism and control the data we pass to our VideoArea component:
<template>
  <div class="chat-dialog">
    <md-dialog>
      <div v-if="videoCall" class="chat-dialog__left">
        <VideoArea
          :room="showDialog.room"
          :to="showDialog.user"
          :videoAnswer="videoAnswer"
          @closeVideo="video(false)">
        </VideoArea>
      </div>
      <div class="chat-dialog__right">
        <!-- Private chat UI -->
      </div>
    </md-dialog>
  </div>
</template>

<script>
export default {
  name: "ChatDialog",
  components: { ChatArea, VideoArea },
  props: { showDialog: Object },
  sockets: {
    // Signaling listener
    privateMessagePCSignaling: function({ desc, from, candidate }) {
      if (from !== this.$store.state.username) { // If it's not my message
        try {
          // RECEIVING A DESCRIPTION
          if (desc) {
            // Incoming call
            if (desc.type === "offer") {
              this.openChat(desc, from) // Open private chat
            // Answer
            } else if (desc.type === "answer") {
              this.videoAnswer = { ...this.videoAnswer, remoteDesc: desc };
            } else {
              console.log("Unsupported SDP type");
            }
          // RECEIVING A CANDIDATE
          } else if (candidate) {
            this.videoAnswer = { ...this.videoAnswer, candidate };
          }
        } catch (error) {
          console.log(error);
        }
      }
    }
  },
  methods: {
    openChat(description, from){
      this.videoAnswer = {
        ...this.videoAnser,
        video: true,
        remoteDesc: description,
        from
      };
      this.videoCall = true;
    }
   }
}
</script>
ChatDialog.vue
Based on the message information we detect whether it’s an income call, an answer to a call or just a new candidate to be added to the peer object, acting accordingly in each case.
We’ll create 3 containers: 2 video-chat instances and the one for Redis:
For that we’ll create a docker-compose.yml file in the root of the project with the following configuration:
version: '3'

services:
  redis:
    image: redis:4.0.5-alpine
    networks:
      - video-chat
    ports:
      - 6379:6379
    expose:
      - "6379"
    restart: always
    command: ["redis-server", "--appendonly", "yes"]

  # Copy 1
  chat1:
    build:
      context: .
      args:
        VUE_APP_SOCKET_HOST: localhost
        VUE_APP_SOCKET_PORT: 3000
    ports:
      - 3000:3000
    networks:
      - video-chat
    depends_on:
      - redis
    environment:
      PORT: 3000
      REDIS_HOST: redis
      REDIS_PORT: 6379

  # Copy 2
  chat2:
    build:
      context: .
      args:
        VUE_APP_SOCKET_HOST: localhost
        VUE_APP_SOCKET_PORT: 3001
    ports:
      - 3001:3001
    networks:
      - video-chat
    depends_on:
      - redis
    environment:
      PORT: 3001
      REDIS_HOST: redis
      REDIS_PORT: 6379

networks:
  video-chat:
docker-compose.yml
Thecontextattribute defines theDockerfiledirectory. Here we describe the steps to compile our client and run the server with the appropriate configuration in each case.
FROM node:8.6

# Workdir and installing
WORKDIR /videochat
COPY package.json /videochat/
RUN npm install

COPY ./ /videochat

# Get instance configuration
ARG VUE_APP_SOCKET_HOST=NOT_SET
ARG VUE_APP_SOCKET_PORT=NOT_SET
# Build the app
RUN export VUE_APP_SOCKET_HOST=${VUE_APP_SOCKET_HOST} VUE_APP_SOCKET_PORT=${VUE_APP_SOCKET_PORT} && npm run build
# Run the server on the startup
CMD ["npm", "run", "run:server"]
Dockerfile
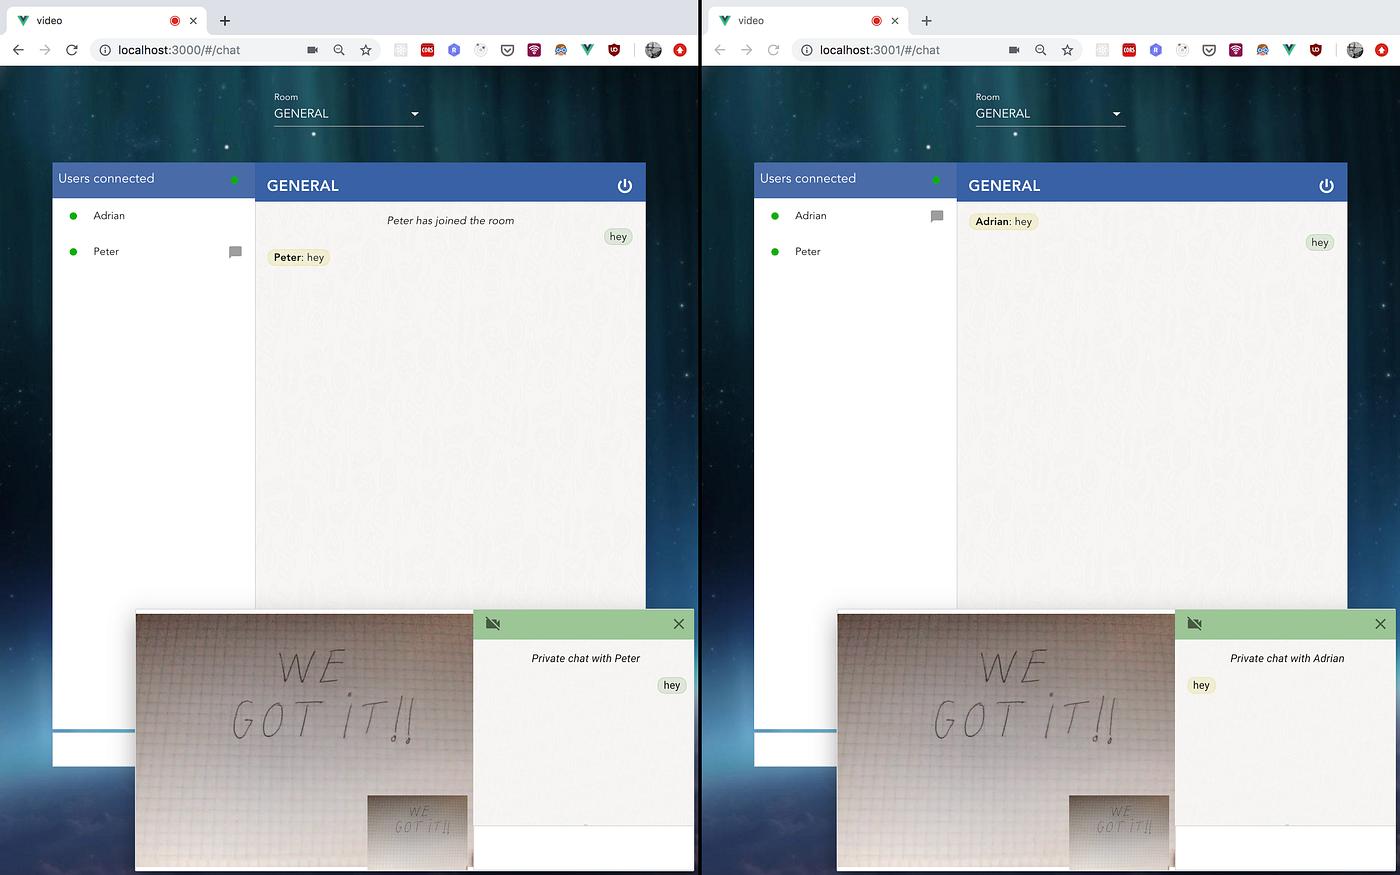
Now we just need to build and run the containers with docker-compose build and docker-compose up and open both video-chat copies in the browser:

We observe how each application creates a web socket connection with its server, so Redis will be the only way to communicate both connections.
We’re done! We’ve seen how without too much code we’ve been able to build a straightforward video chat. That’s a very simple example covering the basic points and we could improve it in several ways: adding login and websocket authentication, handling reconnections, enhancing the WebRTC functionality, improving camera and sound handling, allowing multi private chats, having the chance to accept or deny a private video call and so on.
You can check out all the code in the following repo
You also can find a simple version deployed in the following url
I’ve deployed the frontend with surgeand the server side in a micro EC2 instance in AWS, so try to not overload it too much :)
Based on the location, the WebRTC media sometimes fails due to the ICE server configuration (or you might need to try the video call more than just one time) so something else that needs to be updated and improved
I hope you’ve found it interesting.
Recommended Reading
☞ Build a PWA With Vue & Ionic 4
☞ Set Up a Vue.js Development Environment
☞ Build a Mini Vue Task Scheduler with the Kendo UI Scheduler Component
☞ Vue.js Pattern for Async Requests: Using Renderless Components
☞ Getting Started with Vuetify 2.0
Suggest:
☞ Getting Started with Node.js - Full Tutorial
☞ How To Create A Password Protected File Sharing Site With Node.js, MongoDB, and Express
☞ Using WebAssembly With Node.js
☞ Angular and Nodejs Integration Tutorial