Node.js Authentication using Passport.js

In this article you will learn how to handle authentication for your Node server using Passport.js. This article does not cover Frontend authentication. Use this to configure your Backend authentication (Generate token for each user & protect routes).
Keep in mind that if you get stuck on any step, you can refer to this GitHub repo.
In this article I will teach you the following:
- Handling protected routes
- Handling JWT tokens
- Handling unauthorised responses
- Creating a basic API
- Creating models & schemas
Introduction
What is Passport.js?
Passport is authentication middleware for Node.js. As it’s extremely flexible and modular, Passport can be unobtrusively dropped into any Express-based web application. A comprehensive set of strategies supports authentication using a username and password, Facebook, Twitter, and more. Find out more about Passport here.
Tutorial
Creating our node server from scratch
Create a new directory with this “app.js”file inside:
app.js
const express = require('express');
const path = require('path');
const bodyParser = require('body-parser');
const session = require('express-session');
const cors = require('cors');
const mongoose = require('mongoose');
const errorHandler = require('errorhandler');
//Configure mongoose's promise to global promise
mongoose.promise = global.Promise;
//Configure isProduction variable
const isProduction = process.env.NODE_ENV === 'production';
//Initiate our app
const app = express();
//Configure our app
app.use(cors());
app.use(require('morgan')('dev'));
app.use(bodyParser.urlencoded({ extended: false }));
app.use(bodyParser.json());
app.use(express.static(path.join(__dirname, 'public')));
app.use(session({ secret: 'passport-tutorial', cookie: { maxAge: 60000 }, resave: false, saveUninitialized: false }));
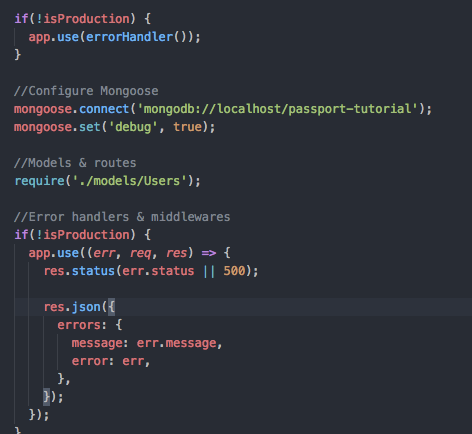
if(!isProduction) {
app.use(errorHandler());
}
//Configure Mongoose
mongoose.connect('mongodb://localhost/passport-tutorial');
mongoose.set('debug', true);
//Error handlers & middlewares
if(!isProduction) {
app.use((err, req, res) => {
res.status(err.status || 500);
res.json({
errors: {
message: err.message,
error: err,
},
});
});
}
app.use((err, req, res) => {
res.status(err.status || 500);
res.json({
errors: {
message: err.message,
error: {},
},
});
});
app.listen(8000, () => console.log('Server running on http://localhost:8000/'));
We will install nodemon for easier development.
nodemon
npm install -g nodemon
and then we will run our “app.js” with it.

Creating the user model
Create a new folder called “models”,and create the “Users.js” file inside that folder.This is where we will define our “UsersSchema”. We are going to use JWT and Crypto to generate hash and salt from the received password string. This will later be used to validate the user.
Users.js
const mongoose = require('mongoose');
const crypto = require('crypto');
const jwt = require('jsonwebtoken');

const { Schema } = mongoose;

const UsersSchema = new Schema({
  email: String,
  hash: String,
  salt: String,
});

UsersSchema.methods.setPassword = function(password) {
  this.salt = crypto.randomBytes(16).toString('hex');
  this.hash = crypto.pbkdf2Sync(password, this.salt, 10000, 512, 'sha512').toString('hex');
};

UsersSchema.methods.validatePassword = function(password) {
  const hash = crypto.pbkdf2Sync(password, this.salt, 10000, 512, 'sha512').toString('hex');
  return this.hash === hash;
};

UsersSchema.methods.generateJWT = function() {
  const today = new Date();
  const expirationDate = new Date(today);
  expirationDate.setDate(today.getDate() + 60);

  return jwt.sign({
    email: this.email,
    id: this._id,
    exp: parseInt(expirationDate.getTime() / 1000, 10),
  }, 'secret');
}

UsersSchema.methods.toAuthJSON = function() {
  return {
    _id: this._id,
    email: this.email,
    token: this.generateJWT(),
  };
};

mongoose.model('Users', UsersSchema);

Let’s add our newly created model to “app.js”.
Add the following line to your “app.js” file after configuring Mongoose:
require('./models/Users');
Configure Passport
Create a new folder “config” with the “passport.js” file inside it:
passport.js
const mongoose = require('mongoose');
const passport = require('passport');
const LocalStrategy = require('passport-local');

const Users = mongoose.model('Users');

passport.use(new LocalStrategy({
  usernameField: 'user[email]',
  passwordField: 'user[password]',
}, (email, password, done) => {
  Users.findOne({ email })
    .then((user) => {
      if(!user || !user.validatePassword(password)) {
        return done(null, false, { errors: { 'email or password': 'is invalid' } });
      }

      return done(null, user);
    }).catch(done);
}));
In this file, we use the method validatePassword that we defined in the User model. Based on the result, we return a different output from Passport’s LocalStrategy.

Let’s connect “passport.js” to our “app.js” file. Add the following line below all models:
require('./config/passport');

Routes and authentication options
Create a new folder called “routes” with the file “auth.js” inside it.
In this file we use the function getTokenFromHeaders to get a JWT token that will be sent from the client side in the request’s headers. We also create an auth object with optional and required properties. We will use these later in our routes.
auth.js
const jwt = require('express-jwt');

const getTokenFromHeaders = (req) => {
  const { headers: { authorization } } = req;

  if(authorization && authorization.split(' ')[0] === 'Token') {
    return authorization.split(' ')[1];
  }
  return null;
};

const auth = {
  required: jwt({
    secret: 'secret',
    userProperty: 'payload',
    getToken: getTokenFromHeaders,
  }),
  optional: jwt({
    secret: 'secret',
    userProperty: 'payload',
    getToken: getTokenFromHeaders,
    credentialsRequired: false,
  }),
};

module.exports = auth;
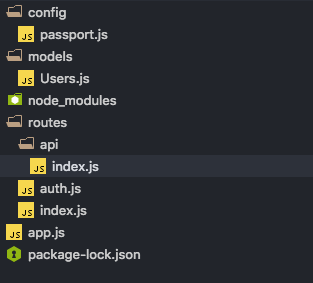
In the same “routes” folder create an “index.js” file:
index.js
const express = require('express');
const router = express.Router();

router.use('/api', require('./api'));

module.exports = router;
We now need an “api” folder inside the “routes” folder, with another “index.js” file inside it.
index.js
const express = require('express');
const router = express.Router();

router.use('/users', require('./users'));

module.exports = router;
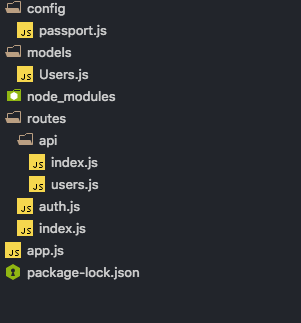
Now, let’s create the “users.js” file that we require in “api/index.js”.
First, we are going to create an optional auth route ‘/’ which will be used for new model creation (register).
router.post('/', auth.optional, (req, res, next) ...
After that, we are going to create another optional auth route ‘/login’ . This will be used to activate our passport configuration and validate a received password with email.
router.post('/login', auth.optional, (req, res, next) ...
Lastly, we will create a required auth route, which will be used to return the currently logged in user. Only logged in users (users that have their token successfully sent through request’s headers) have access to this route.
router.get('/current', auth.required, (req, res, next) ...
users.js
const mongoose = require('mongoose');
const passport = require('passport');
const router = require('express').Router();
const auth = require('../auth');
const Users = mongoose.model('Users');

//POST new user route (optional, everyone has access)
router.post('/', auth.optional, (req, res, next) => {
  const { body: { user } } = req;

  if(!user.email) {
    return res.status(422).json({
      errors: {
        email: 'is required',
      },
    });
  }

  if(!user.password) {
    return res.status(422).json({
      errors: {
        password: 'is required',
      },
    });
  }

  const finalUser = new Users(user);

  finalUser.setPassword(user.password);

  return finalUser.save()
    .then(() => res.json({ user: finalUser.toAuthJSON() }));
});

//POST login route (optional, everyone has access)
router.post('/login', auth.optional, (req, res, next) => {
  const { body: { user } } = req;

  if(!user.email) {
    return res.status(422).json({
      errors: {
        email: 'is required',
      },
    });
  }

  if(!user.password) {
    return res.status(422).json({
      errors: {
        password: 'is required',
      },
    });
  }

  return passport.authenticate('local', { session: false }, (err, passportUser, info) => {
    if(err) {
      return next(err);
    }

    if(passportUser) {
      const user = passportUser;
      user.token = passportUser.generateJWT();

      return res.json({ user: user.toAuthJSON() });
    }

    return status(400).info;
  })(req, res, next);
});

//GET current route (required, only authenticated users have access)
router.get('/current', auth.required, (req, res, next) => {
  const { payload: { id } } = req;

  return Users.findById(id)
    .then((user) => {
      if(!user) {
        return res.sendStatus(400);
      }

      return res.json({ user: user.toAuthJSON() });
    });
});

module.exports = router;
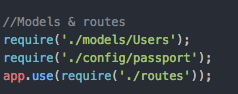
Let’s add our “routes” folder to “app.js”.Add the following line below our passport require:
app.use(require('./routes'));
Route testing
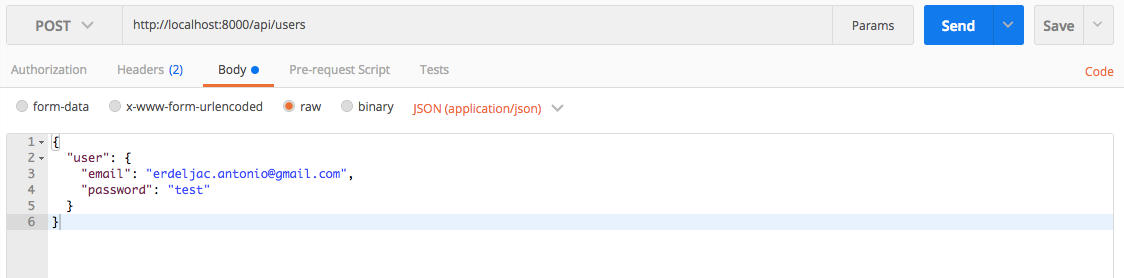
I will be using Postmanto send requests to our server.
Our server accepts the following body:
{
  "user": {
    "email": String,
    "password": String
  }
}
Creating a POST request to create a user
Test body:
Response:
{
    "user": {
        "_id": "5b0f38772c46910f16a058c5",
        "email": "[email protected]",
        "token": "eyJhbGciOiJIUzI1NiIsInR5cCI6IkpXVCJ9.eyJlbWFpbCI6ImVyZGVsamFjLmFudG9uaW9AZ21haWwuY29tIiwiaWQiOiI1YjBmMzg3NzJjNDY5MTBmMTZhMDU4YzUiLCJleHAiOjE1MzI5MDgxNTEsImlhdCI6MTUyNzcyNDE1MX0.4TWc1TzY6zToHx_O1Dl2I9Hf9krFTqPkNLHI5U9rn8c"
    }
}
We will now use this token and add it to our “Headers” in Postman’s configuration.

And now let’s test our auth only route.
Creating a GET request to return the currently logged in user
Request URL:
GET http://localhost:8000/api/users/current
Response:
{
    "user": {
        "_id": "5b0f38772c46910f16a058c5",
        "email": "[email protected]",
        "token": "eyJhbGciOiJIUzI1NiIsInR5cCI6IkpXVCJ9.eyJlbWFpbCI6ImVyZGVsamFjLmFudG9uaW9AZ21haWwuY29tIiwiaWQiOiI1YjBmMzg3NzJjNDY5MTBmMTZhMDU4YzUiLCJleHAiOjE1MzI5MDgzMTgsImlhdCI6MTUyNzcyNDMxOH0.5UnA2mpS-_puPwwxZEb4VxRGFHX6qJ_Fn3pytgGaJT0"
    }
}
Let’s try to do it without token in “Headers”.
Response:

The end
Thank you for going through this tutorial. If you notice any errors please report them to me. If you got stuck on any step, please refer to this GitHub repo.
Source viva : Node.js Authentication using Passport.js
Recommended Courses:
Node.js, Express & MongoDB Dev to Deployment
☞ http://bit.ly/2ysBOku
GraphQL: Learning GraphQL with Node.Js
☞ http://bit.ly/2JLb1F5
NodeJS API Development with Express MongoDB and Mongoose
☞ http://bit.ly/2HRzJxS
Suggest:
☞ Web Development Tutorial - JavaScript, HTML, CSS
☞ E-Commerce JavaScript Tutorial - Shopping Cart from Scratch
☞ Javascript Project Tutorial: Budget App