Angular 7 App with AngularCLI + Angular Universal + i18n + Firebase

I’ve seen base projects using Angular CLI or Angular Universal, some including i18n or the popular ngx-translate library. Most of them sometimes don’t work as expected, are outdated (Angular moves very fast nowadays) or just miss some cool feature.
I want to show in this post how I built an example project (it’s about heroes), up-to-date and with everything included. A ready for production app with Universal, the official i18n and deployed into Firebase Hosting with a Cloud Function.
You can find the repo link at the end of this post and the link for the live demo.
Angular CLI
The project is based on angular CLI. Nothing new from here. You can follow this awesome tutorial from angular.io and it will provide you a good starting point.
Project structure
I would like to share here what I think it’s a better folder structure based on my experience. Tell me in the comments what do you think about this:
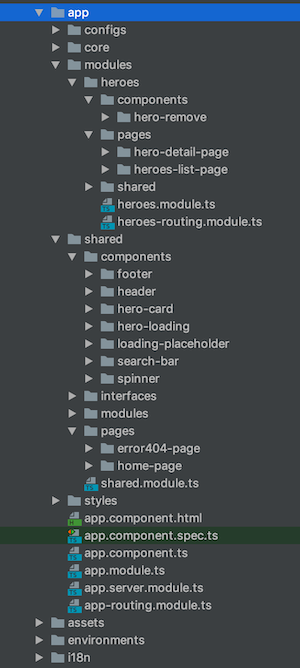
Things to mention:
- Every module included the shared folder it’s divided in pages and components. A page is an angular component as well, but this way, we can identify what is a hole page in the application and what is a single component.
- Styles are inside the app folder, and contains all global SASS files like material styles, variables, colors, functions, mixins, etc. Then we just have to add this configuration to the angular.json file:
"stylePreprocessorOptions": {
  "includePaths": [
    "src/app/styles"
  ]
}
Angular Internationalization (i18n)
Let’s see how to add i18n to the project. If you want to translate a message just add the directive i18n with one id. You can provide a description too, more info here:
<p i18n="@@idOfTheTranslation">This is a message in english</p>
Now, execute this command:
ng xi18n yourprojectname --i18n-format xlf --output-path i18n --i18n-locale en
This will generate all the translations in the src/i18n path. Add two scripts, one per language, to the package.json:
"start": "ng serve --configuration=en --open",
"start:es": "ng serve --configuration=es --open",
And here the configurations:
"architect": {
  "build": {
    "builder": "@angular-devkit/build-angular:browser",
    "options": {
      "outputPath": "dist/browser/",
      "index": "src/index.html",
      "main": "src/main.ts",
      "polyfills": "src/polyfills.ts",
      "tsConfig": "src/tsconfig.app.json",
      ...
    },
    "configurations": {
      "en": {
        "aot": true,
        "outputPath": "dist/browser/",
        "baseHref": "/",
        "i18nFile": "src/i18n/messages.en.xlf",
        "i18nFormat": "xlf",
        "i18nLocale": "en",
        "i18nMissingTranslation": "error"
      },
      "es": {
        "aot": true,
        "outputPath": "dist/browser/es/",
        "baseHref": "/es/",
        "i18nFile": "src/i18n/messages.es.xlf",
        "i18nFormat": "xlf",
        "i18nLocale": "es",
        "i18nMissingTranslation": "error"
      },
      ...
    }
  }
}
But what happen if I want to translate messages inside the any typescript file? That’s ok, at this moment Angular has no official way to do that but there is available a polyfill to solve this problem. They are working on this, so I expect in the near future we’ll have a similar solution to this problem. All you have to do is:
npm i @ngx-translate/i18n-polyfill --save
app.module.ts: add this to the providers
{
  provide: TRANSLATIONS,
  useFactory: (locale) => {
    locale = locale || 'en';
    return require(`raw-loader!../i18n/messages.${locale}.xlf`);
  },
  deps: [LOCALE_ID]
},
I18n
And now you can do:
constructor(private i18n: I18n) {
  console.log(this.i18n({value: 'This is the title of the application', id: '@@appTitle'}));
}
If you want to extract those messages, you can do it like this:
ngx-extractor --input=\"src/**/*.ts\" --format=xlf --out-file=src/i18n/messages.xlf
There is a good tool to merge all the translations and mark them as new for the translator which is xliffmerge.
npm i [@ngx-i18nsupport/xliffmerge](https://npmjs.com/package/@ngx-i18nsupport/ngx-i18nsupport) --save-dev
The command you need to execute:
ng run yourprojectname:xliffmerge
And the angular.json configuration:
"xliffmerge": {
  "builder": "@ngx-i18nsupport/tooling:xliffmerge",
  "options": {
    "xliffmergeOptions": {
      "i18nFormat": "xlf",
      "srcDir": "src/i18n",
      "genDir": "src/i18n",
      "defaultLanguage": "en",
      "languages": [
        "en",
        "es"
      ]
    }
  }
}
When I have to create new messages all I do is, add the text with the id in the template or inside the ts, and execute:
npm run extract-i18n
"extract-i18n": "ng xi18n yourprojectname --i18n-format xlf --output-path i18n --i18n-locale en && ngx-extractor --input=\"src/**/*.ts\" --format=xlf --out-file=src/i18n/messages.xlf && ng run yourprojectname:xliffmerge",
Then I use this awesome tool to translate the new messages, save the file and replace it in the project.
Builds
You have to know that with the official i18n, you will need to build the app once per language. So now I’m going to show the build configuration for the english language (similar to the spanish one):
Script:
"build:prod:en": "ng build --configuration=production-en"
Configuration:
"production-en": {
  "fileReplacements": [
    {
      "replace": "src/environments/environment.ts",
      "with": "src/environments/environment.prod.ts"
    }
  ],
  "optimization": true,
  "outputHashing": "all",
  "sourceMap": false,
  "extractCss": true,
  "namedChunks": false,
  "aot": true,
  "extractLicenses": true,
  "vendorChunk": false,
  "buildOptimizer": true,
  "outputPath": "dist/browser/",
  "baseHref": "/",
  "i18nFile": "src/i18n/messages.en.xlf",
  "i18nFormat": "xlf",
  "i18nLocale": "en",
  "i18nMissingTranslation": "error"
}
With this, we are ready to go and see how to use Universal for SSR.
Angular Universal
There are two ways of implementing Universal, build time Pre-rendering vs. Server-side Rendering (SSR). I will show here SSR, but it’s good to know:
Pre-render
- Happens at build time
- Renders your application and replaces the dist index.html with a version rendered at the route
/
Server-side Rendering (SSR)
- Happens at runtime
- Uses
ngExpressEngineto render your application on the fly at the requested url.
First of all, we’ll need to create two files in the root folder and update the angular.json file. Like this:
server.ts:
import 'zone.js/dist/zone-node';
import 'reflect-metadata';
import {enableProdMode} from '@angular/core';
import * as express from 'express';
import {join} from 'path';
import {ngExpressEngine} from '@nguniversal/express-engine';
import {provideModuleMap} from '@nguniversal/module-map-ngfactory-loader';

enableProdMode();

(global as any).XMLHttpRequest = require('xmlhttprequest').XMLHttpRequest;

const app = express();
const PORT = process.env.PORT || 4000;
const DIST_FOLDER = join(process.cwd(), 'dist');
const routes = [
  {path: '/es/*', view: 'es/index', bundle: require('./dist/server/es/main')},
  {path: '/*', view: 'index', bundle: require('./dist/server/en/main')}
];

// Load your engine
app.engine('html', (filePath, options, callback) => {
  options.engine(
    filePath,
    {req: options.req, res: options.res},
    callback
  );
});

app.set('view engine', 'html');
app.set('views', join(DIST_FOLDER, 'browser'));

app.get('*.*', express.static(join(DIST_FOLDER, 'browser')));
routes.forEach((route) => {
  app.get(route.path, (req, res) => {
    res.render(route.view, {
      req, res, engine: ngExpressEngine({
        bootstrap: route.bundle.AppServerModuleNgFactory,
        providers: [provideModuleMap(route.bundle.LAZY_MODULE_MAP)]
      })
    });
  });
});

app.listen(PORT, () => {
  console.log(`Node server listening on port ${PORT}`);
});
Things to mention:
- I provide english translations here, just to start the server with
npm run serve:ssr. - Special attention on
provideModuleMap(LAZY_MODULE_MAP), otherwise lazy loading will fail! - Add this (
global as any).XMLHttpRequest = require ('xmlhttprequest’);because of this error.
webpack.server.config.ts
const path = require('path');
const webpack = require('webpack');

module.exports = {
  entry: { server: './server.ts' },
  resolve: { extensions: ['.js', '.ts'] },
  target: 'node',
  mode: 'none',
  // this makes sure we include node_modules and other 3rd party libraries
  externals: [/node_modules/],
  output: {
    path: path.join(__dirname, 'dist'),
    filename: '[name].js'
  },
  module: {
    rules: [{ test: /\.ts$/, loader: 'ts-loader' }]
  },
  plugins: [
    // Temporary Fix for issue: https://github.com/angular/angular/issues/11580
    // for 'WARNING Critical dependency: the request of a dependency is an expression'
    new webpack.ContextReplacementPlugin(
      /(.+)?angular(\\|\/)core(.+)?/,
      path.join(__dirname, 'src'), // location of your src
      {} // a map of your routes
    ),
    new webpack.ContextReplacementPlugin(
      /(.+)?express(\\|\/)(.+)?/,
      path.join(__dirname, 'src'),
      {}
    )
  ]
};
angular.json:
"server": {
 "builder": "@angular-devkit/build-angular:server",
 "options": {
   "main": "src/main.server.ts",
   "tsConfig": "src/tsconfig.server.json",
   "stylePreprocessorOptions": {
     "includePaths": [
       "src/app/styles"
     ]
   }
 },
 "configurations": {
   "production-en": {
     "outputPath": "dist/server/en",
     "i18nFile": "src/i18n/messages.en.xlf",
     "i18nFormat": "xlf",
     "i18nLocale": "en",
     "i18nMissingTranslation": "error",
     "fileReplacements": [
       {
         "replace": "src/environments/environment.ts",
         "with": "src/environments/environment.prod.ts"
       }
     ]
   },
   "production-es": {
     "outputPath": "dist/server/es",
     "i18nFile": "src/i18n/messages.es.xlf",
     "i18nFormat": "xlf",
     "i18nLocale": "es",
     "i18nMissingTranslation": "error",
     "fileReplacements": [
       {
         "replace": "src/environments/environment.ts",
         "with": "src/environments/environment.prod.ts"
       }
     ]
   }
 }
}
You can see I use a different typescript configuration for the server. This is because of a new module called AppServerModule that will import the ServerModule and the ModuleMapLoaderModule for lazy loading, like this:
src/tsconfig.server.json
{
  "extends": "./tsconfig.app.json",
  "compilerOptions": {
    "outDir": "../out-tsc/app-server",
    "baseUrl": "."
  },
  "angularCompilerOptions": {
    "entryModule": "app/app.server.module#AppServerModule"
  }
}
src/main.server.json
if (environment.production) {
  enableProdMode();
}

export {AppServerModule} from './app/app.server.module';
export {AppServerModule} from ‘./app/app.server.module’;
src/app/app.server.module.ts
Be careful with the order, it matters:
@NgModule({
  imports: [
    AppModule,
    ServerModule,
    ModuleMapLoaderModule,
    FlexLayoutServerModule
  ],
  bootstrap: [AppComponent]
})
export class AppServerModule {
}
Once you have done this, you should be able to build the application and serve it with SSR. My scripts are:
"build:prod:en": "ng build --configuration=production-en",
"build:prod:es": "ng build --configuration=production-es",
"build:server:prod:en": "ng run angularexampleapp:server:production-en",
"build:server:prod:es": "ng run angularexampleapp:server:production-es",
"build:library": "ng build ngx-example-library",
"build:client-and-server-bundles": "npm run build:prod:en && npm run build:prod:es && npm run build:server:prod:en && npm run build:server:prod:es",
"webpack:server": "webpack --config webpack.server.config.js --progress --colors",
"build:ssr": "npm run build:client-and-server-bundles && npm run webpack:server",
"serve:ssr": "node dist/server",
Just type:
npm run build:ssr
npm run serve:ssr
Firebase
I will assume you already have an account in firebase and you’ve created a project so you have the api key. More info here. My current configuration for the production environment is:
firebase: {
  apiKey: 'AIzaSyC4RNNlqXSwTM1Kt6Pbgutq2yuavSQ9WnU',
  authDomain: 'ismaestro-angularexampleapp.firebaseapp.com',
  databaseURL: 'https://ismaestro-angularexampleapp.firebaseio.com',
  projectId: 'ismaestro-angularexampleapp',
  storageBucket: 'ismaestro-angularexampleapp.appspot.com',
  messagingSenderId: '965114235515'
}
If your are thinking why this is public, check this. Let’s begin installing firebase globally:
npm install firebase-tools -g
Then init the project and give it a name with:
firebase init
Cloud function
We’ll need to create a function to receive all the requests that our app we’ll do. This function will be a node express server which is very similar to the previous one that we have already saw.
First of all, create a folder in the root and name it ‘functions’. Then create a package.json and add all the dependencies of our application. In my case is:
{
  "name": "functions",
  "description": "Cloud Functions for Firebase",
  "dependencies": {
    "@angular/animations": "7.2.7",
    "@angular/cdk": "7.3.3",
    "@angular/common": "7.2.7",
    "@angular/compiler": "7.2.7",
    "@angular/core": "7.2.7",
    "@angular/fire": "5.1.1",
    "@angular/flex-layout": "7.0.0-beta.23",
    "@angular/forms": "7.2.7",
    "@angular/http": "7.2.7",
    "@angular/material": "7.3.3",
    "@angular/platform-browser": "7.2.7",
    "@angular/platform-browser-dynamic": "7.2.7",
    "@angular/platform-server": "7.2.7",
    "@angular/router": "7.2.7",
    "@angular/upgrade": "7.2.7",
    "@ismaestro/ngx-example-library": "1.0.0",
    "@ismaestro/ngx-scroll-to-first-invalid": "2.0.0",
    "@nguniversal/common": "7.1.0",
    "@nguniversal/express-engine": "7.1.0",
    "@nguniversal/module-map-ngfactory-loader": "v7.1.0",
    "@ngx-i18nsupport/tooling": "1.1.2",
    "@ngx-translate/i18n-polyfill": "1.0.0",
    "@sentry/browser": "4.6.4",
    "bowser": "2.1.2",
    "classlist.js": "1.1.20150312",
    "core-js": "2.6.5",
    "express": "4.16.4",
    "firebase": "5.8.5",
    "firebase-admin": "7.0.0",
    "firebase-functions": "2.2.0",
    "moment": "2.24.0",
    "reflect-metadata": "0.1.13",
    "rxjs": "6.4.0",
    "tslib": "1.9.3",
    "web-animations-js": "2.3.1",
    "zone.js": "0.8.29"
  },
  "private": true
}
Then create an index.js file that will contain the ssr function:
const functions = require('firebase-functions');
require('zone.js/dist/zone-node');
require('reflect-metadata');

const core = require('@angular/core');
const expressengine = require('@nguniversal/express-engine');
const modulemapngfactoryloader = require('@nguniversal/module-map-ngfactory-loader');

const express = require('express');
const path = require('path');

core.enableProdMode();

const app = express();
const PORT = process.env.PORT || 4000;
const DIST_FOLDER = path.join(process.cwd(), 'dist');
const routes = [
  {path: '/es/*', view: 'es/index', bundle: require('./dist/server/es/main')},
  {path: '/*', view: 'index', bundle: require('./dist/server/en/main')}
];

// Load your engine
app.engine('html', (filePath, options, callback) => {
  options.engine(
    filePath,
    {req: options.req, res: options.res},
    callback
  );
});

app.set('view engine', 'html');
app.set('views', path.join(DIST_FOLDER, 'browser'));

app.get('*.*', express.static(path.join(DIST_FOLDER, 'browser')));
routes.forEach((route) => {
  app.get(route.path, (req, res) => {
    res.render(route.view, {
      req, res, engine: expressengine.ngExpressEngine({
        bootstrap: route.bundle.AppServerModuleNgFactory,
        providers: [modulemapngfactoryloader.provideModuleMap(route.bundle.LAZY_MODULE_MAP)]
      })
    });
  });
});

app.listen(PORT, () => {
  console.log(`Node Express server listening on port ${PORT}`);
});
exports.ssr = functions.https.onRequest(app);
Firebase Hosting
Firebase hosting is simple because you only have to create a public folder and a configuration file:
firebase.json
{
  "hosting": {
    "public": "public",
    "ignore": [
      "firebase.json",
      "**/.*",
      "**/node_modules/**"
    ],
    "rewrites": [
      {
        "source" : "**/*.@(css|js)",
        "destination": "/index2.html"
      },
      {
        "source": "**",
        "function": "ssr"
      }
    ]
  }
}
These rewrites are very important, otherwise anyone is going to be able to share the link and load the path in the specific language.
It’s also important to change the index file name to something like app.html or index2.html. I had a lot of problems because of that.
Deploy script
This can be a simple script (I’m not an expert with unix commands :) :
#!/usr/bin/env bash
rm -Rf public &&
mkdir public &&
cp -a dist/browser/. public/ &&
# VERY IMPORTANT: if you want to execute the functions!!!!!
mv public/index.html public/index2.html &&
mv public/es/index.html public/es/index2.html &&
cp -a dist/ functions/dist &&
firebase deploy
Once you executed npm run deploy with this in your package.json:
"deploy": "bash scripts/deploy.sh"
You should see the app deployed in your firebase account. You can also see any error in the firebase console.
Conclusion
I hope this project can help someone that is starting with the Angular ecosystem. Here is the repo link with all the code from above and the live demo. In short:
Live demo in english: https://www.angularexampleapp.com
Live demo in spanish: https://www.angularexampleapp.com/es
30s ad
☞ Angular 7 with Angular Material and Firebase Cloud Firestore
☞ Angular 6 , Angular 7 Step by Step for beginners
☞ NgRx In Depth (Angular 7 and NgRx 7, with FREE E-Book)
☞ A Quick Guide to Angular 7 in 4 Hours
☞ Complete Angular 7 - Ultimate Guide - with Real World App
Suggest:
☞ Angular Tutorial - Learn Angular from Scratch
☞ Learn Angular 8 from Scratch for Beginners - Crash Course
☞ Firebase - Ultimate Beginner's Guide
☞ React Firebase Tutorial | AUTH - CRUD - Image Upload