How to Create a Package in Laravel

In today’s fast-paced technology, reinventing the wheel just drags a company’s productivity down and eventually its revenues. We don’t want this to happen in the company where we work, right?
Many developers make use of “reusable” code by copying and pasting classes from one project to another. This practice still requires you to make a lot of adjustments to make it work on your specific project. This also leaves the library vulnerable to small edits by other developers that in time defeats the purpose it was designed for.
In Laravel framework, we can write libraries where we can just call its services without worrying about how it was implemented. We can reuse these libraries and manage them separately from our project’s main source code. These are called Laravel packages.
What are packages?
Packages are stand-alone source code which developers can import into their projects using a package management tool (I’ll describe this tool in a minute). Instead of copying and pasting the library source code to another project, developers only need to import the package and call any service that it provides to help with their project development.
These source codes can be versioned separately from the main source code and can have its own tests and manage its own dependencies. Developers can think about packages like small APIs within the project. Developers only need to provide required and valid inputs, then the package will do what it’s supposed to do and deliver an output.
At a company level, creating our own maintained packages means high-efficiency and high productivity output. Packages will be standardized and if an update is needed in case of a vulnerability issue or a bug fix, developers who maintain the package will fix the issue and project lead developers will only need to update the package in their own projects and redeploy. Fewer headaches and repetitive work for developers, more revenues for the company. Everyone’s happy and that’s the goal!
Why should we use packages?
When we have lots of projects, where some functionalities or features are similar, it would be better if we start implementing these features in packages. When you have a team or an individual maintaining a package, let’s say in GitLab, it is much easier to collaborate possible fixes to bugs or improvements. This means that each package will undergo the same process as a normal project.
Another issue packages solve is when developers have to modify their library to fix a bug, add a new feature, or resolve a vulnerability. It is a daunting task to implement these improvements in all of the projects that used the library. Creating packages is a good start to avoid these challenges.
How do we manage Laravel packages?
Composer is a dependency management tool for PHP packages. It helps us to manage our packages by pulling in all dependencies that each package require without duplicating them in your vendor directory. You can define the version of the package you want and even set it to automatically update to the latest version every time you run your package updates.
You don’t have to reinvent the wheel. Just imagine, if everyone has to discover electricity, how to use it to light a bulb until we come up with echoing “Hello World”? I know it’s an exaggeration but well, you get my point. However, there are instances where you wish you could have additional functionalities that you might want to customize specifically for your own project’s need.
In this tech blog, I will show you how we can implement our own packages for Laravel projects. We will use GitLab to version our package and import it to our project using Composer. To have an overview of how Laravel packages are created, we will create a simple greetr package. If given the chance, I would elaborate each step and probably create a more realistic and reusable package in succeeding tech blogs.
Creating Laravel Packages
Prerequisites
Before we can start creating our package, it is expected that you already have Composer and Git installed on your system. It is also required that you can create a remote repository to any VCSservice like GitLab, GitHub or Bitbucket. For this tech blog, we are going to use GitLab and Laravel 5.8.
Create a new Laravel project
The package we are creating is called “greetr” that just displays a greeting message when called. We are going to use _Composer_in the command line to create our Laravel project.
$ composer create-project — prefer-dist laravel/laravel greetr
File Structure
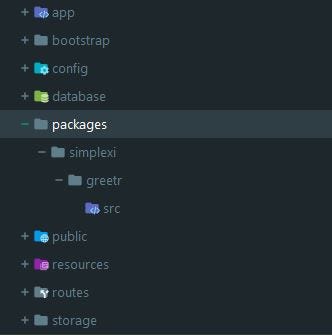
On the default folder structure of a new Laravel project, create a file structure as shown below to house our package development.

Note that inside the packages folder should be the vendor name simplexi followed by the package name greetr. The src folder will contain all of our package source code. In some instances, you may also create a dist branch if you are compiling your assets for a production server. In this way, developers that will be using your package will have an option to choose between the source files in the src folder or the distribution files in the dist folder when installing your package through Composer.
By the way, “simplexi” stands for Simplex Internet which is the company I’ve been working for since 2017.
Package composer.json
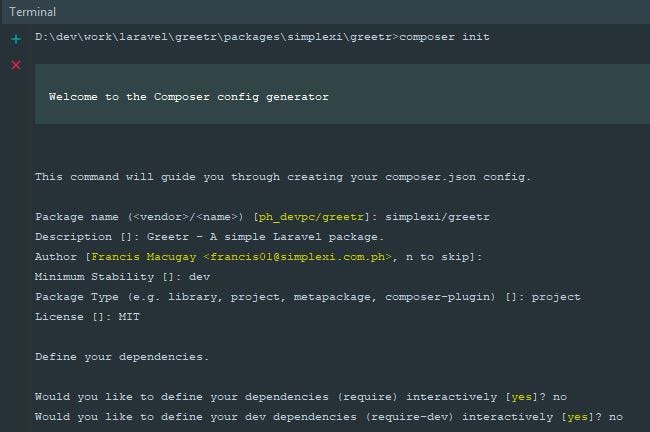
In your command prompt, navigate to packages/simplexi/greetr directory. Then we will need to initialize this folder as a composer package by running the following command:
$ composer init
This command will ask you for some info regarding your package. You can accept the defaults by pressing enter and edit composer.json file that will be created later.

After the initialization, we can edit the composer.json file as follows.
// packages/simplexi/greetr/composer.json
{
    "name": "simplexi/greetr",
    "description": "Greetr - A simple Laravel package.",
    "type": "project",
    "license": "MIT",
    "authors": [
        {
            "name": "Francis Macugay",
            "email": "[email protected]"
        }
    ],
    "minimum-stability": "dev",
    "autoload": {
        "psr-4": {
            "Simplexi\\Greetr\\": "src/"
        }
    },
    "require": {}
}
The only thing added here and that should be noted is the autoload object property. This will automatically load your package with the given namespace Simplexi\Greetr. You may also include any package dependencies in the require property. To learn more about composer.json file schema, click here.
Note that the
composer.jsonin your project is different from thecomposer.jsonin your package. Be sure you are editing the correctcomposer.jsonfile.
Project composer.json
Autoload the namespace for your package by adding the line "Simplexi\\Greetr\\": “packages/simplexi/greetr/src" inside the autoload->psr-4 property of your project composer.json file. With this, your package classes inside the src folder will be autoloaded and available for our project to use.
// composer.json
"autoload": {
    "psr-4": {
        "App\\": "app/",
        "Simplexi\\Greetr\\": "packages/simplexi/greetr/src"
    },
    "classmap": [
        "database/seeds",
        "database/factories"
    ]
},
There are other options for package discovery which you can reference here. Now, since we’ve edited our project’s composer.json file, we should reload it by running the following command in the project root directory:
$ composer dump-autoload
Greetr.php Class
Create the Greetr.php class inside the src folder as follows.
// packages/simplexi/greetr/src/Greetr.php
<?php
namespace Simplexi\Greetr;
class Greetr
{
    public function greet(String $sName)
    {
        return 'Hi ' . $sName . '! How are you doing today?';
    }
}
We should indicate a namespace for this class which should be the same namespace that you indicated in the project composer.json file for it to be autoloaded. In our case, following namespace convention in Laravel, it should be Simplexi\Greetr.
Of course, it is a good idea to follow the same project structure as the Laravel project. But in this tech blog, we are just showing a simple greeting in the browser. Keep in mind that as your package grows, it is good practice to keep publicly available functionalities in one or two service classes. All other classes should not be available outside the package. In this way, your package should be manageable independently from other packages or from the main project.
Testing Our Package
Our simple package is now ready for testing. But first, let’s create a route and call our package Greetr class from this route for now.
// routes/web.php
<?php
use Simplexi\Greetr\Greetr;
Route::get('/greet/{name}', function($sName) {
    $oGreetr = new Greetr();
    return $oGreetr->greet($sName);
});
We can import our Greetr class from our package by specifying its namespace first with the use keyword. Then we can instantiate the class and call its member functions in our project’s route file.
Run an out of the box development server from Laravel by running the following command in your project root directory:
$ php artisan serve
Laravel development server started: <http://127.0.0.1:8000>
Open your browser and enter the following URL: http://127.0.0.1:8000/greetr/Francis

Publishing Packages to GitLab
Creating GitLab repository
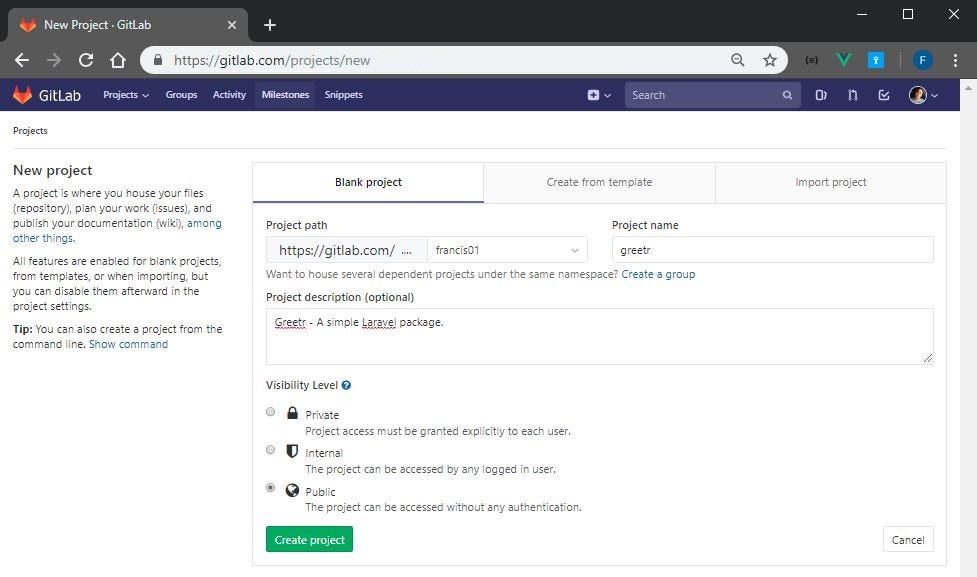
First, we should create a new project in GitLab. Make sure the visibility level is set to public. We may also set it to private if we want control over who can use our package. Doing this will require additional steps. But for this tech blog’s purposes, we will set it as public.

Navigate to our package directory packages/simplexi/greetr. Initialize git, commit changes, and tag changeset with semantic versioning by running the following commands.
// packages/simplexi/greetr
$ git init
$ git checkout -b master
$ git add .
$ git commit -m "initial commit"
$ git tag 1.0.0
Push local source code to remote GitLab server
Make sure your account is already setup on your local machine for us to push our source code to the GitLab server. We only need to push the packages/simplexi/greetr directory to GitLab. It is advisable to include files like CHANGELOG.md and readme.md for other developers to know more about your package.
To push our local source code to the newly created GitLab project, run the following commands. Make sure to replace the origin URL with your own remote repository URL.
// packages/simplexi/greetr
$ git remote add origin https://gitlab.com/francis01/greetr.git
$ git push -u origin --all
$ git push -u origin --tags
Now, we are all set. Other developers may install our package to their own projects to speed up their development time. In the next section, we will try to import our package in a new Laravel project.
Importing Laravel Package
We can now import our package from the GitLab server into a new Laravel project using Composer. Create another Laravel project on your local machine.
Require our package in composer.json
Edit the new project’s composer.jsonfile to require our package and also indicate our repository in GitLab for Composer to know where to fetch packages aside from the default packagist repositories.
// composer.json
...
"require": {
    "php": "^7.1.3",
    "fideloper/proxy": "^4.0",
    "laravel/framework": "5.7.*",
    "laravel/tinker": "^1.0",
    "simplexi/greetr": "^1.0.0"
},
...
"repositories": [
    {
        "type": "vcs",
        "url": "https://gitlab.com/francis01/greetr"
    }
]
...
The repository’s property lists all non-packagist repositories. If you are going to install several packages from the same GitLab domain, instead of specifying each package’s repository you may use the type “composer” and only indicate the domain in the URL. However, there’s an additional setup that your GitLab admin should do in this case. For now, let’s stick to a single repository with type “vcs”.
Run the following command to load the changes we made to our project’s composer.json file and install our package.
$ composer update
We now should find our package in the vendor directory of our project. We should be able to use our package like any other packages that we require in our project. We can test our package by just following the previous section on testing our package but this time do it on the new Laravel project that you just created.
Choosing a Package Version
When other developers are using your package, there will come a time that they will start raising bugs, improvements or suggest new features. You as the maintainer of the package will have to fix that bug and release a new version. Now, all developers using your package will be informed about your fix in your repository documentations.
The thing is, whenever a new version is released, developers will have the option to upgrade to that release if they are affected by the bug or choose not to. This can be done in Composer very easily by just updating your project’s composer.json file with the desired version, run composer update, run your tests, and redeploy. If the new release doesn’t work, you may rollback to previous versions easily. This is one of those perks of having Composer manage your package dependencies and it’s really useful.
We’ve covered just the tip of the icing about Laravel packages in this tech blog. Surely there are a lot more we can do with packages. But for now, you may explore the official documentation on Laravel packages.
Summary
Implementing the use of packages in our projects can have a bit of overhead at first when developing new projects. But in the long run, our library codebase can be much more manageable.
This way of sharing packages, in my opinion, also made open sources much more reliable. Thinking in packages makes our daily work as developers much easier especially if there’s a lot of ready-made packages that we can use in our projects. Sharing packages makes our creation live longer and get a chance to be appreciated by others for the efforts we’ve put in it. So yeah, stop reinventing the wheel and start building your packages now!
Suggest:
☞ PHP Tutorial for Absolute Beginners - Learn PHP from Scratch -
☞ Laravel Tutorial - Abusing Laravel
☞ Restful controllers in Laravel