How to Use Vue.js and Axios to Display Data from an API
More often than not, when building your JavaScript application, you’ll want to fetch data from a remote source or consume an API. I recently looked into some publicly available APIs and found that there’s lots of cool stuff that can be done with data from these sources

With Vue.js, you can literally build an app around one of these services and start serving content to users in minutes.
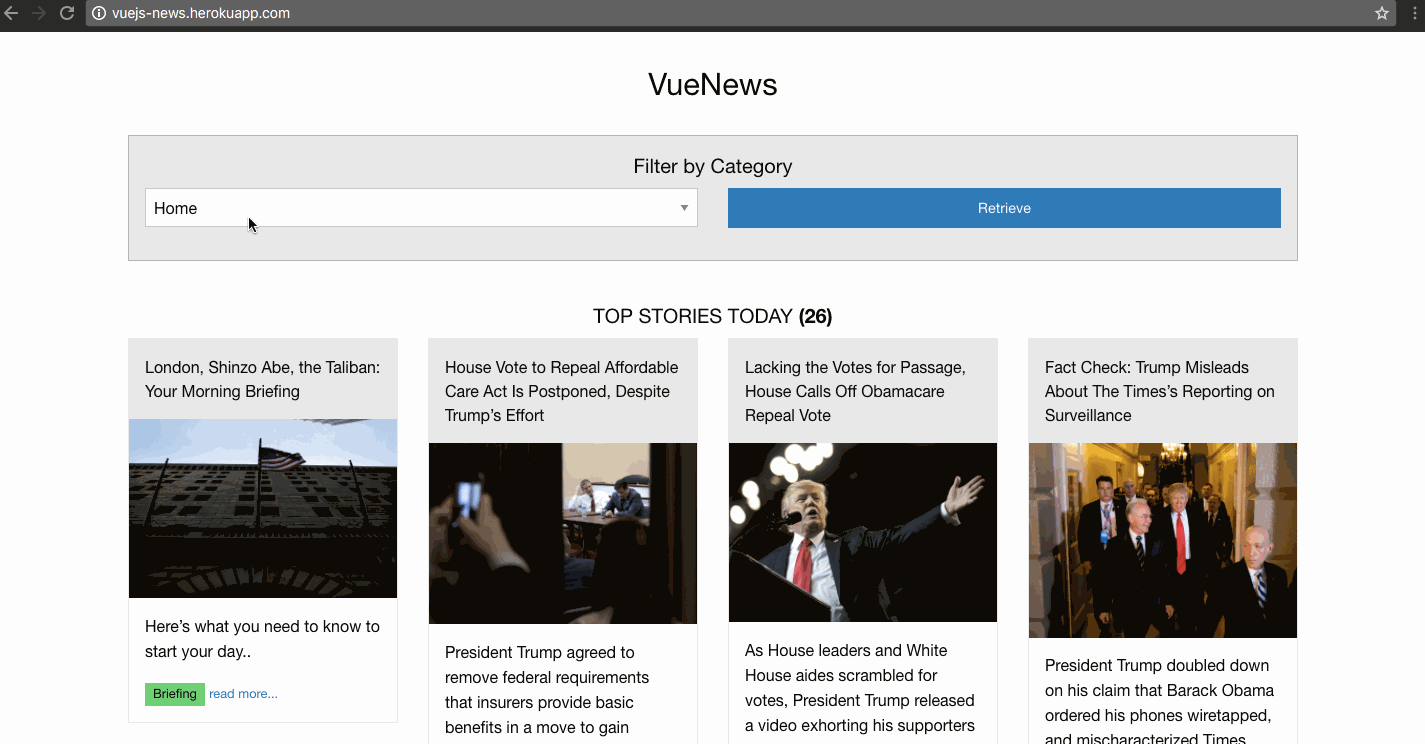
I’ll demonstrate how to build a simple news app that will show the top news articles of the day allow users to filter by their category of interest, fetching data from the New York Times API. You can find the complete code for this tutorial here.
Here’s what the final app will look like:
To follow along with this tutorial, you’ll need a very basic knowledge of Vue.js. You can find a great “getting started” guide for that here. I’ll also be using ES6 Syntax, and you can get a refresher on that here.
Project Structure
We’ll keep things very simple by limiting ourselves to just 2 files:
./app.js
./index.html
app.js will contain all the logic for our app, and the index.html file will contain our app’s main view.
We’ll start off with some basic markup in index.html:
<!DOCTYPE html>
<html lang="en">
  <head>
    <meta charset="utf-8">
    <title>The greatest news app ever</title>
  </head>
  <body>
    <div class="container" id="app">
      <h3 class="text-center">VueNews</h3>
    </div>
  </body>
</html>
Next, include Vue.js and app.js at the bottom of index.html, just before the closing </body> tag:
<script src="https://unpkg.com/vue"></script>
<script src="app.js"></script>
Optionally, Foundation can be included, to take advantage of some pre-made styles and make our view look a bit nicer. Include this within the <head> tag:
<link rel="stylesheet" href="https://cdnjs.cloudflare.com/ajax/libs/foundation/6.3.1/css/foundation.min.css">
Creating a Simple Vue App
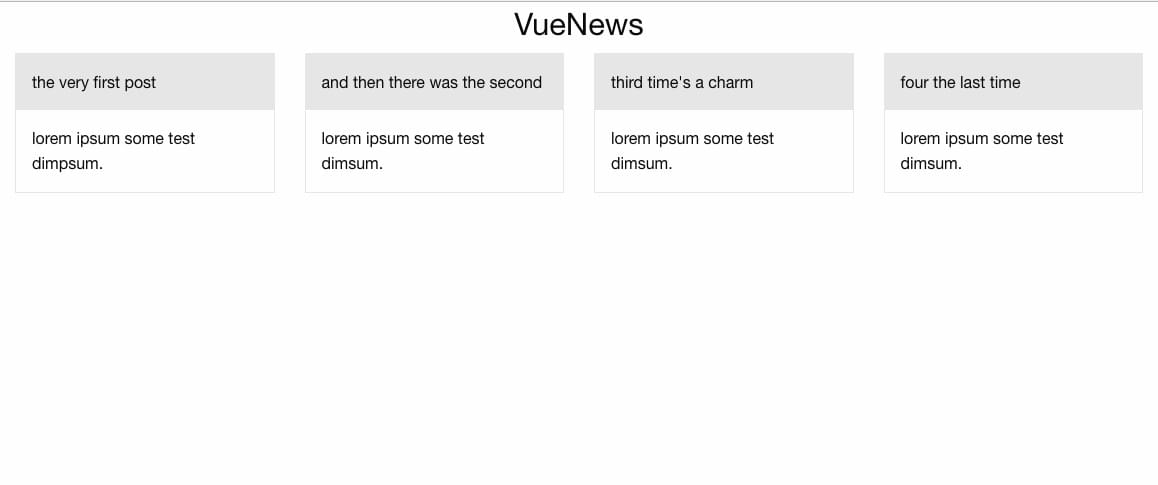
First, we’ll create a new Vue instance on the element div#app, and mock the response from the news API using some test data:
// ./app.js
const vm = new Vue({
  el: '#app',
  data: {
    results: [
      {title: "the very first post", abstract: "lorem ipsum some test dimpsum"},
      {title: "and then there was the second", abstract: "lorem ipsum some test dimsum"},
      {title: "third time's a charm", abstract: "lorem ipsum some test dimsum"},
      {title: "four the last time", abstract: "lorem ipsum some test dimsum"}
    ]
  }
});
We tell Vue what element to mount on, via the el option, and specify what data our app would be using via the data option.
To display this mock data in our app view, we can write this markup inside the #app element:
<!-- ./index.html -->
<div class="columns medium-3" v-for="result in results">
  <div class="card">
    <div class="card-divider">
      {{ result.title }}
    </div>
    <div class="card-section">
      <p>{{ result.abstract }}.</p>
    </div>
  </div>
</div>
The v-for directive is used for rendering our list of results. We also use double curly braces to show the contents of each of them.
Note: you can read more on the Vue Template Syntax here.
We now have the basic layout working:
Fetching Data from the API
To make use of the NYTimes API, you’ll need to get an API key. So if you don’t already have one, head over to their signup page and register to get an API key for the Top Stories API.
Making Ajax Requests and Handling Responses
Axios is a promise-based HTTP client for making Ajax requests, and will work great for our purposes. It provides a simple and rich API. It’s quite similar to the fetch API, but without the need to add a polyfill for older browsers, and some other subtleties.
Note: previously, vue-resource was commonly used with Vue projects, but it has been retired now.
Including axios:
<!-- ./index.html -->
<script src="https://unpkg.com/axios/dist/axios.min.js"></script>
Now we can make a request to get a list of top stories from the home section, once our Vue app is mounted:
// ./app.js

const vm = new Vue({
  el: '#app',
  data: {
    results: []
  },
  mounted() {
    axios.get("https://api.nytimes.com/svc/topstories/v2/home.json?api-key=your_api_key")
    .then(response => {this.results = response.data.results})
  }
});
Remember: replace your_api_key with your actual API key obtained from the NYT Dev Network area.
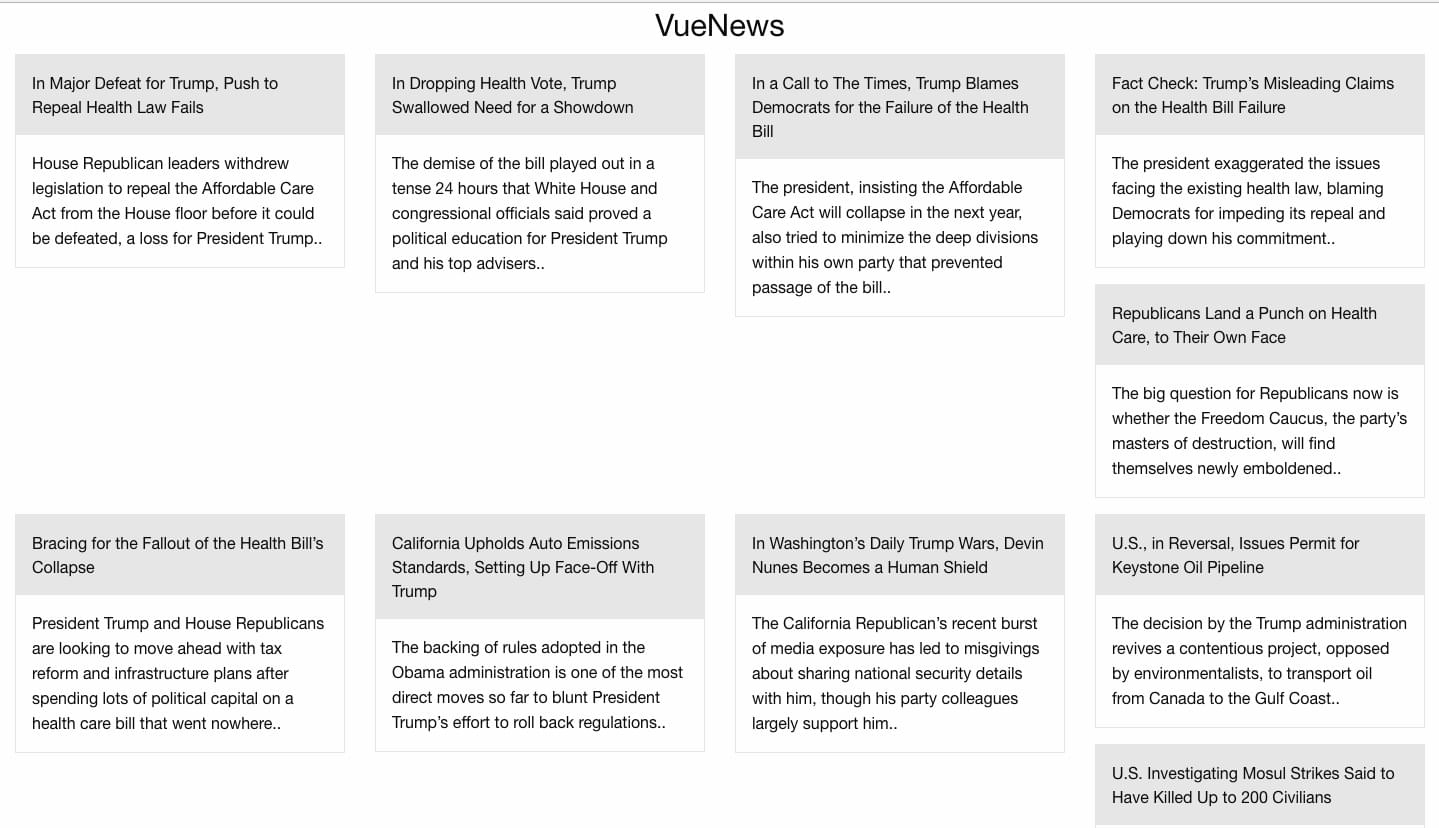
Now we can see the news feed on our app homepage. Don’t worry about the distorted view; we’ll get to that in a bit:
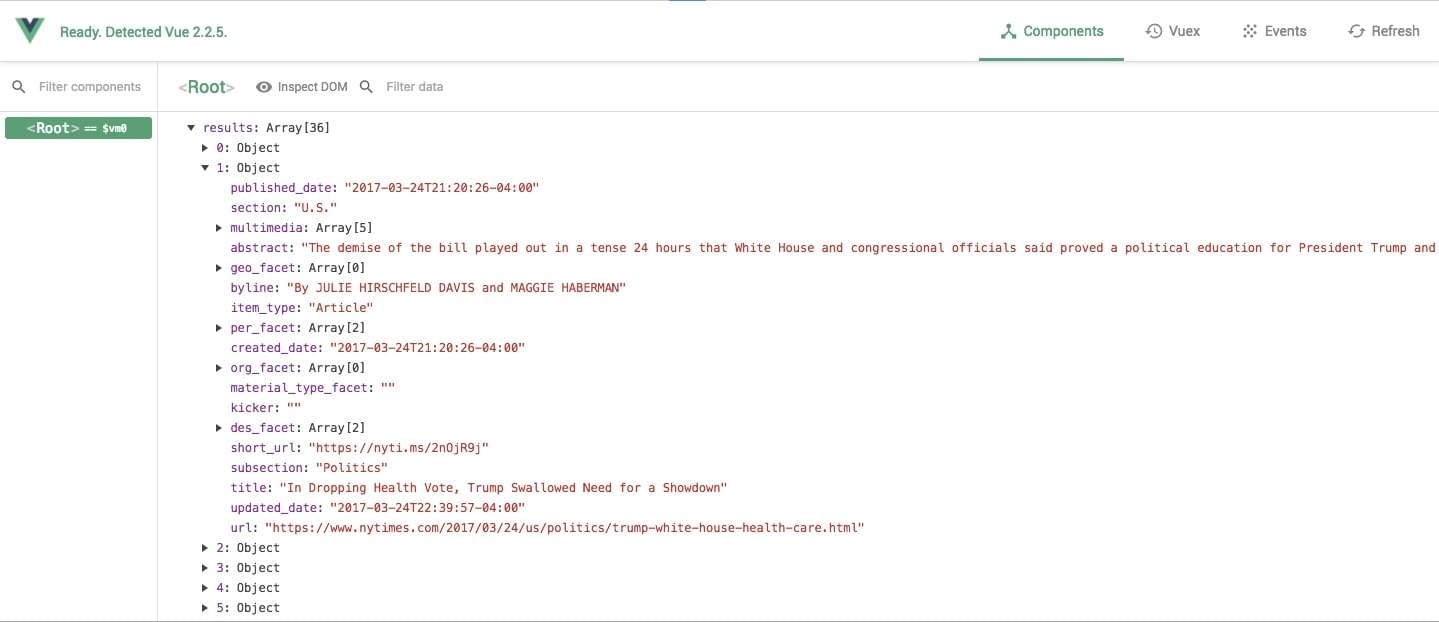
The response from the NYT API looks like this, via Vue devtools:
Tip: Get Vue Devtools to make debugging Vue applications easier.
To make our work a bit neater and reusable, we’ll do some minor refactoring, and introduce a helper function for building our URLs. We’ll also register getPosts as a method for our application by adding it to the methods object:
const NYTBaseUrl = "https://api.nytimes.com/svc/topstories/v2/";
const ApiKey = "your_api_key";

function buildUrl (url) {
  return NYTBaseUrl + url + ".json?api-key=" + ApiKey
}

const vm = new Vue({
  el: '#app',
  data: {
    results: []
  },
  mounted () {
    this.getPosts('home');
  },
  methods: {
    getPosts(section) {
      let url = buildUrl(section);
      axios.get(url).then((response) => {
        this.results = response.data.results;
      }).catch( error => { console.log(error); });
    }
  }
});
We can make some more changes to the way our view looks by introducing a computed property with some modifications to the original results returned from the API:
// ./app.js

const vm = new Vue({
  el: '#app',
  data: {
    results: []
  },
  mounted () {
    this.getPosts('home');
  },
  methods: {
    getPosts(section) {
      let url = buildUrl(section);
      axios.get(url).then((response) => {
        this.results = response.data.results;
      }).catch( error => { console.log(error); });
    }
  },
  computed: {
    processedPosts() {
      let posts = this.results;

      // Add image_url attribute
      posts.map(post => {
        let imgObj = post.multimedia.find(media => media.format === "superJumbo");
        post.image_url = imgObj ? imgObj.url : "http://placehold.it/300x200?text=N/A";
      });

      // Put Array into Chunks
      let i, j, chunkedArray = [], chunk = 4;
      for (i=0, j=0; i < posts.length; i += chunk, j++) {
        chunkedArray[j] = posts.slice(i,i+chunk);
      }
      return chunkedArray;
    }
  }
});
In the above code, in the processedPosts computed property, we attach an image_url attribute to each news article object. We do this by looping through the results from the API, and searching through the multimedia array of each result to find a media type with the format we need. We then assign the URL of that media to the image_url attribute. In cases where the media isn’t available, we make the default URL an image from Placehold.it.
We also write a loop to group our results array into chunks of four. This will take care of the distorted view we saw earlier.
Note: You can also easily do this chunking with a library like Lodash.
Computed properties are great for manipulating data. Instead of creating a method, and calling it every time we need to chunk our array of posts, we can simply define it as a computed property and use it as we wish, as Vue will automatically update the processedPosts computed property anytime results changes.
Computed properties are also cached based on their dependencies, so as long as results doesn’t change, the processedPosts property returns a cached version of itself. This will help with performance, especially when doing complex data manipulation.
Next, we edit our markup in index.html to show our computed results:
<!-- ./index.html -->
<div class="row" v-for="posts in processedPosts">
  <div class="columns large-3 medium-6" v-for="post in posts">
    <div class="card">
    <div class="card-divider">
      {{ post.title }}
    </div>
    <a :href="post.url" target="_blank"><img :src="post.image_url"></a>
    <div class="card-section">
      <p>{{ post.abstract }}</p>
    </div>
  </div>
  </div>
</div>
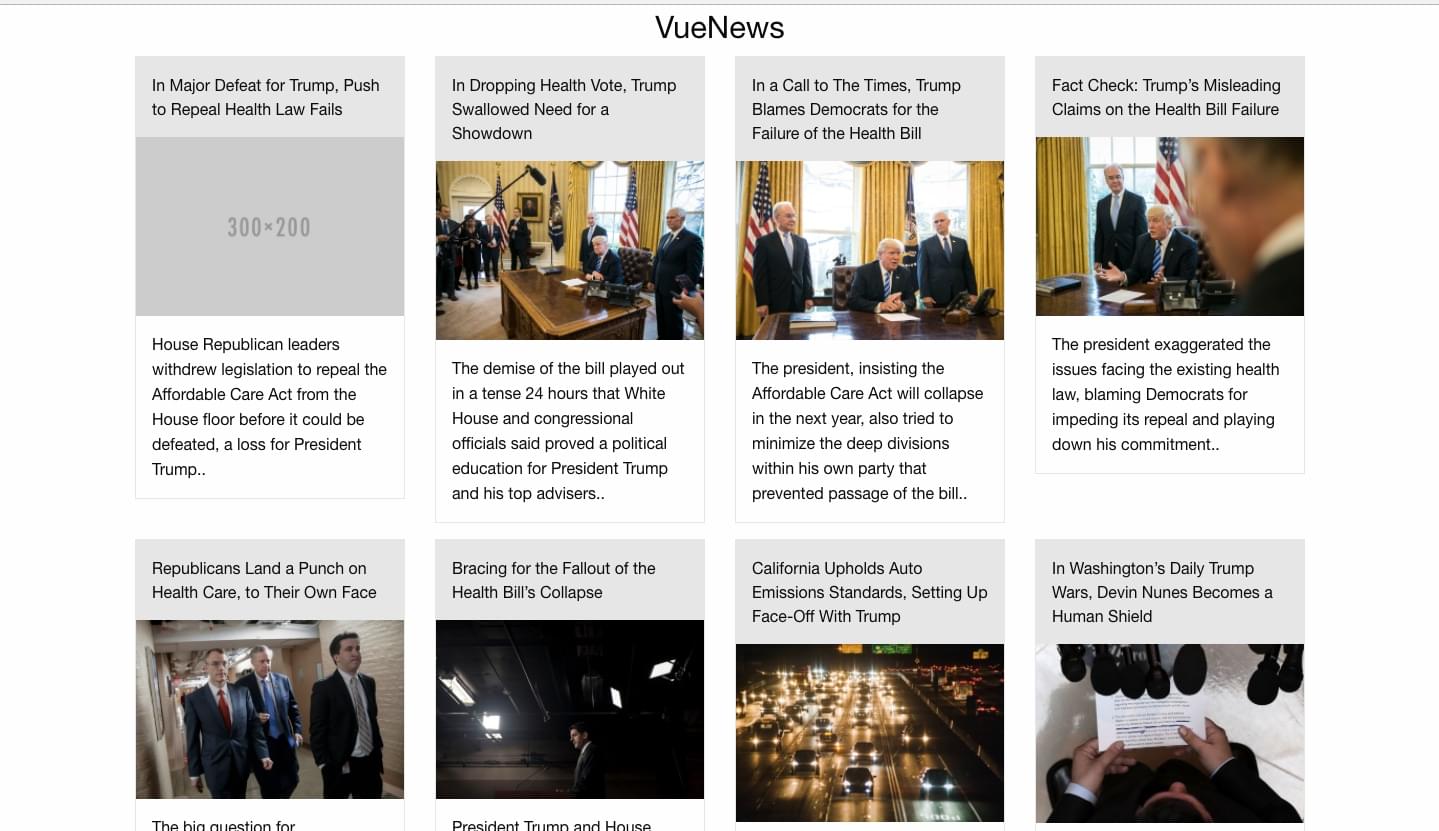
Now the app looks a tad better:
Introducing a News List Component
Components can be used to keep the application modular, and basically extend HTML. The “news list” can be refactored to a component so that, for example, if the app grows and a decision is made to use the news list anywhere else, it’ll be easy:
// ./app.js

Vue.component('news-list', {
  props: ['results'],
  template: `
    <section>
      <div class="row" v-for="posts in processedPosts">
        <div class="columns large-3 medium-6" v-for="post in posts">
          <div class="card">
          <div class="card-divider">
          {{ post.title }}
          </div>
          <a :href="post.url" target="_blank"><img :src="post.image_url"></a>
          <div class="card-section">
            <p>{{ post.abstract }}</p>
          </div>
        </div>
        </div>
      </div>
  </section>
  `,
  computed: {
    processedPosts() {
      let posts = this.results;

      // Add image_url attribute
      posts.map(post => {
        let imgObj = post.multimedia.find(media => media.format === "superJumbo");
        post.image_url = imgObj ? imgObj.url : "http://placehold.it/300x200?text=N/A";
      });

      // Put Array into Chunks
      let i, j, chunkedArray = [], chunk = 4;
      for (i=0, j=0; i < posts.length; i += chunk, j++) {
        chunkedArray[j] = posts.slice(i,i+chunk);
      }
      return chunkedArray;
    }
  }
});

const vm = new Vue({
  el: '#app',
  data: {
    results: []
  },
  mounted () {
    this.getPosts('home');
  },
  methods: {
    getPosts(section) {
      let url = buildUrl(section);
      axios.get(url).then((response) => {
        this.results = response.data.results;
      }).catch( error => { console.log(error); });
    }
  }
});
In the above code, we register a global component using the syntax Vue.component(tagName, options). It’s advisable to use a hyphen when defining tag names, so they don’t clash with any current or future standard HTML tags.
The additional options we introduced are explained as follows.
- Props: this is an array of data we want to pass down the component from the parent scope. We added
resultsbecause we load that from the main app instance. - Template: here we define the markup for the news list. Notice that we wrapped our list in a
<section>tag. This is because a component needs to have a single root element, and not multiple ones (that would have been created by ourdiv.rowiteration).
Adjusting our markup to use our news-list component, and passing it the results data, looks like this:
<!-- ./index.html -->

<div class="container" id="app">
  <h3 class="text-center">VueNews</h3>
  <news-list :results="results"></news-list>
</div>
Note: components can also be created as single file components (.vue files), and then parsed by a build tool like webpack. Although this is beyond the scope of this tutorial, it’s recommended for larger or more complex applications.
To take things further, you could even decide to go as far as making each article a component and make things even more modular.
Implementing Category Filters
To make our app richer, we can now introduce category filters to allow users to show only certain categories of news.
First, we’ll register the list of sections and the section being viewed in our app:
const SECTIONS = "home, arts, automobiles, books, business, fashion, food, health, insider, magazine, movies, national, nyregion, obituaries, opinion, politics, realestate, science, sports, sundayreview, technology, theater, tmagazine, travel, upshot, world"; // From NYTimes

const vm = new Vue({
  el: '#app',
  data: {
    results: [],
    sections: SECTIONS.split(', '), // create an array of the sections
    section: 'home', // set default section to 'home'
  },
  mounted () {
    this.getPosts(this.section);
  },
  // ....
});
Next, we can add this inside our div#app container:
<!-- ./index.html -->
<section class="callout secondary">
  <h5 class="text-center">Filter by Category</h5>
  <form>
    <div class="row">
      <div class="large-6 columns">
        <select v-model="section">
          <option v-for="section in sections" :value="section">{{ section }}</option>
        </select>
      </div>
      <div class="medium-6 columns">
        <a @click="getPosts(section)" class="button expanded">Retrieve</a>
      </div>
    </div>
  </form>
</section>
When the “Retrieve” button is clicked, we trigger the getPosts method for the selected section by listening for the click event with the syntax @click.
Final Touches and Demos
I decided to add some minor (optional) touches to make the app experience a little bit better, like introducing a loading image.
You can see a demo in the CodePen below (limited functionality):
See the Pen VueJS and NYTimes News App by SitePoint (@SitePoint) on CodePen.
Alternatively, you can view a live version here.
Conclusion
In this tutorial, we’ve learned how to start a Vue.js project from scratch, how to fetch data from an API using axios, and how to handle responses and manipulate data using components and computed properties.
Now we have a functional Vue.js 2.0 app, built around an API service. There are loads of improvements that could be made by plugging in some other APIs. For example, we could:
- automatically queue social media posts from a category using the Buffer API
- Mark posts to be read later, using the Pocket API
… and so on.
The entire code for this project is also hosted on GitHub, so you can clone, run, and make any improvements you fancy.
Suggest:
☞ Is Vue.js 3.0 Breaking Vue? Vue 3.0 Preview!
☞ Vue js Tutorial Zero to Hero || Brief Overview about Vue.js || Learn VueJS 2023 || JS Framework
☞ Learn Vue.js from scratch 2018
☞ React vs Vue - I Built the Same App in Both Frameworks