Deploy a Node App to Heroku

Heroku is a cloud-based, fully-managed platform as a service (PaaS) for building, running, and managing apps. The platform is flexible and designed with DX support for you and your team’s preferred development style and to help you stay focused and productive.
Developers, teams, and businesses of all sizes use Heroku to deploy, manage, and scale apps. Whether you’re building a simple prototype or a business-critical product, Heroku’s fully-managed platform gives you the simplest path to delivering apps quickly.
With features like Heroku Runtime, Heroku Postgres (SQL), Heroku Redis, Add-ons, Data Clips, App metrics, Smart containers, Enterprise-grade support, GitHub Integration and lots more, Heroku gives developers the freedom to focus on their core product without the distraction of maintaining servers, hardware, or infrastructure.

One of Heroku’s core feature is deploying, managing, and scaling apps with your favorite languages [Node, Ruby, Python, Java, PHP, Go, and more].
In this article, I’ll show you how to take an existing Node.js app and deploy it to Heroku – everything from creating your Heroku account to adding a database to your deployed application.
Prerequisites
In my previous article, I wrote about “Building a SlackBot with Node.js and SlackBots.js” and I promised to write a follow-up article to show how to host the SlackBot on either Heroku, Zeit or Netlify and publish it to the Slack Apps store. Well, this is the follow-up article but without the “Publishing to Slack Apps” part. We’ll cover that in another article.
I assume you have/ know the following already:
- Read my previous article
- Built the inspireNuggets SlackBot
- Git, Node, and npm installed
- A free Heroku account
- Heroku CLI installed
Bonus
If you don’t have npm, Node, and Heroku CLI installed or a Heroku account already, here’s a quick bonus [ Yes, you’re welcome :) ].
Installing npm and Node
- Node.js is a JavaScript runtime built on Chrome’s V8 JavaScript engine.
- npm is the package manager for Node.js. An open-source project created to help JavaScript developers easily share packaged modules of code.
You can simply download Node.js here. Don’t worry, npm comes with Node.js, so doing this installs both ✨
Creating a free Heroku account
Kindly head here and fill the Signup form. It’s pretty simple.

Installing Heroku CLI
The Heroku Command Line Interface (CLI) makes it easy to create and manage your Heroku apps directly from the terminal. It’s an essential part of using Heroku. [ Well, you can decide to use the GitHub integration feature and Heroku Dashboard but yes you should learn how to use the CLI ]
Heroku CLI requires Git, the popular version control system. If you don’t already have Git installed, I wrote this article to help you.
Heroku CLI for Mac OS
brew tap heroku/brew && brew install heroku
Heroku CLI for Ubuntu
sudo snap install --classic heroku
Heroku CLI for Windows
Download the installer for 64-Bit or 32-Bit.
Other installation methods
Please read this.
Getting started with Heroku CLI
- Verify your installation
heroku --version
heroku/7.30.1 linux-x64 node-v11.14.0
- Login to your Heroku account
There are two ways to do this:
- Web based auth
heroku login

Follow the instructions and login via your web browser then return to your terminal.

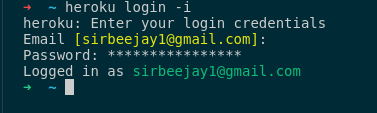
- CLI auth
This is a safer option as it saves your email address and an API token to ~/.netrc for future use.
heroku login -i
Deploying your Node.js App
I presume you’ve built the SlackBot already. If you haven’t, please clone the finished project.
The project is a simple Slackbot that displays random inspiring techie quotes and jokes for developers/designers.
git clone https://github.com/BolajiAyodeji/inspireNuggetsSlackBot.git && cd inspireNuggetsSlackBot
Now let’s deploy our app to Heroku 🎉🎉. I’ll show you two ways to do this:
Deploy via the Heroku Git
This is done via the Heroku CLI.
☑️ Checklist
- Specify the version of Node.js that will be used to run your application on Heroku in your
package.jsonfile.
"engines": {
    "node": "10.16.0"
  },
- Specify your start script.
Simply create aProcfile(without any file extension) and add
web: node index.js
Heroku first looks for this Procfile. If none is found, Heroku will attempt to start a default web process via the start script in your package.json.
- Start your app locally using the heroku local command to be sure everything works fine
heroku local web
Your app should now be running on http://localhost:5000.
- Don’t forget to
.gitignore
/node_modules
.DS_Store
/*.env
🚀 Let’s Deploy
How this works is, you have the project working on local already and you’ve pushed to GitHub already.
- Run
heroku create

Basically, this command creates a new Heroku app for you with some randomly generated domain and adds Heroku to your local Git repository.
- Now run
git push heroku master
This is the magic command, it pushes your app to Heroku, installs it there, and launches it on your allocated domain.
In the example above, it’s https://lit-cove-58897.herokuapp.com/
You can always make changes to your app settings and domains in your Heroku Dashboard
- Now visit your app in your browser
heroku open
- You can also view information about your running app using one of the logging commands. This is very useful in debugging errors.
heroku logs --tail
Deploy via GitHub integration
You can configure GitHub integration in the Deploy tab of apps in the Heroku Dashboard.
☑️ Checklist
- All previous checklists apply here – ensure you have the app deployed to GitHub already
🚀 Let’s Deploy
How this method works is that you push your entire project to GitHub and integrate it to Heroku. Every time you push, it deploys from GitHub to Heroku. Pretty cool right?
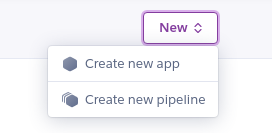
- Login to your Heroku Dashboard and create a new app
- Select your app name and region
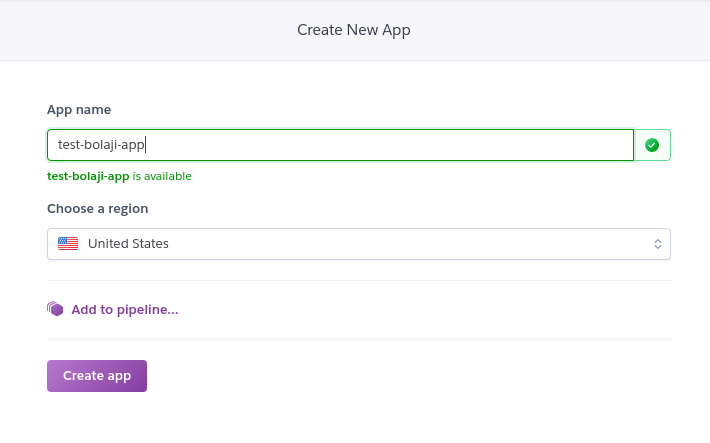
Now your app has successfully been created

- Click the deploy tab and scroll to the Deployment method section

- Click the Connect to GitHub button
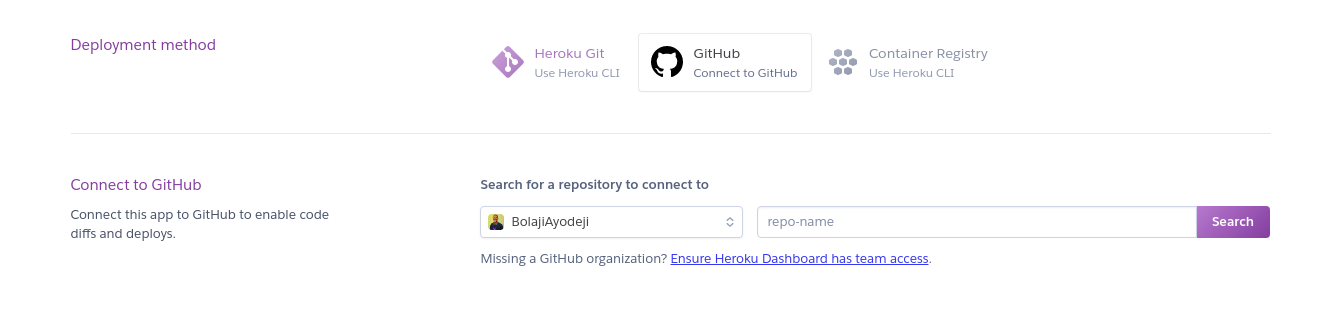
- Now you have the Connect to GitHub section, search for the repository and deploy.
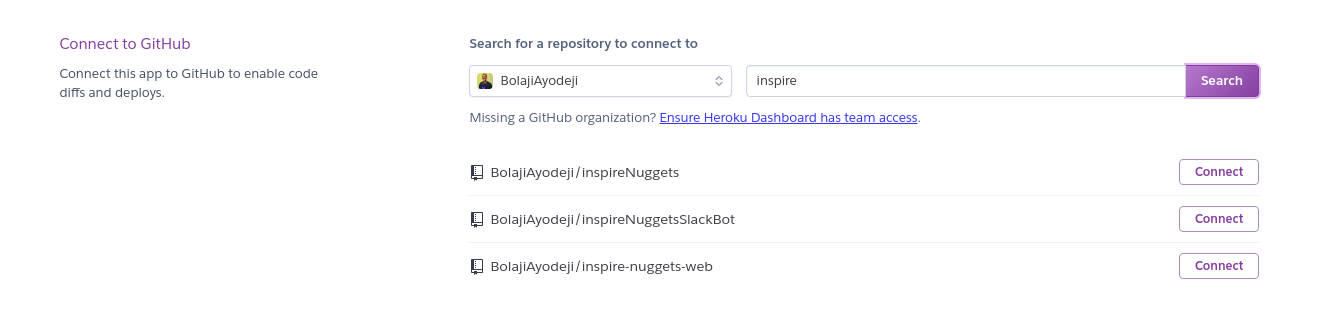
- Now your app was deployed successfully

Automatic deploys
Now your app is deployed but you’ll have to keep deploying manually. You need to enable automatic deploys for a GitHub branch, so Heroku builds and deploys all pushes to that branch.
- Scroll to the Automatic Deploys section
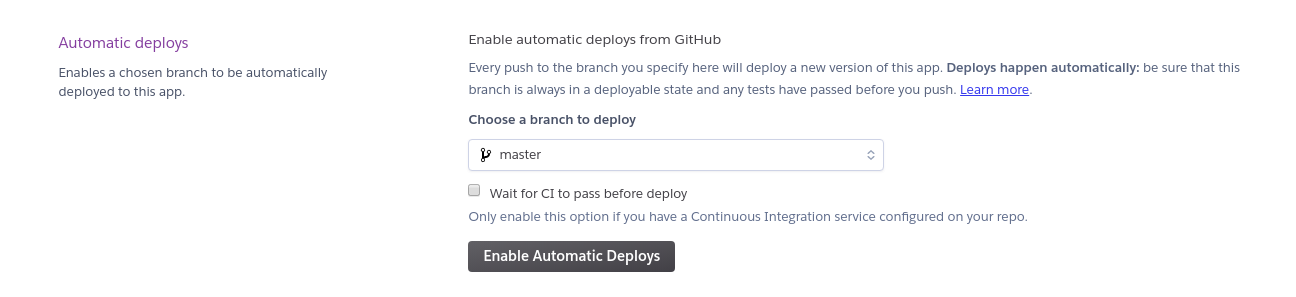
Select the branch you want to deploy. Ideally, this should be the master branch but change this according to your preference.
Now every push to master (or the branch you chose) will deploy a new version of this app.

Node.js Buildpack
In Heroku, Buildpacks are scripts that are run when your app is deployed. They are used to install dependencies for your app and configure your environment.
After deploying your app, ensure you add a Node.js buildpack to your project.
- Go to Settings and scroll to the Buildpack section

- Click the Add Buildpack button and select Node.js in the Popup modal.
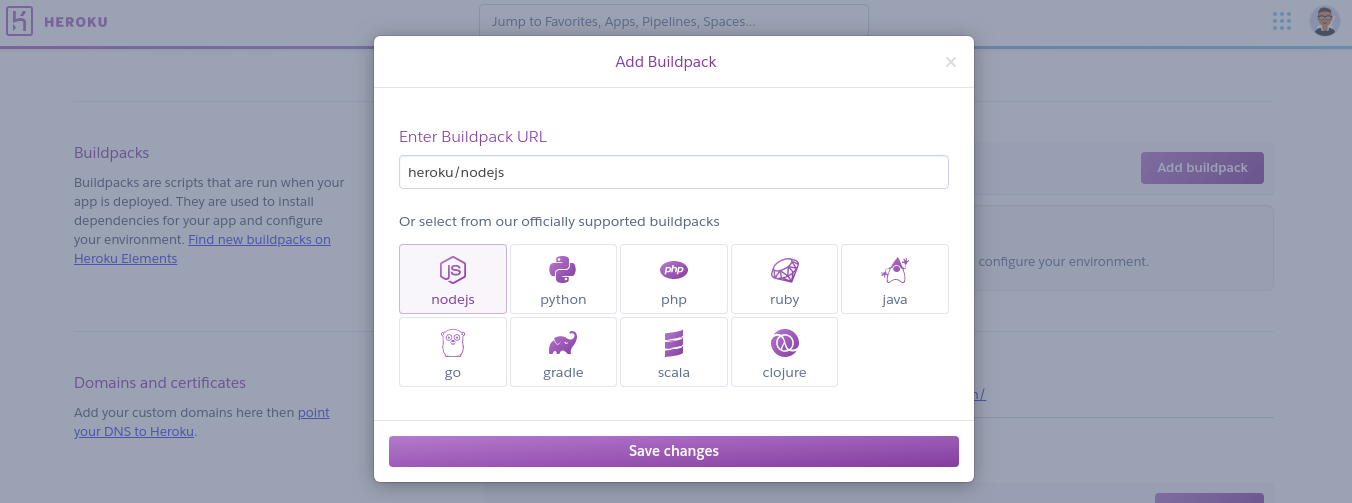
- Now the new buildpack configuration will be used when this app is next deployed. Make some changes to your app and push to GitHub – it will automatically deploy.
Adding a Database to your deployed App’
The Heroku add-on marketplace has a large number of data stores, from Redis and MongoDB providers, to Postgres and MySQL.
Heroku provides three managed data services to all customers in the form of Add-ons:
Writing about this three will make this article too long. It’s pretty simple and I’ll add some links to the Heroku Docs.
Conclusion
Every Heroku account is allocated a pool of free dyno hours. Heroku (free) dynos are great for hosting apps and personal projects. The downside, however, is that your app will fall asleep if it doesn’t receive any web traffic within 30-minutes :(.
You can use external tools to ping your server periodically so it never falls asleep.
Here are some to consider:
Heroku is meticulously designed to help developers be as productive as possible. The platform removes frustrating obstacles and mundane tasks, so you can stay free of distraction in your development flow. Wherever you are on the learning path, Heroku helps you love app development even more. - Heroku
The Heroku experience provides services, tools, workflows, and polyglot support—all designed to enhance developer productivity. There is more to using Heroku and I hope you explore more and build amazing stuff with Heroku.
If you’re a student, Kindly register for the GitHub Student Developer Pack to get One free Hobby Dyno for up to two years.
The pack give students free access to the best developer tools in one place so you can learn by doing.
Recommended Reading
☞ Understanding Asynchronous Programming in Node.js
☞ Learn how to build a SlackBot with Node.js and SlackBots.js
☞ Crafting build pipelines with Docker in Node.js
☞ Top 24 Node.js Frameworks for Web Developers in 2020
Building a realtime analytics DASHBOARD with Node.js and Mongodb
Suggest:
☞ Getting Started with Node.js - Full Tutorial
☞ JavaScript Programming Tutorial Full Course for Beginners
☞ Learn JavaScript - Become a Zero to Hero
☞ Angular and Nodejs Integration Tutorial
☞ How To Create A Password Protected File Sharing Site With Node.js, MongoDB, and Express