How to Scale Your Node.js Server

Today, we’re going to see an easy and straightforward example about Node.js clustering. This is a programming technique which will help you parallelize your code and speed up performance.
“A single instance of Node.js runs in a single thread. To take advantage of multi-core systems, the user will sometimes want to launch a cluster of Node.js processes to handle the load.”
We’re gonna create a simple web server using Koa, which is really similar to Express in terms of use.
The complete example is available in this Github repository.
What we’re gonna build

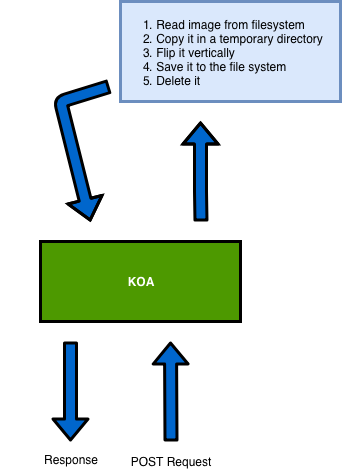
We’ll build a simple web server which will act as follows:
- Our server will receive a
POSTrequest, we’ll pretend that user is sending us a picture. - We’ll copy an image from the filesystem into a temporary directory.
- We’ll flip it vertically using Jimp, an image processing library for Node.js.
- We’ll save it to the file system.
- We’ll delete it and we’ll send a response to the user.
Of course, this is not a real world application, but is pretty close to one. We just want to measure the benefits of using clustering.
Setting up the project
I’m gonna use yarn to install my dependencies and initialize my project:
yarn-clustering-node
$ yarn init
$ yarn add -D forever
$ yarn add jimp koa koa-router
Since Node.js is single threaded, if our web server crashes, it will remain down until some other process will restarts it. So we’re gonna install forever, a simple daemon which will restart our web server if it ever crashes.
We’ll also install Jimp, Koa and Koa Router.
Getting started with Koa
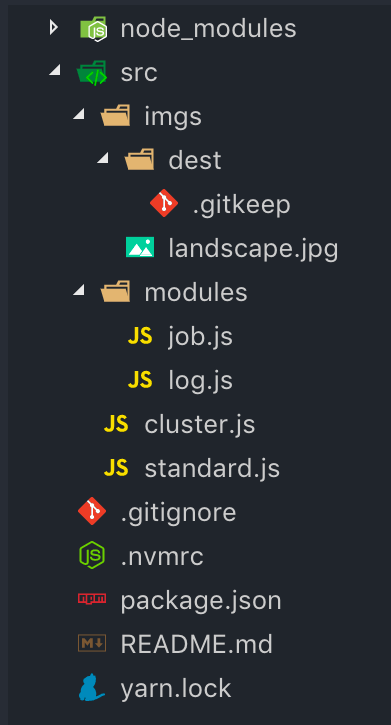
This is the folder structure we need to create:

We’ll have an src folder which contains two JavaScript files: cluster.js and standard.js .
The first one will be the file where we’ll experiment with the cluster module. The second is a simple Koa server which will work without any clustering.
In the module directory, we’re gonna create two files: job.js and log.js.
job.js will perform the image manipulation work. log.js will log every event that occurs during that process.
The Log module
Log module will be a simple function which will take an argument and will write it to the stdout (similar to console.log).
It will also append the current timestamp at the beginning of the log. This will allow us to check when a process started and to measure its performance.
node-log.js
module.exports = function log(args) {
  return process.stdout.write(`[${+ new Date()}] - ${args}\n`)
}
The Job module
I’ll be honest, this is not a beautiful and super-optimized script. It’s just an easy job which will allow us to stress our machine.
node-job.js
const fs   = require('fs')
const jimp = require('jimp')
const log  = require('./log')

module.exports = function runJob() {

  return new Promise(async (resolve, reject) => {

    const randomNumber = () => Math.floor(Math.random() * 1995) * 15
    const destFileName = `${__dirname}/../imgs/dest/${randomNumber()}-img.jpg`

    log(`Copying ${destFileName}`)
    fs.copyFileSync(`${__dirname}/../imgs/landscape.jpg`, destFileName)

    log(`Flipping ${destFileName}`)
    const image = await jimp.read(destFileName)
    image.flip(true, false)

    log(`Deleting ${destFileName}`)
    fs.unlink(destFileName, (err) => {
      return err ? reject(err) : resolve('success')
    })

  })

}
The Koa Webserver
We’re gonna create a very simple webserver. It will respond on two routes with two different HTTP methods.
We’ll be able to perform a GET request on [http://localhost:3000/](http://localhost:3000/.). Koa will respond with a simple text which will show us the current PID (process id).
The second route will only accept POST requests on the /flip path, and will perform the job that we just created.
We’ll also create a simple middleware which will set an X-Response-Time header. This will allow us to measure the performance.
koa-standard.js
const Koa    = require('koa')
const Router = require('koa-router')
const runJob = require('./modules/job')
const log    = require('./modules/log')
const router = new Router()
const app    = new Koa()

router.get('/', async ctx => ctx.body = `PID ${process.pid} listening here!`)
      .post('/flip', async ctx => {
        const res = await runJob()
        ctx.body  = res
      })

app.use(async (ctx, next) => {
      await next();
      const rt = ctx.response.get('X-Response-Time');
      log(`${ctx.method} ${ctx.url} - ${rt}`);
    })
    .use(async (ctx, next) => {
      const start = Date.now();
      await next();
      const ms = Date.now() - start;
      ctx.set('X-Response-Time', `${ms}ms`);
    })
    .use(router.routes())
    .listen(3000)
Great! We can now start our server typing node ./src/standard.js and test our routes.
The problem

Let’s use my machine as a server:
- Macbook Pro 15-inch 2016
- 2.7GHz Intel Core i7
- 16GB RAM
If I make a POST request, the script above will send me a response in ~3800 milliseconds. Not so bad, given that the image I am currently working on is about 6.7MB.
I can try making more requests, but the response time won’t decrease too much. This is because the requests will be performed sequentially.
So, what would happen if I tried to make 10, 100, 1000 concurrent requests?
I made a simple Elixir script which performs multiple concurrent HTTP requests:
elixir-concurrent-http-requests.ex
defmodule Processes do
  alias __MODULE__

  def sendRequest url do
    case HTTPoison.post url, [], [], [timeout: 50_000, recv_timeout: 50_000] do
      {:ok,    %HTTPoison.Response{status_code: 200, headers: headers}}
          -> IO.inspect headers
      {:error, %HTTPoison.Error{reason: reason}}
          -> IO.inspect {:error, reason}
    end
  end

  def spawnProcesses number do
    for _ <- 1..number do
      spawn(fn -> sendRequest('http://localhost:3000/flip') end)
    end
  end

end
I chose Elixir because it’s really easy to create parallel processes, but you can use whatever you prefer!
Testing ten concurrent requests — without clustering
As you can see, we spawn 10 concurrent processes from our iex (an Elixir REPL).
The Node.js server will immediately copy our image and start to flip it.
The first response will be logged after 16 seconds and the last one after 40 seconds.
Such a dramatic performance decrease! With just 10 concurrent requests,we decreased the webserver performance by 950%!
Introducing clustering

Remember what I mentioned at the beginning of the article?
To take advantage of multi-core systems, the user will sometimes want to launch a cluster of Node.js processes to handle the load.
Depending on which server we’re gonna run our Koa application, we could have a different number of cores.
Every core will be responsible for handling the load individually. Basically, each HTTP request will be satisfied by a single core.
So for example — my machine, which has eight cores, will handle eight concurrent requests.
We can now count how many CPUs we have thanks to the os module:
node-cpu.js
const { cpus }   = require('os')
const numWorkers = cpus().length
The cpus() method will return an array of objects that describe our CPUs. We can bind its length to a constant which will be called numWorkers, ’cause that’s the number of workers that we’re gonna use.
We’re now ready to require the cluster module.
cluster.js
const cluster = require('cluster')
We now need a way of splitting our main process into N distinct processes.
We’ll call our main process master and the other processes workers.
Node.js cluster module offers a method called isMaster. It will return a boolean value that will tell us if the current process is directed by a worker or master:
cluster.js
const cluster  = require('cluster')
const isMaster = cluster.isMaster
Great. The golden rule here is that we don’t want to serve our Koa application under the master process.
We want to create a Koa application for each worker, so when a request comes in, the first free worker will take care of it.
The cluster.fork() method will fit our purpose:
cluster.js
const cluster    = require('cluster')
const { cpus }   = require('os')
const numWorkers = cpus().length
const isMaster   = cluster.isMaster

if (isMaster) {

  process.stdout.write('I am master!')
  const workers = [...Array(numWorkers)].map(_ => cluster.fork())

} else {

  process.stdout.write('I am a worker!')

}
Ok, at first that may be a little tricky.
As you can see in the script above, if our script has been executed by the master process, we’re gonna declare a constant called workers. This will create a worker for each core of our CPU, and will store all the information about them.
If you feel unsure about the adopted syntax, using […Array(x)].map() is just the same as:
cluster.js
  let workers = []

  for(let i = 0; i < numWorkers; i++) {
    workers.push(cluster.fork())
  }
I just prefer to use immutable values while developing a high-concurrency app.
Adding Koa

As we said before, we don’t want to serve our Koa application under the master process.
Let’s copy our Koa app structure into the else statement, so we will be sure that it will be served by a worker:
koa-cluster.js
const cluster  = require('cluster')
const { cpus } = require('os')
const log      = require('./modules/log')

const isMaster   = cluster.isMaster
const numWorkers = cpus().length

if (isMaster) {

  log(`Forking ${numWorkers} workers`)
  const workers = [...Array(numWorkers)].map(_ => cluster.fork())

  cluster.on('online', (worker) => log(`Worker ${worker.process.pid} is online`))
  cluster.on('exit', (worker, exitCode) => {
    log(`Worker ${worker.process.id} exited with code ${exitCode}`)
    log(`Starting a new worker`)
    cluster.fork()
  })

} else {

  const Koa    = require('koa')
  const Router = require('koa-router')
  const runJob = require('./modules/job')
  const router = new Router()
  const app    = new Koa()

  router.get('/', async ctx => ctx.body = `PID ${process.pid} listening here!`)
        .post('/flip', async ctx => {
          const res = await runJob()
          ctx.body  = res
        })

  app.use(async (ctx, next) => {
        await next();
        const rt = ctx.response.get('X-Response-Time');
        log(`${ctx.method} ${ctx.url} - ${rt}`);
      })
      .use(async (ctx, next) => {
        const start = Date.now();
        await next();
        const ms = Date.now() - start;
        ctx.set('X-Response-Time', `${ms}ms`);
      })
      .use(router.routes())
      .listen(3000)

}
As you can see, we also added a couple of event listeners in the isMaster statement:
 cluster.on('online', (worker) => log(`Worker ${worker.process.pid} is online`))

  cluster.on('exit', (worker, exitCode) => {
    log(`Worker ${worker.process.id} exited with code ${exitCode}`)
    log(`Starting a new worker`)
    cluster.fork()
  }
The first one will tell us that a new worker has been spawned. The second one will create a new worker when one other worker crashes.
That way, the master process will only be responsible for creating new workers and orchestrating them. Every worker will serve an instance of Koa which will be accessible on the :3000 port.
Testing ten concurrent requests — with clustering
As you can see, we got our first response after about 10 seconds, and the last one after about 14 seconds. It’s an amazing improvement over the previous 40 second response time!
We made ten concurrent requests, and the Koa server took eight of them immediately. When the first worker has sent its response to the client, it took one of the remaining requests and processed it!
Conclusion
Node.js has an amazing capacity of handling high loads, but it wouldn’t be wise to stop a request until the server finishes its process.
In fact, Node.js webservers can handle thousands of concurrent requests only if you immediately send a response to the client.
A best practice would be to add a pub/sub messaging interface using Redis or any other amazing tool. When the client sends a request, the server starts a realtime communication with other services. This takes charge of expensive jobs.
Load balancers would also help a lot splitting out high traffic loads.
Once again, technology is giving us endless possibilities, and we’re sure to find the right solution to scale our application to infinity and beyond!
Recommended Courses:
☞ The Complete Web Scraping Course with Projects 2019
☞ The complete guide to testing javascript & node applications
☞ Node.js Unit Testing In-Depth
☞ Mastering REST APIs in Node.js: Zero To Hero
Suggest:
☞ What To Learn To Become a Python Backend Developer
☞ Build a full stack application with Node-RED
☞ 40+ Online Tools & Resources For Web Developers & Designers