How to build a Vue app with Firebase authentication

What is Vue.js ?
Here is an overview of this amazing and lightweight javascript framework:
Vue (pronounced /vjuː/, like view) is a progressive framework for building user interfaces. Unlike other monolithic frameworks, Vue is designed from the ground up to be incrementally adoptable. The core library is focused on the view layer only, and is very easy to pick up and integrate with other libraries or existing projects
from vuejs official documentation: https://vuejs.org/v2/guide
Why Vue.js ?
Vue.js is very easy to use, powerful and well documented. In the age of new javascript frameworks that are component-driven, Vue stands out by his simplicity and his performance. The eco-system is vibrant, with more and more people switching to Vue every day.
If you want to go deeper in why you should use Vue.js, you can check this comparaison with other javascript framework: https://vuejs.org/v2/guide/comparison.html
What is Firebase ?
Firebase is a mobile and web application development platform. Firebase is made up of complementary features that developers can mix-and-match to fit their needs. [...] Firebase's initial product was a realtime database, which provides an API that allows developers to store and sync data across multiple clients. Over time, it has expanded its product line to become a full suite for app development.
from wikipedia: https://en.wikipedia.org/wiki/Firebase
In short terms, Firebase is a set of tools that allows you to develop an application without server-side programming. It has realtime database, authentication system, crash reporting, analytics and other services ready to use in your mobile/web app. That way, you can focus on your app and users.
Why Firebase ?
For application with minimal back-end needs such as authentication or database storage, no need to re-invent the wheel, Firebase does it for you, and gives you much more tools. Also, you don’t need to bother about scaling, server performance and database size, Firebase scales everything automatically.
Let’s start !
First, we are going to initialize a new Vue project by using the great tool vue-cli (https://github.com/vuejs/vue-cli).
If you don’t already have vue-cli installed, let’s install it:
$ npm install -g vue-cli
Now that you have vue-cli installed, let’s create a new project. In vue-cli documentation, it say’s:
Usage
$ vue init <template-name> <project-name>
One of the cool features of vue-cli, is that you can initialize your project based on different project templates, so that people can start to code as fast as possible. You can find the official list of the templates here https://github.com/vuejs-templates.
For this tutorial, we will use the webpack template.
Let’s create our new Vue project using webpack and call it ‘vue-firebase-tutorial’.
$ vue init webpack vue-firebase-tutorial

During the initialization, you’ll have to choose some options. Make sure you install vue-router since we will be using it during this tutorial. For the other options, do as you want, it won’t really matter for the rest of the tutorial.
Then, enter the new vue-firebase-tutorial directory, run npm install, and then run npm run dev
$ cd vue-firebase-tutorial
$ npm install
[...]
$ npm run dev
Now, you should have your browser open with a view already created !

The App Structure
Let’s have a quick look of the app structure.

For this tutorial, we just need to know that our source code will be under the src/ directory.
To have a complete overview of each directory and file, you can check the documentation of the webpack template here : http://vuejs-templates.github.io/webpack/structure.html.
Also, before going further in this tutorial, if you don’t already know the structure of a Vue file (like src/components/Hello.vue), i advise you to take a look to this: vue-loader.vuejs.org/en/start/spec.html
LET’S WRITE SOME CODE !
Our future App Architecture
Our app will consist of three views, two (Login view and Sign Up view) that we can access only without authentication, and one (Hello view) that we can access only with authentication.

After login successfully or after a new account creation, we will be redirected to the authenticated part of the app, the Hello view.
Step One: Login and SignUp
1–1 The Login View
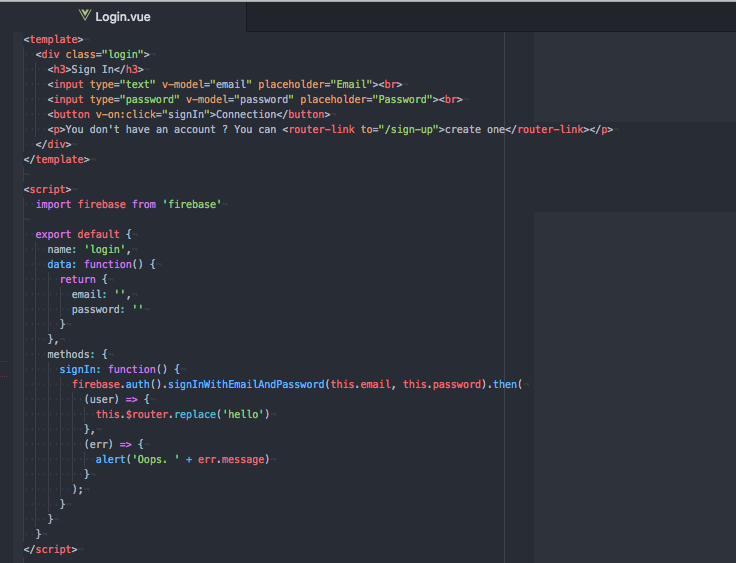
Let’s create the Login view. To do so, we will create a new Vue component called Login under src/components
For the moment, the component will simply consist of a title, two input fields, a button and a small sentence in the html.

Our component is now created! But how to display this new component in our app? Well, for that, we are going to use vue-router. Remember? We already installed it when we initialized the app with vue-cli.
What is vue-router ?
vue-router is the official router for Vue.js. It deeply integrates with Vue.js core to make building Single Page Applications with Vue.js a breeze.
Creating a Single-page Application with Vue.js + vue-router is dead simple. With Vue.js, we are already composing our application with components. When adding vue-router to the mix, all we need to do is map our components to the routes and let vue-router know where to render them.
from vue-router documentation: https://github.com/vuejs/vue-route
So, let’s add our new Logincomponent that we just created to our app router. Open the src/router/index.js file and add the Logincomponent to the router like that:

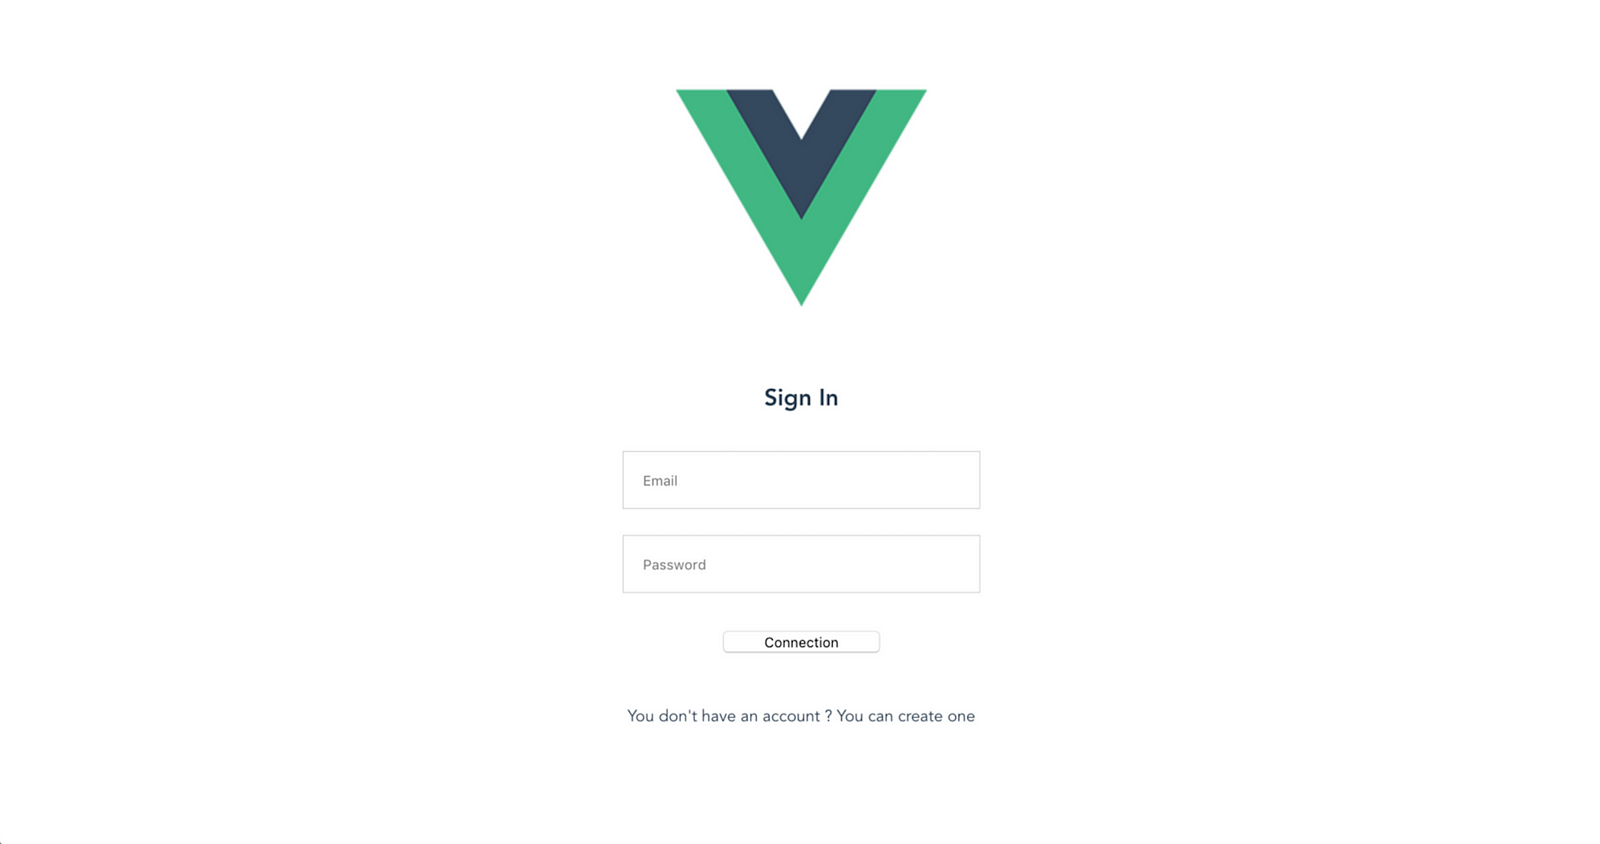
Then, if you change your browser url to localhost:8080/#/login you should see the new Logincomponent that we just created displayed in your browser:

Why do we have the Vue logo despite the fact that we didn’t put it any image in the html template of the Logincomponent? Well, if you open the App.vue file, the template of the App component is as follow:

The App component is the main component of the app and will be the first to be rendered. It contains an image and a html component called router-view.
Router-view is a component of vue-router:
The <router-view> component is a functional component that renders the matched component for the given path. Components rendered in <router-view> can also contain its own <router-view>, which will render components for nested paths.
from vue-router documentation https://router.vuejs.org/en/api/router-view.html
So, when reaching [http://localhost:8080/#/login](http://localhost:8080/#/login) vue-router will render the attached component of the path/login we defined in router/index.js inside the router-view component. And since the App component contain the image of Vue.js logo in his template, we also have it display.
Let’s add some style to our Login component.
Inside the <style> element of your Login.vue file, add those styles.
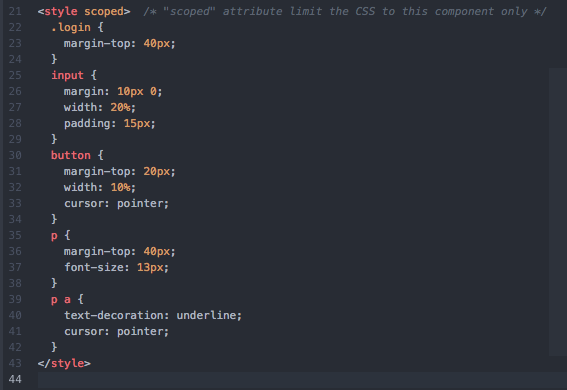
Now, the login page should be a little bit prettier.
1-2- The Sign Up View
The same way we created the Login view, we are going to create the Sign Up view.
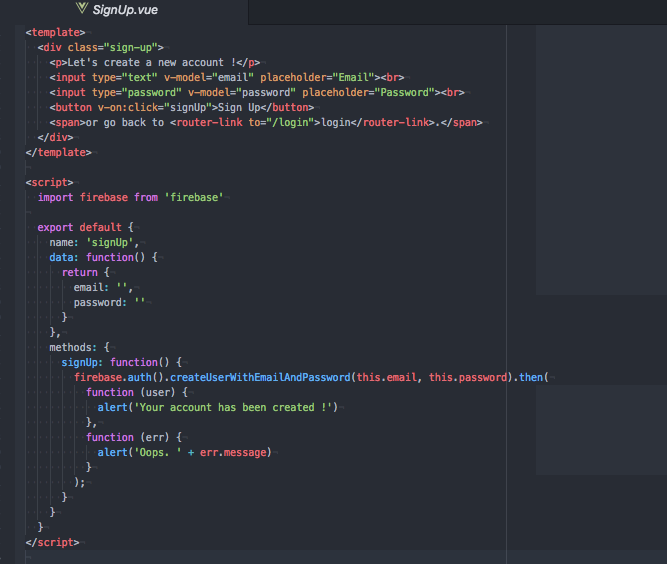
For that, create a new vue component called SignUp under src/components/.
As for the Login component, the SignUp component will consist, for now, of a simple form and some style attached to it.

Then, add the new component in our routes inside src/router/index.js

Then, if you open your browser to [http://localhost:8080/#/sign-up](http://localhost:8080/#/sign-up%60), you should have the following view:

Step Two: Navigation between views
If we look back to the schema of the app architecture we defined, we can navigate from the Login view to the SignUp view, and from those two views to the Hello view. How to do so?
Well, we will use another component of vue-router calledrouter-link.
<router-link> is the component for enabling user navigation in a router-enabled app. The target location is specified with the to prop. It renders as an <a> tag with correct href by default, but can be configured with the tag prop. In addition, the link automatically gets an active CSS class when the target route is active.
from vue-router documentation: https://router.vuejs.org/en/api/router-link.html
So, in the Login and SignUp component, let’s implement router-link so we can navigate between those two views.


Now, you should be able to navigate between the two pages by using the links we just created.
The last part of navigation will consist to go from Login/SignUp views to the Hello view. For now, since we don’t have any code implemented, we will do a simple redirection to the Hello view when clicking on the Connection button, without any authentication checking.
With router-link, the navigation take places in the html part of the component, but now, we want to navigate between routes programmatically. To do so, we need to attach an event when clicking on the Connection button, and with Vue 2, we can do that with the v-on directive.
Listening to Events
We can use the v-on directive to listen to DOM events and run some JavaScript when they’re triggered.
from Vue 2 doc: https://vuejs.org/v2/guide/events.html#Listening-to-Events
The event we want to listen to is click. So, on the click event of the Connection button, we want to navigate to the Hello view.
To navigate programmatically between views, vue-router has a set of function we can use in our app. To know more about those functions, you take a look in their documentation https://router.vuejs.org/en/essentials/navigation.html.
In our example, we are going to use the replace function, because once the user is logged in, we want the Hello view as our starting route.
Let’s change our Login component to put this in place.

You can see inside the login function that we have this.$router.replace('hello')
Why do we access the router with this? If you take a look into the main.js file, you’ll see that the router object is injected to the Vue app. That way, we can easily access it in every components of the app.

Also, we change the navigation to hello, but we don’t have any hello path yet.
The default path of the Hello component was / on the app initialization, but now that we know that the Hello view will be only accessible when user is authenticated, let’s change the route so that the Hello view is accessible when reaching /hello path.

Now, back to our Login view, if you click on the Connection button, you’ll be redirect to the Hello view !
Step Three: Firebase Integration
Now that we have our front-end app ready, let’s implement Firbase so we can use it’s authentication system !
3.1 Create a new project on Firebase
To use Firebase, you first need to create a new project on the firebase console. If you don’t have any account created, create one, then go to console.firebase.google.com.

Click on Add project . Them you should have a popup to create a new project. Choose the name you want. I choose to call it vue-firebase-tutorial

Then, you should arrive on your project home page.

Congrats ! Your Firebase project is created. Now, to integrate it in our app, click on Add Firebase to your web app.
A popup with a code snippet should appear. Copy the code inside the second script balise. It should look like:
// Initialize Firebase
let config = {
  apiKey: "YOUR_API_KEY",
  authDomain: "YOUR_PROJECT_ID.firebaseapp.com",
  databaseURL: "https://YOUR_PROJECT_ID.firebaseio.com",
  projectId: "YOUR_PROJECT_ID",
  storageBucket: "YOUR_PROJECT_ID.appspot.com",
  messagingSenderId: "YOUR_MESSAGING_SEND_ID"
};
firebase.initializeApp(config);
Now, let’s back to our vue project. We need to add the Firebase module to our project. To do so:
$ npm install ——save firebase
Once the installation is done, let’s import Firebase module to our app. Open the main.js file, and initialize Firebase with the configuration code we copied earlier.

For the simplicity of the tutorial, we put the Firebase configuration in main.js file, but on real production system, avoid to do that and put it in a specific configuration file.
We have everything ready now to create new users on Firebase !
3.2 Create User on Firebase with the SignUp component
Let’s go back to our SignUp component and implement what we need to create users on Firebase.
To create a new user, we will need to get back the email and the password typed in our form inside our component controller. To do so, we are going to use the v-model directive of Vue 2.
You can use the v-model directive to create two-way data bindings on form input and textarea elements. It automatically picks the correct way to update the element based on the input type. Although a bit magical, v-model is essentially syntax sugar for updating data on user input events, plus special care for some edge cases.
from Vue 2 documentation: https://vuejs.org/v2/guide/forms.html
Once we retrieved the email and the password of the new user we want to create, we are going to use the Firebase function called createUserWithEmailAndPassword.
This Firebase function does exactly what the name says, it create a new user with an email and a password. You can know more about this function in the official Firebase documentation here: https://firebase.google.com/docs/reference/js/firebase.auth.Auth#createUserWithEmailAndPassword
Let’s add all that in our SignUp component:
The createUserWithEmailAndPassword function return a Firebase promise, with an onResolve and onReject callback. You can know more about the different type of Firebase promises here: (https://firebase.google.com/docs/reference/js/firebase.Promise).
For the moment, we just display an alert to see the result of the function.
Let’s try to create a new user in the interface.
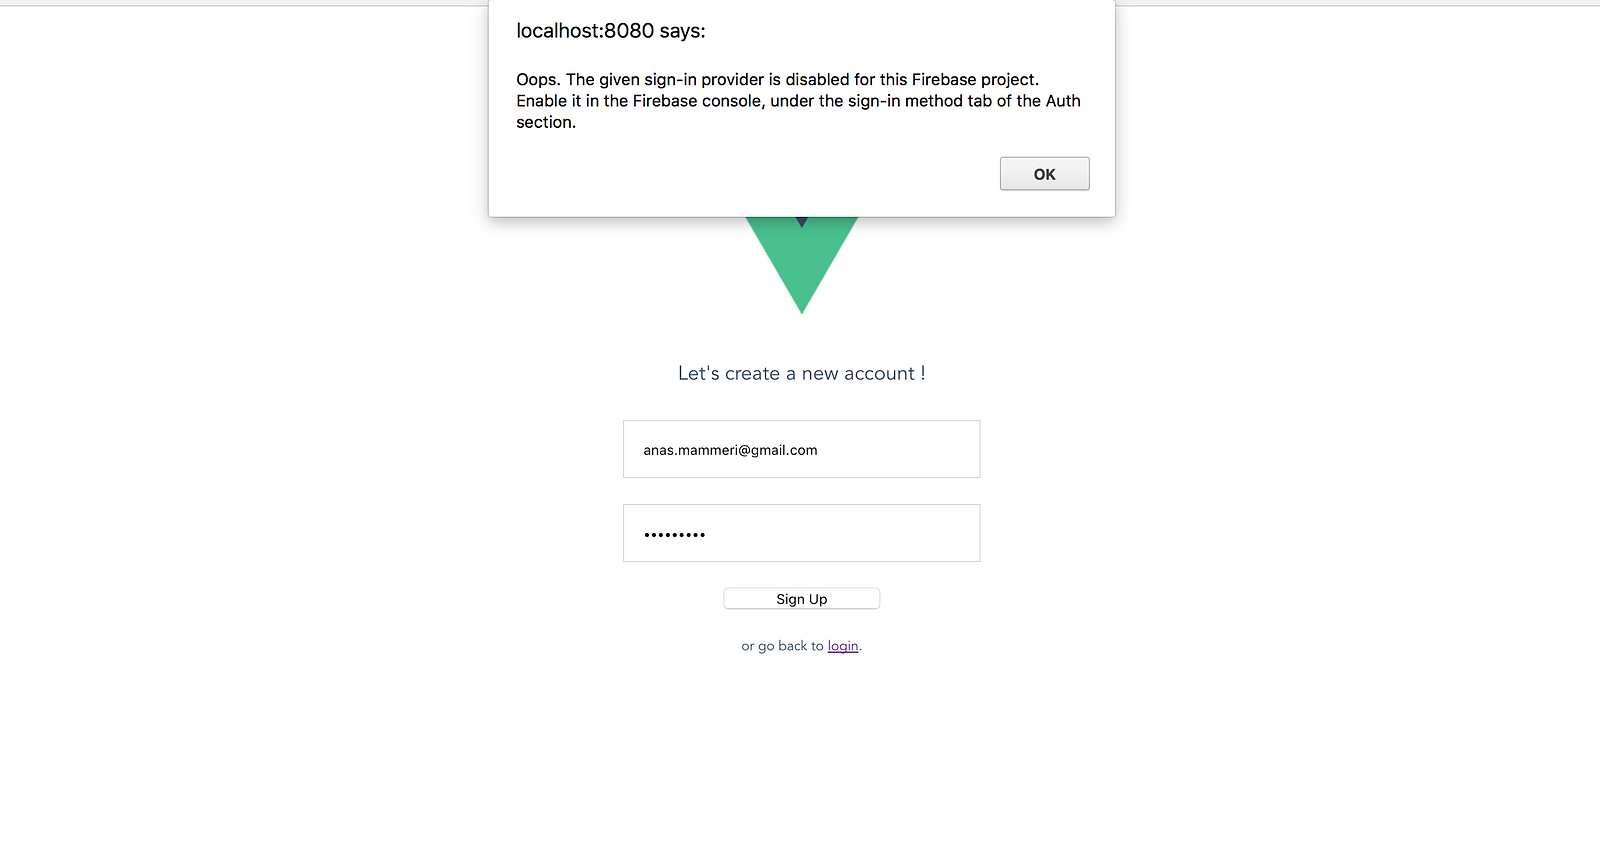
It’s not working ! Why ?
The error message says:
The given sign-in provider is disabled for this Firebase project. Enable it in the Firebase console, under the sign-in method tab of the Auth section.
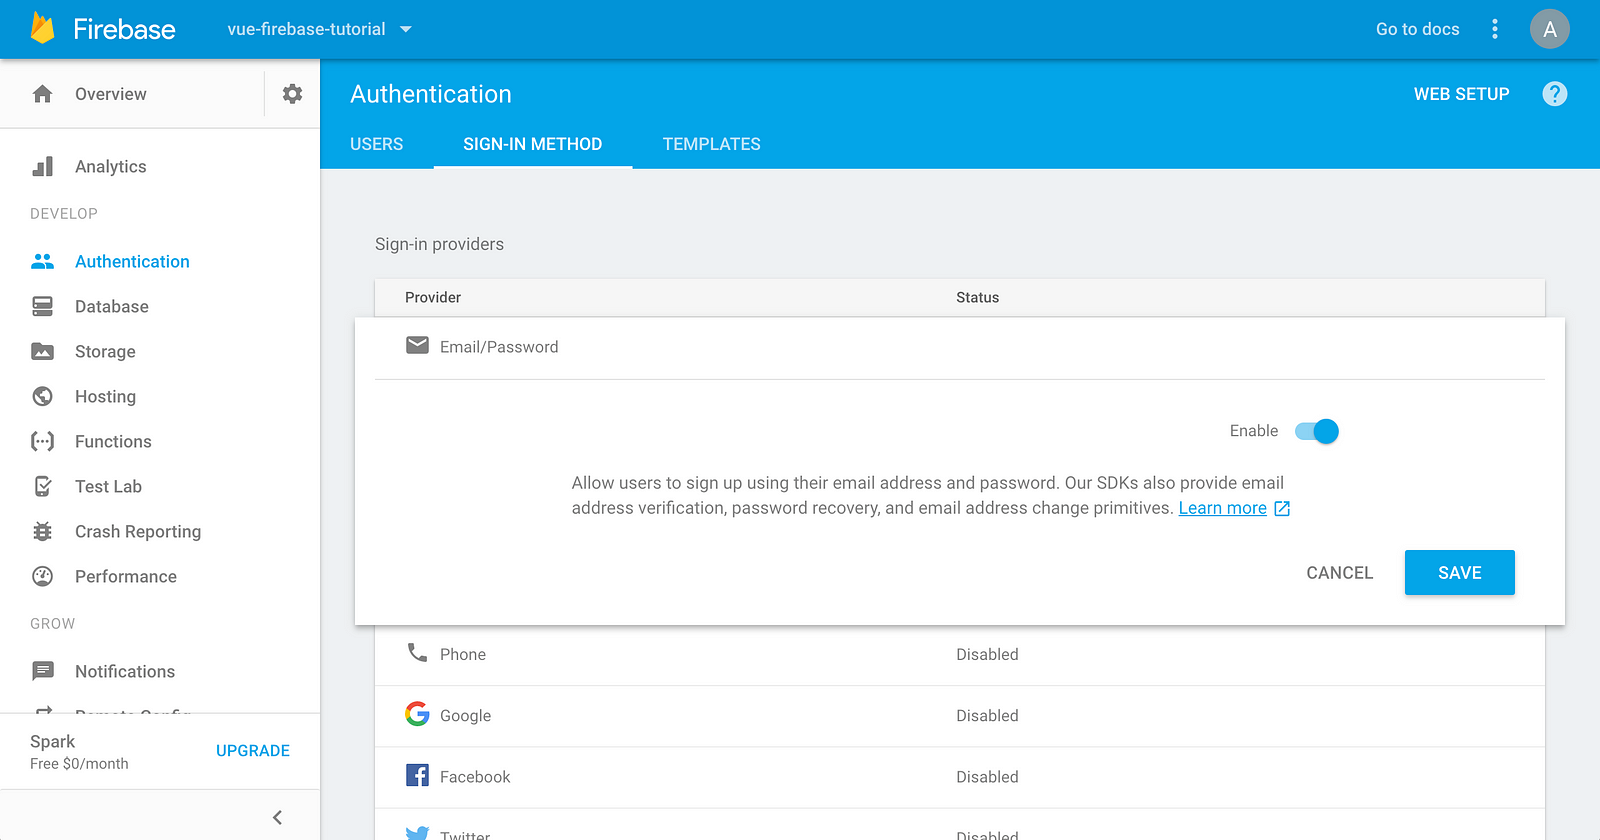
To have the possibility to create new user, we should enable the sign-in provider of Firebase. Let’s go back to the Firebase console, on the project we created in step 3.1.
On the Authentication part, we have a tab named SIGN-IN METHOD
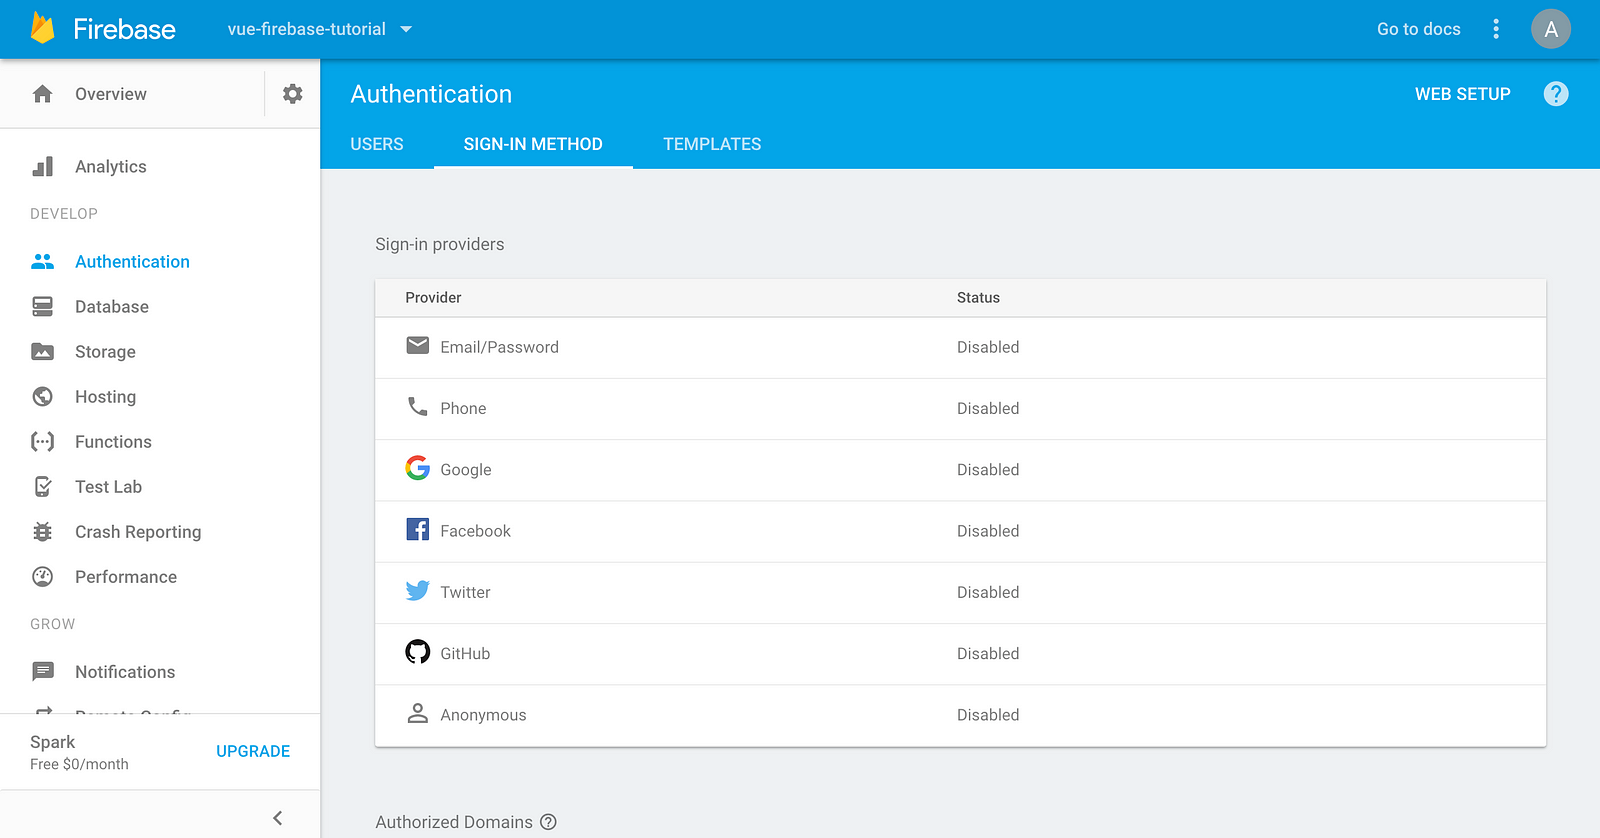
You just need to enable the Email/Password provider.
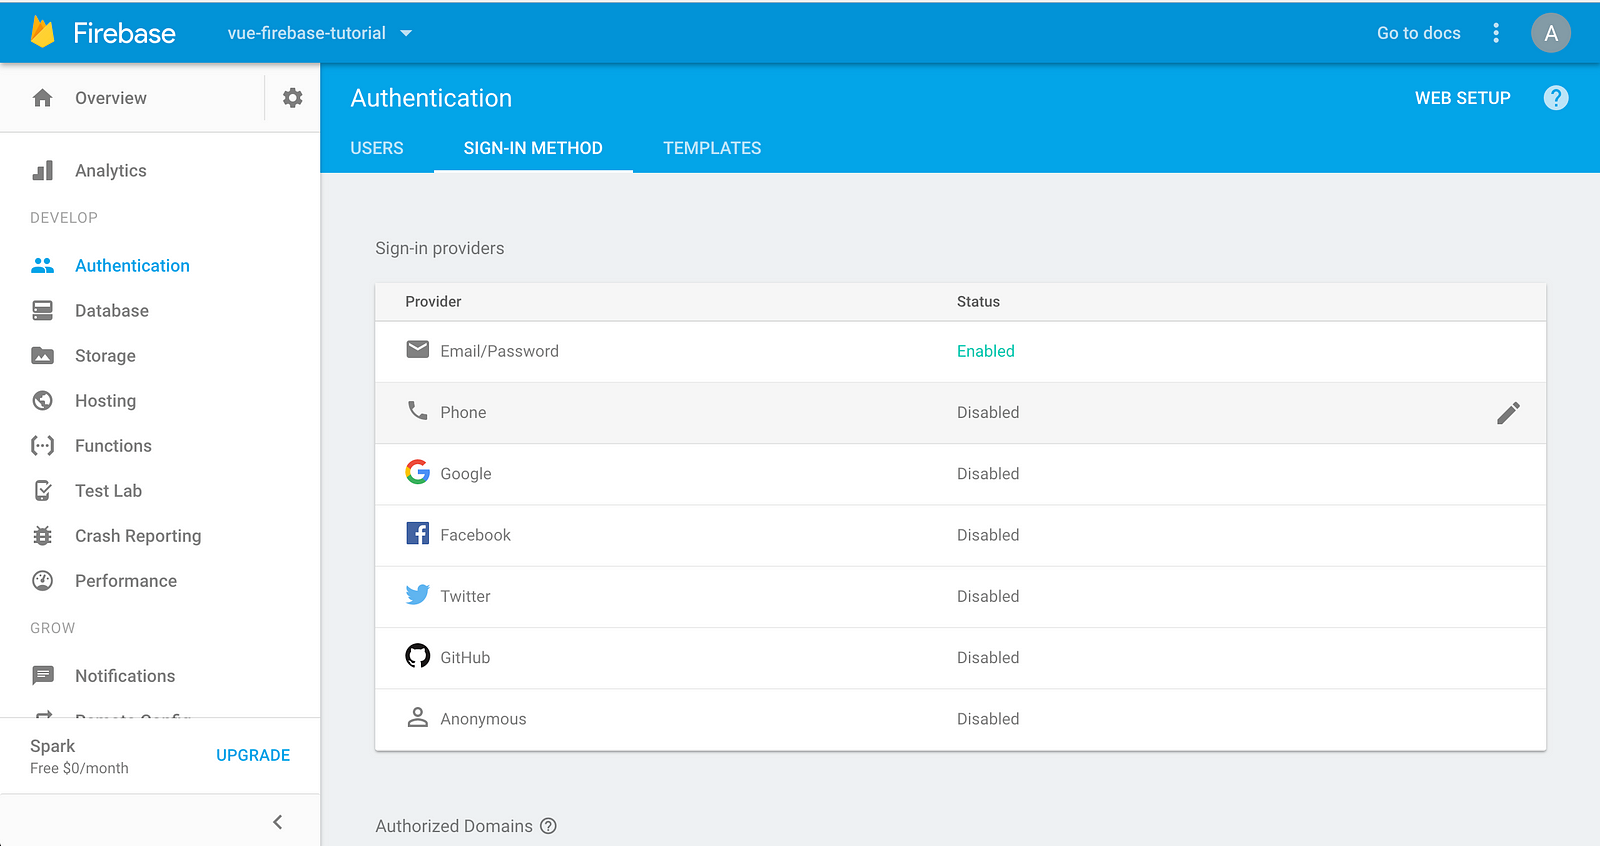
Then, let’s try again to create a new user in our Vue app.
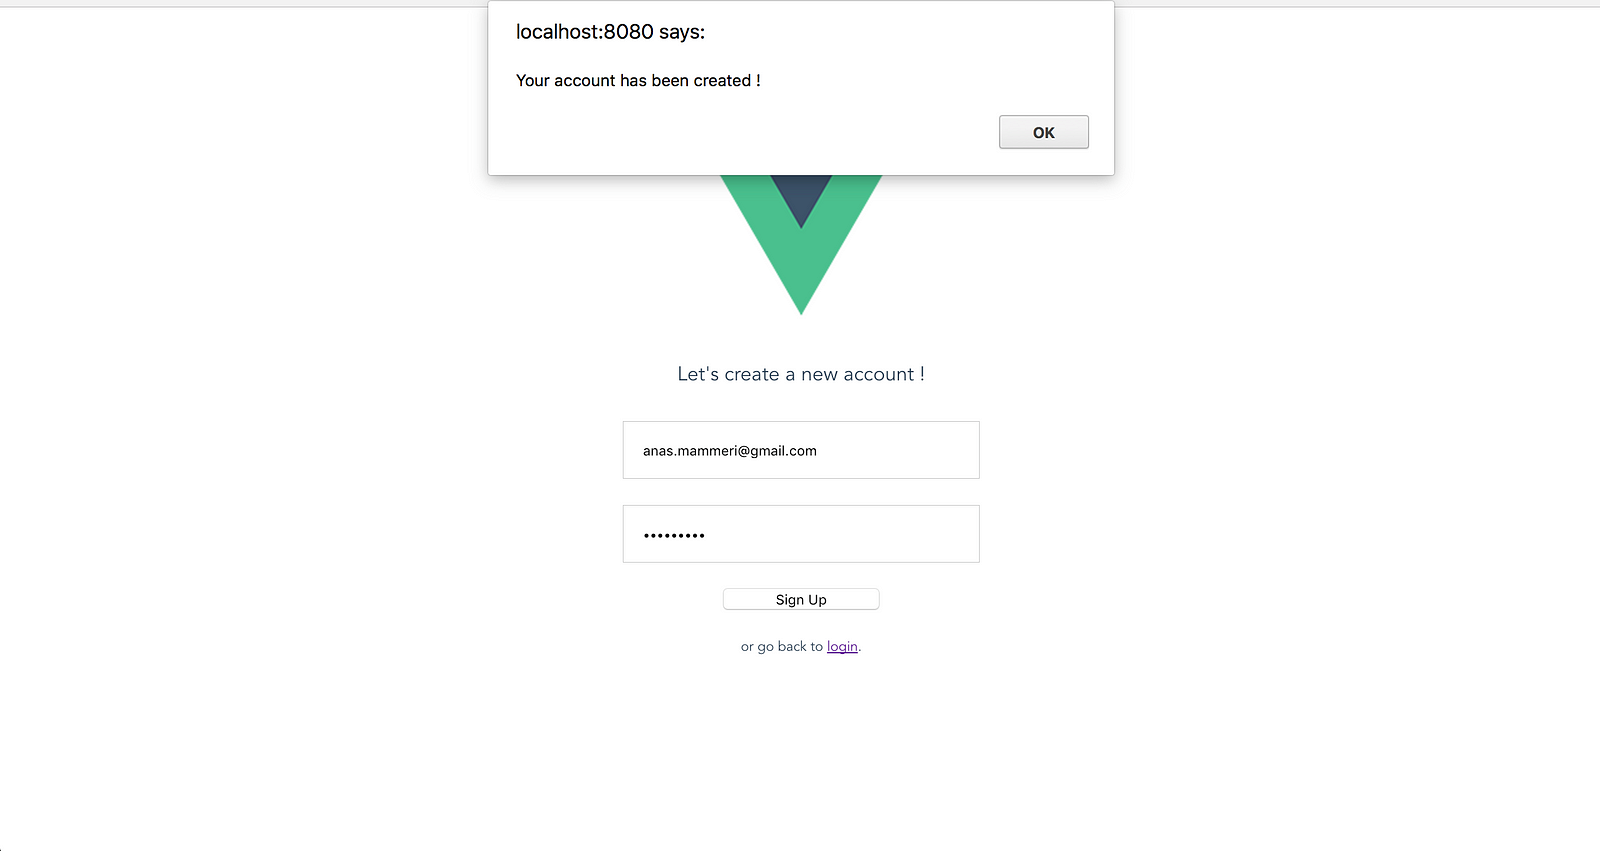
It’s working now ! Congrats, you just created an new user in your Firebase project !
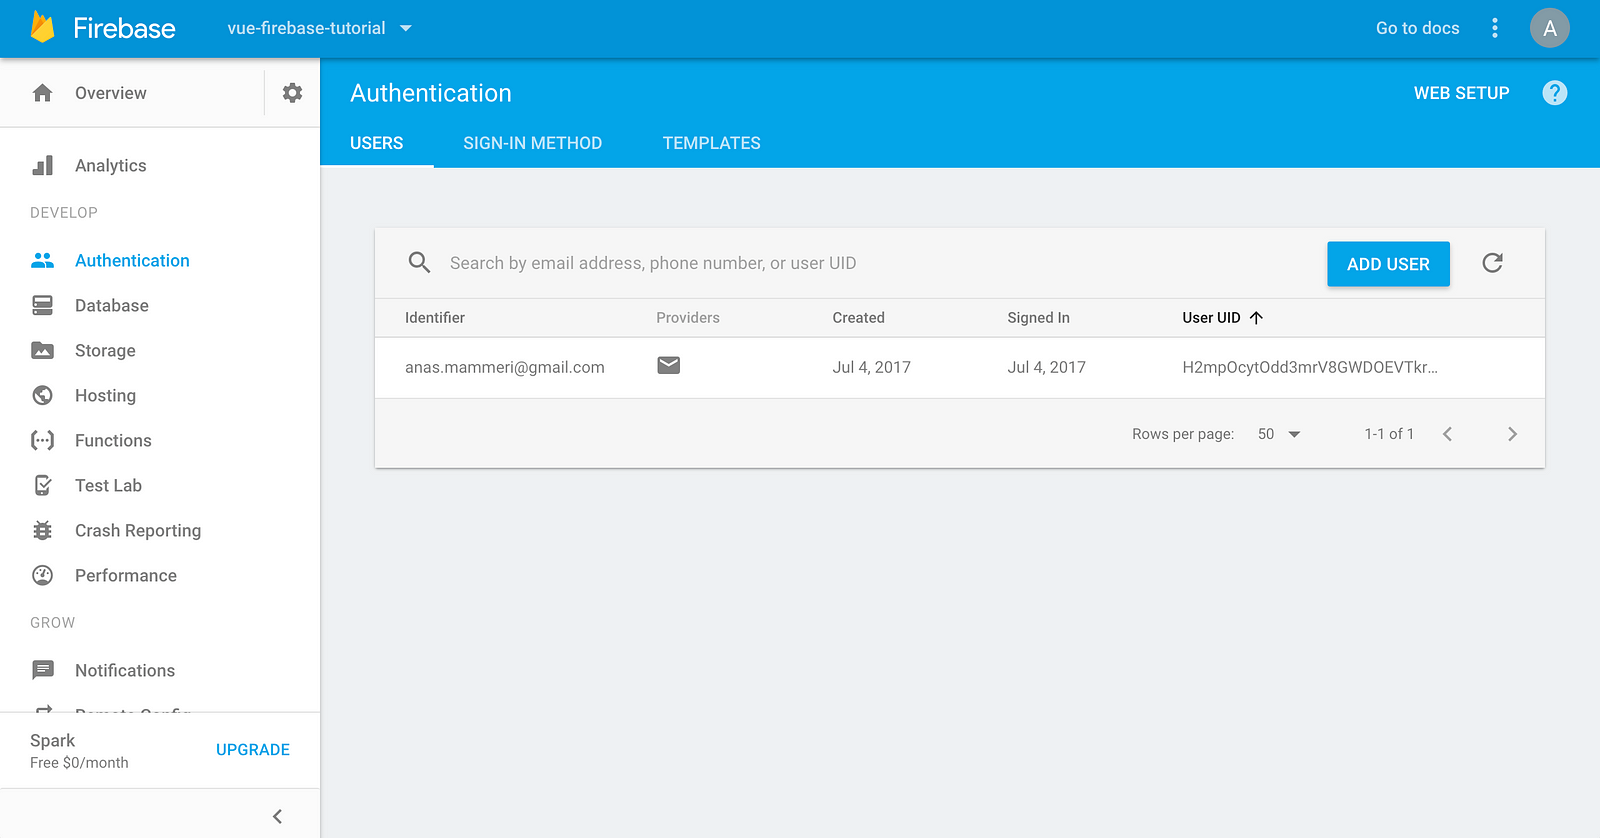
To be sure that everything was correct, we can take a look in the firebase console, under Authentication part and see the list of users. You should have the user you just created in the list !
3.3 Login with the new user
Now that we have a new user created, let’s try to login with this user ! (When you successfully create a new user on Firebase, it automatically sign in the user in to the application, but for this example, we are going to sign in again from the Login view)
Let’s go back to our Login component. We need to get back the email and the password of the user who try to login, and sign in this user into Firebase. This component will look like the SignUp component, but the change will be the function we will call. To sign in a user in Firebase, we are going to use the signInWithEmailAndPassword function provided by Firebase. It takes the email and password as parameters and return a Firebase promise.

Now, let’s try to login with the user we just created
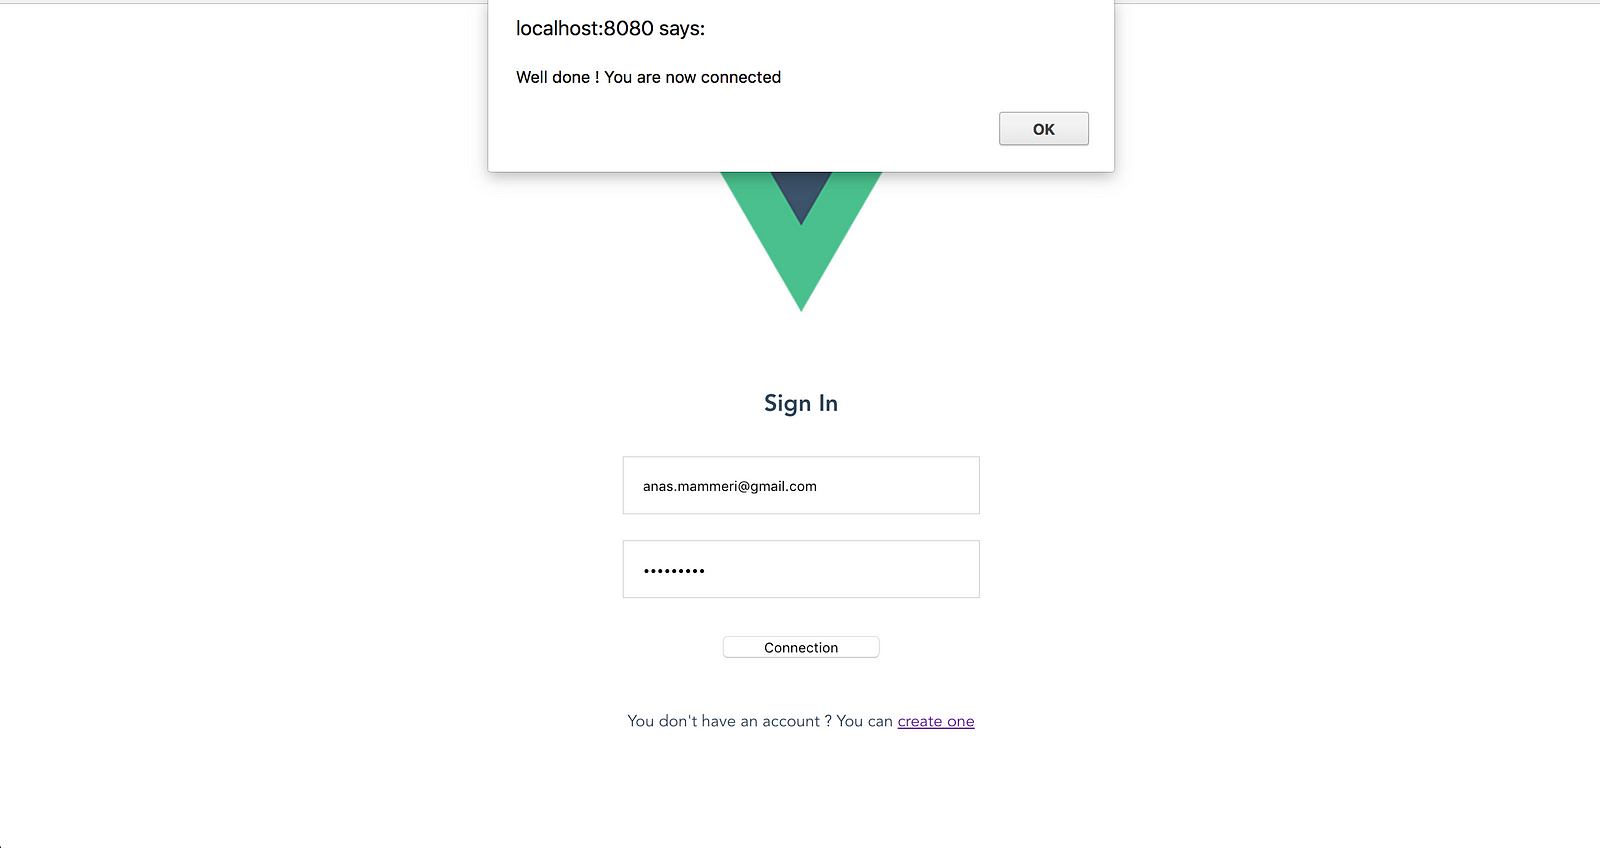
It’s working ! Your user is now authenticated in Firebase !
Step Four: Access the app only with authentication
4.1: Add meta fields to routes
We are now authenticated! But nothing happen’s, right? Well, we need to redirect the user to the part of the application that can be accessed only if the user is authenticated. We already defined in our (beautiful) schema that the authenticated view of our app will be the Hello view.
To implement that in our Vue application, we can use meta field of vue-router. A meta field is an additional information you can set to your route.
To know more about meta, you can check the vue-router documentation here: https://router.vuejs.org/en/advanced/meta.html
Let’s add a meta field to the Hello view that we will use for this example. This meta will be called requiresAuth and will inform us that this view need authentication.
Also, now that we will have all our routes, we should define a default route for the app, since we changed the hello component that was before the default landing page.
With path: ‘*’, we redirect every paths that does not exist to the Login view. If the user is authenticated, since the login page won’t be accessible when user is logged in, it will automatically redirect the view to the Hello view.
You can now try to enter a bad url, and you’ll see that it will redirect to the Login view.
4.2: Redirect the routes if user is authenticated
Now that we have everything ready, we need to know if the user is authenticated in Firebase. To do so, Firebase provides a function to get back the current user: firebase.auth().currentUser
This function send back the currently signed-in user by using the currentUser property. If a user isn’t signed in, currentUser is null.
In the previous part, we set meta fields to our routes, so that we could know which view need authentication to be accessible.
Now, we need to check before accessing each views if the user is authenticated and if the view we want to access need authentication or not.
To do so, we are going to use navigation guards of vue-router.
Navigation Guards
As the name suggests, the navigation guards provided by vue-router are primarily used to guard navigations either by redirecting it or canceling it. There are a number of ways to hook into the route navigation process: globally, per-route, or in-component.
from vue-router documentation: https://router.vuejs.org/en/advanced/navigation-guards.html
In our example, we are going to use the global navigation guard beforeEach.
Let’s implement it in our src/router/index.js file.
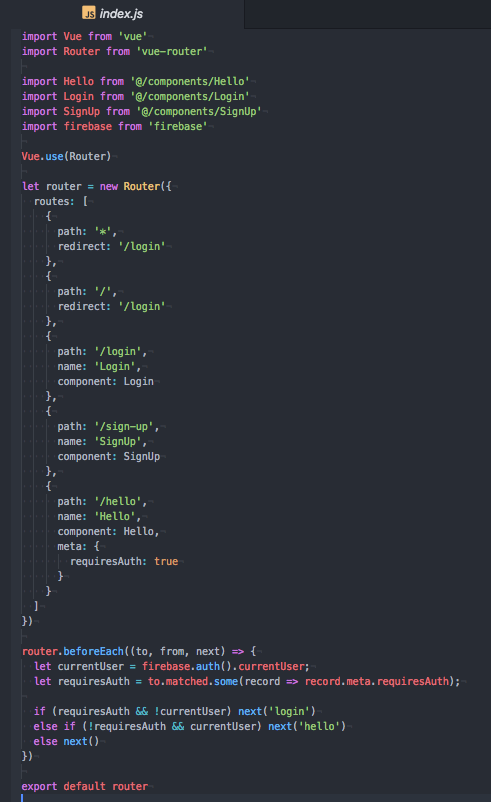
The beforeEach function take three parameters, to, from, and next and will be called whenever a navigation is triggered.
toparameter is the target Route Object being navigated to.fromparameter is the current route being navigated away from.nextparameter is a function that must be called to resolve the hook, and can take argument to redirect or abort the navigation (see more on the documentation)
In the beforeEach function, we get back the currentUser of Firebase, and we check if the route we want to navigate to need authentication by checking if the route object has the requiresAuth meta.
To understand the way we get back the requiresAuth meta, we need first to know that each route object in the routes configuration is called a route record. In our tutorial, we don’t have nested routes, but a route records may be nested. Therefore when a route is matched, it can potentially match more than one route record.
All route records matched by a route are exposed on the $route object (and also route objects in navigation guards) as the $route.matched Array. Therefore, we need to iterate over $route.matched to check for meta fields in route records.
So, in our navigation guard global function, inside the to route object, we search if the matched Array has some records (in our case a single one) with requiresAuth meta.
Then, we defined our rules for navigation !
If the route we navigate to requires authentication and there is no current user logged in, we redirect to the Login view.
If the route we navigate to does not require authentication and there is a user logged in, we redirect to the Hello view.
Else, we proceed navigation.
We should now be able to access the app only when the user is authenticated !
Since we already logged-in in the previous step, if you reload the page, based on our navigation guard implementation, you should be redirect to the Hello view.
Let’s try to reload the page.
Nothing is happening ! We still are in the Login view.
Why ?
Well, it’s simply because in the lifecycle of our app, the execution of our navigation guard beforeEach take place before Firebase initialization end. So, when we first load the app, since Firebase module has not finish his initialization, firebase.auth().currentUser return null!
After the first load, if you try to go to the sign-up view, you’ll see that the redirection take place and you ends up in the Hello view.
How can we avoid this scenario and make sure that the redirection take place directly on the first load of the app?
Well, Firebase let’s us the possibility to set an observer on the Auth object, so we can ensure that the Auth object isn’t in an intermediate state — such as initialization — when you get the current user.
This observer is called onAuthStateChanged. (you can see more about the observer in the Firebase documentation: https://firebase.google.com/docs/auth/web/manage-users#get_a_users_profile)
So, by setting a callback on the onAuthStateChanged observer, we can initialize the Vue app only when we are sure Firebase is initialized.
Let’s change our src/main.js file like that:

We now initialize the app only when we are sure Firebase Auth object is ready to use.
Now if you refresh the page, or try to access the Login or SignUp view from url, you’ll see the redirection in action !
4.3: Redirection after Login/SignUp and logout from the app
Now that we have our authentication system, we still need to redirect the user after the Login or when a new user is created. Also, we want to be able to logout from Firebase.
To logout, let’s just add a button in our Hello component and attached an event to logout from Firebase.
Like signInWithEmailAndPassword and createUserWithEmailAndPassword, Firebase provide a function to logout called signOut that return a promise**.** Once the SignOut function is done, we will redirect the app to the Login view.
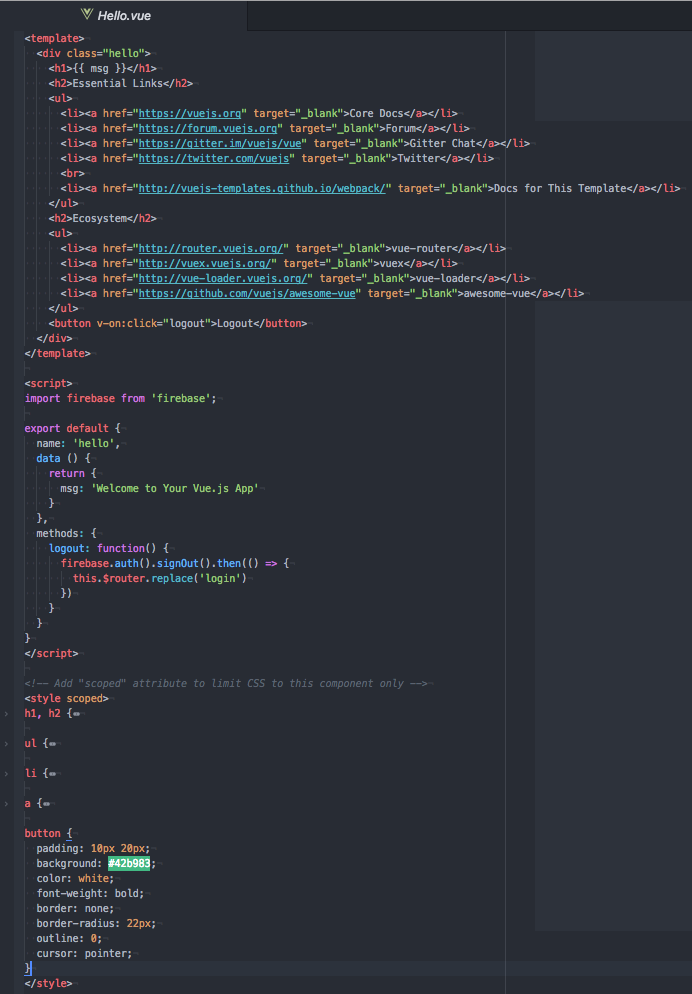
Now, when we click on the button, we logout from Firebase and go back on the Login view.
To be sure that you are now logout from Firebase, you can refresh the page or try to access the Hello view.
Now, let’s sign in again, but before that, let’s change the code so that we can be redirect to the authenticate part of the app after login.
Now, try to login, and you should be redirect to the Hello view.
Let’s implement the same thing for the SignUp component.

Now, after a new account creation, the user will also be redirect to the Hello view !
You may noticed that i turned the callback functions in signInWithEmailAndPassword, createUserWithEmailAndPassword, and signOut in ES6 arrow functions. Why ?
Simply because method definition (function name() {}), have their own this context. If we were using method definition, we wouldn’t be able to access this.$router inside our callbacks. We should have encapsulate the this object of the parent method inside a variable to access it.
With ES6 arrow function, this is lexical, meaning that it does not create its own this context. Instead, this has the original meaning from the enclosing context.
By using ES6 arrow function, we can access this.$router and let the redirection take place.
The End
We now have a small Vue app using Firebase authentication system !
All the sources are available on Github: github.com/CaptainYouz/vue-firebase-tutorial.
Recommended Courses:
Learn the core concepts of Vue.js while creating an app
☞ http://bit.ly/2vd31WK
Vue JS 2.0 - Mastering Web Apps
☞ http://bit.ly/2qxJtqe
Vue JS 2: From Beginner to Professional (includes Vuex)
☞ http://bit.ly/2I0dCtZ
Real Time Single Page Forum App with Pusher Laravel & vuejs
☞ http://bit.ly/2jGQS3u
Suggest:
☞ Vue js Tutorial Zero to Hero || Brief Overview about Vue.js || Learn VueJS 2023 || JS Framework
☞ Learn Vue.js from scratch 2018
☞ Is Vue.js 3.0 Breaking Vue? Vue 3.0 Preview!
☞ Vue.js & Firebase Tutorial - Real-time Chat