The Ultimate Vue.js & Laravel CRUD Tutorial

But what happens when you add a Vue.js single-page app as the frontend to this the stack? Suddenly you have to deal with asynchronous CRUD, since operations now occur without a page refresh. This will require special attention to ensuring the state of the data is consistent in both the front end backends.
In this tutorial, I’ll show you how to set up a full-stack Vue & Laravel app and demo each of the CRUD operations. AJAX is the key to this architecture, so we’ll use Axios as the HTTP client. I’ll also show you some strategies for dealing with the UX pitfalls of this architecture.
You can check out the finished product in this GitHub repo.
Note: this article was originally posted here on the Vue.js Developers blog on 2018/02/05
Demo app
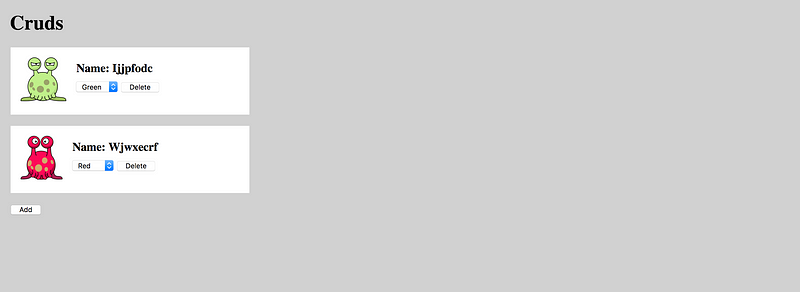
The demo full-stack app allows a user to create new “Cruds”, which I decided, after an incredible amount of creative thinking, are alien creatures with strange names and the ability to change from red to green and back.
The Cruds are shown on the main page, and the user has the power to create new Cruds, to delete them, or to update their color.
CRUD in the Laravel backend
We’ll begin the tutorial with the Laravel backend where the CRUD operations are fulfilled. I’ll keep this part brief as Laravel CRUD is a topic covered extensively elsewhere.
In summary, we will:
- Set up a database
- Set up RESTful API routes by using a Resource Controller
- Define methods in the controller to perform the CRUD operations
Database
Firstly, the migration. Our Cruds have two properties: a name, and color which we store as text.
2018_02_02_081739_create_cruds_table.php
<?php
...
class CreateCrudsTable extends Migration
{
  public function up()
  {
    Schema::create('cruds', function (Blueprint $table) {
      $table->increments('id');
      $table->text('name');
      $table->text('color');
      $table->timestamps();
    });
  }
  ...
}
...
API
Now we set up RESTful API routes. The resource method of the Route facade will create all the actions we need automatically. However, we don’t need edit, show or store so we’ll exclude those.
routes/api.php
<?php
Route::resource('/cruds', 'CrudsController', [
  'except' => ['edit', 'show', 'store']
]);
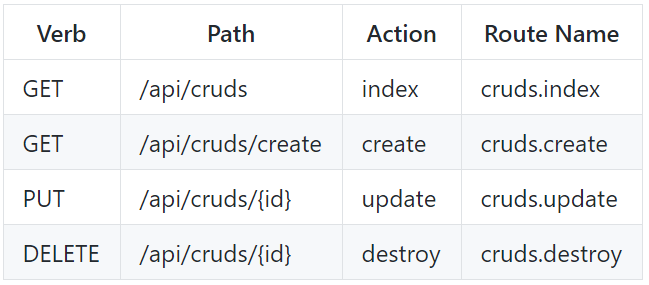
With this in place, here are the various endpoints we’ll now have available in our API:
<?php
namespace App\Http\Controllers;
use App\Crud;
use Illuminate\Http\Request;
use Illuminate\Http\Response;
use Faker\Generator;
class CrudsController extends Controller
{
  // Methods
}
Controller
We now need to implement those actions in the controller:
app/Http/Controllers/CrudsController.php
<?php
...
public function create(Generator $faker)
{
  $crud = new Crud();
  $crud->name = $faker->lexify('????????');
  $crud->color = $faker->boolean ? 'red' : 'green';
  $crud->save();
  return response($crud->jsonSerialize(), Response::HTTP_CREATED);
}
Let’s do a brief overview of each method:
create. We randomize the name and color of a new Crud using the Faker package included with Laravel. We send the new Crud data back as JSON.
app/Http/Controllers/CrudsController.php
<?php
...
public function create(Generator $faker)
{
  $crud = new Crud();
  $crud->name = $faker->lexify('????????');
  $crud->color = $faker->boolean ? 'red' : 'green';
  $crud->save();
  return response($crud->jsonSerialize(), Response::HTTP_CREATED);
}
index. We return the full set of Cruds with the index method. In a more serious app we’d use pagination, but let’s keep it simple for now.
<?php
...
public function index()
{
  return response(Crud::all()->jsonSerialize(), Response::HTTP_OK);
}
update. This action allows a client to change the color of a Crud.
<?php
...
public function update(Request $request, $id)
{
  $crud = Crud::findOrFail($id);
  $crud->color = $request->color;
  $crud->save();
  return response(null, Response::HTTP_OK);
}
public function update(Request $request, $id)
{
  $crud = Crud::findOrFail($id);
  $crud->color = $request->color;
  $crud->save();
  return response(null, Response::HTTP_OK);
}
destroy. This is how we delete our Cruds.
<?php
...
public function destroy($id)
{
  Crud::destroy($id);
  return response(null, Response::HTTP_OK);
}
Vue.js app
Now for our Vue single-page app. We’ll begin by creating a single-file component to represent our Cruds called CrudComponent.vue.

This component is just for display and doesn’t have much logic. Here are the noteworthy aspects:
- The image shown depends on the color of the Crud (either red.png or green.png)
- Has a delete button which triggers a method
delon click, which emits an eventdeletewith the ID of the Crud - Has an HTML select (for choosing the color) which triggers a method
updateon change, which emits an eventupdatewith the ID of the Crud and the new color selected
resources/assets/js/components/CrudComponent.vue
<template>
  <div class="crud">
    <div class="col-1">
      <img :src="image"/>
    </div>
    <div class="col-2">
      <h3>Name: {{ name | properCase }}</h3>
      <select @change="update">
        <option
          v-for="col in [ 'red', 'green' ]"
          :value="col"
          :key="col"
          :selected="col === color ? 'selected' : ''"
        >{{ col | properCase }}</option>
      </select>
      <button @click="del">Delete</button>
    </div>
  </div>
</template>
<script>
  export default {
    computed: {
      image() {
        return `/images/${this.color}.png`;
      }
    },
    methods: {
      update(val) {
        this.$emit('update', this.id, val.target.selectedOptions[0].value);
      },
      del() {
        this.$emit('delete', this.id);
      }
    },
    props: ['id', 'color', 'name'],
    filters: {
      properCase(string) {
        return string.charAt(0).toUpperCase() + string.slice(1);
      }
    }
  }
</script>
<style>...</style>
The other component in this project is App.js. This is where all the interesting logic occurs so we’re going to go through this one step-by-step.
Let’s begin with the template. This has the following jobs:
- Display our Cruds with the
crud-componentcomponent discussed above - Loop through an array of Crud objects (in the array
cruds), with each mapping to an instance ofcrud-component. We pass all the properties of a Crud through to the component as props, and set up listeners for theupdateanddeleteevents coming from the component - We also have an Add button that will create new Cruds by triggering a method
createon click
resources/assets/js/components/App.vue
<template>
  <div id="app">
    <div class="heading">
      <h1>Cruds</h1>
    </div>
    <crud-component
      v-for="crud in cruds"
      v-bind="crud"
      :key="crud.id"
      @update="update"
      @delete="del"
    ></crud-component>
    <div>
      <button @click="create()">Add</button>
    </div>
  </div>
</template>
Here’s the script from App.js. Let’s talk this out too:
- We start with a function
Crudthat creates new objects used to represent our Cruds. Each has an ID, color, and name - We import the adjacent
CrudComponent - The component definition contains the array
crudsas a data property. I’ve also stubbed methods for each CRUD operation which will be populated in the next section
resources/assets/js/components/App.vue
<template>...</template>
<script>
  function Crud({ id, color, name}) {
    this.id = id;
    this.color = color;
    this.name = name;
  }
  import CrudComponent from './CrudComponent.vue';
  export default {
    data() {
      return {
        cruds: []
      }
    },
    methods: {
      create() {
        // To do
      },
      read() {
        // To do
      },
      update(id, color) {
        // To do
      },
      del(id) {
        // To do
      }
    },
    components: {
      CrudComponent
    }
  }
</script>
Triggering CRUD from the frontend with AJAX
All the CRUD operations in a full-stack app will be executed in the backend since that’s where the database is. However, the triggering of CRUD operations will often happen in the frontend.
As such, an HTTP client (something that can communicate between our front and backends across the internet) will be of importance here. Axios is a great HTTP client that comes pre-installed with the default Laravel frontend.
Let’s look at our resource table again, as each AJAX call will need to target a relevant API endpoint:
Read
Let’s begin with the read method. This method is responsible for retrieving our Cruds from the backend and will target the index action of our Laravel controller, thus using the GET endpoint /api/cruds.
We can set up a GET call with window.axios.get, as the Axios library has been aliased as a property of the window object in the default Laravel frontend setup.
Axios methods like get, post etc return a promise. We chain a then method with a callback to access the response. The object resolved can be destructured to allow convenient access to the data property in the callback, which is the body of the AJAX response.
resources/assets/js/components/App.vue
...

methods() {
  read() {
    window.axios.get('/api/cruds').then(({ data }) => {
      // console.log(data)
    });
  },
  ...
}

/*
Sample response:

[
  {
    "id": 0,
    "name": "ijjpfodc",
    "color": "green",
    "created_at": "2018-02-02 09:15:24",
    "updated_at": "2018-02-02 09:24:12"
  },
  {
    "id": 1,
    "name": "wjwxecrf",
    "color": "red",
    "created_at": "2018-02-03 09:26:31",
    "updated_at": "2018-02-03 09:26:31"
  }
]
*/
As you can see, the Cruds are returned in a JSON array. Axios automatically parses the JSON and gives us JavaScript objects, which is nice. Let’s iterate through these in the callback, then create new Cruds with our Crud factory function, then push them to the cruds array data property i.e. this.cruds.push(...).
resources/assets/js/components/App.vue
...

methods() {
  read() {
    window.axios.get('/api/cruds').then(({ data }) => {
      data.forEach(crud => {
        this.cruds.push(new Crud(crud));
      });
    });
  },
},
...
created() {
  this.read();
}
Note: We need to trigger the
_read_method programmatically when the app loads. We do this from the_created_hook, which works, but is not very efficient. It’d be far better to get rid of the_read_method altogether and just include the initial state of the app inlined into the document head when the first loads. I discuss this design pattern in depth in the article Avoid This Common Anti-Pattern In Full-Stack Vue/Laravel Apps if you want to implement it.
With that done, we can now see the Cruds displayed in our app when we load it:
Update (and syncing state)
The update action requires us to send form data, i.e. color, so the controller knows what to update. The ID of the Crud is given in the endpoint.
This is a good time to discuss an issue I mentioned at the beginning of the article: with full-stack apps, you must ensure the state of the data is consistent in both the front and backends.
In the case of the update method, we could update the Crud object in the frontend app instantly before the AJAX call is made, since we already know the new state.
However, we don’t perform this update until the AJAX call completes. Why? The reason is that the action might fail for some reason: the internet connection might drop, the updated value may be rejected by the database, or some other reason.
If we wait until the server responds before updating the frontend state, we can be sure the action was successful and the front and backend data is synchronized.
resources/assets/js/components/App.vue
methods: {
  read() {
    ...
  },
  update(id, color) {
    window.axios.put(`/api/cruds/${id}`, { color }).then(() => {
      // Once AJAX resolves we can update the Crud with the new color
      this.cruds.find(crud => crud.id === id).color = color;
    });
  },
  ...
}
You might argue its bad UX to wait for the AJAX to resolve before showing the changed data when you don’t have to, but I think it’s much worse UX to mislead the user into thinking a change is done, when in fact, we aren’t sure if it is done or not.
Create and Delete
Now that you understand the key points of the architecture, you will be able to understand these last two operations without my commentary:
resources/assets/js/components/App.vue
methods: {
  read() {
    ...
  },
  update(id, color) {
    ...
  },
  create() {
    window.axios.get('/api/cruds/create').then(({ data }) => {
      this.cruds.push(new Crud(data));
    });
  },
  del(id) {
    window.axios.delete(`/api/cruds/${id}`).then(() => {
      let index = this.cruds.findIndex(crud => crud.id === id);
      this.cruds.splice(index, 1);
    });
  }
}
Loading indicator and disabling interaction
As you know, our CRUD operations are asynchronous, and so there’s a small delay while we wait for the AJAX call to reach the server, for the server to respond, and to receive the response.
To improve UX it’d be good to have some kind of visual loading indicator, and to disable any interactivity while we wait for the current action to resolve. This lets the user know what’s going on, plus, it gives them certainty of the state of the data.
There are some good plugins for Vue.js loading state, but I’m just going to make something quick and dirty here: while AJAX is underway I’ll overlay a full screen, semi-transparent div over the top of the app. This will kill both the mentioned birds with a single stone.
resources/views/index.blade.php
<body>
<div id="mute"></div>
<div id="app"></div>
<script src="js/app.js"></script>
</body>
To do this, we’ll toggle the value of a boolean mute from false to true whenever AJAX is underway, and use this value to show/hide the div.
resources/assets/js/components/App.vue
export default {
  data() {
    return {
      cruds: [],
      mute: false
    }
  },
  ...
}
Here’s how we implement the toggling of mute in the update method. When the method is called, mute is set to true. When the promise resolves, AJAX is done so it’s safe for the user to interact with the app again, so we set mute back to false.
resources/assets/js/components/App.vue
update(id, color) {
  this.mute = true;
  window.axios.put(`/api/cruds/${id}`, { color }).then(() => {
    this.cruds.find(crud => crud.id === id).color = color;
    this.mute = false;
  });
},
You’ll need to implement the same thing in each of the CRUD methods, but I won’t show that here for brevity.
To make our loading indicator markup and CSS, we add the element <div id="mute"></div> directly above our mount element <div id="app"></div>.
As you can see from the inline style, when the class on is added to <div id="mute">, it will completely cover the app, adding a greyish tinge and preventing any click events from reaching the buttons and selects:
resources/views/index.blade.php
<!doctype html>
<html lang="{{ app()->getLocale() }}">
<head>
  <meta charset="utf-8">
  <meta http-equiv="X-UA-Compatible" content="IE=edge">
  <meta name="viewport" content="width=device-width, initial-scale=1">
  <meta name="csrf-token" content="{{ csrf_token() }}">
  <title>Cruds</title>
  <style>
    html, body {
      margin: 0;
      padding: 0;,
      height: 100%;
      width: 100%;
      background-color: #d1d1d1
    }
    #mute {
      position: absolute;
    }
    #mute.on {
      opacity: 0.7;
      z-index: 1000;
      background: white;
      height: 100%;
      width: 100%;
    }
  </style>
</head>
<body>
<div id="mute"></div>
<div id="app"></div>
<script src="js/app.js"></script>
</body>
</html>
The last piece of the puzzle is to toggle the on class by utilizing a watch on the value of mute, which calls this method each time mute changes:
export default {
  ...
  watch: {
    mute(val) {
      document.getElementById('mute').className = val ? "on" : "";
    }
  }
}
With that done, you now have a working full-stack Vue/Laravel CRUD app with a loading indicator. Here it is again in its full glory:
Don’t forget to grab the code in this GitHub repo and leave me a comment if you have any thoughts or questions!
Learn more
☞ Vue.js 2 Essentials: Build Your First Vue App
☞ Getting started with Vuejs for development
☞ Horizontal Feed Component with Sass and VueJs 2
☞ Learn Vue 1 JS introduction to simple reactive JavaScript
☞ Real Time Chat With Laravel Broadcast, Pusher and Vuejs
Suggest:
☞ Web Development Tutorial - JavaScript, HTML, CSS
☞ Javascript Project Tutorial: Budget App
☞ Laravel Tutorial - Abusing Laravel
☞ JavaScript Programming Tutorial Full Course for Beginners
☞ E-Commerce JavaScript Tutorial - Shopping Cart from Scratch